Thrifty Kiwi
Like our Facebook page
  • Home
  • Blog
  • Homesteading
  • Gardening
    • 2025 Garden
    • 2021 Garden Blog
    • 2019-2020 Garden Blog
    • 2017-2018 Garden Blog
    • 2016-2017 Garden Blog
    • Kiwi Urban Homestead 2013-2015 Garden Blog
    • Pest & Diseases
  • Recipes
    • Autoimmune Protocol
    • Meals and Snacks
    • Preserving
    • Household Cleaners
    • Health & Beauty
  • Skills
    • Menu Planning & Grocery Shopping
    • Money & Budgeting
    • Preserving How-Tos
    • Housekeeping
    • DIY
    • How to Find Stuff Free or Cheap
  • Animals
    • Critter Blog
  • About
  • Contact

Tomato Soup

31/3/2016

0 Comments

 
I've been wanting a pleasant, fairly mild tomato soup recipe for a while. Last year I made a delicious but strongly flavoured soup using Lynda Hallinan's recipe - but my husband wasn't keen on it after a few times. With a constant supply of tomatoes at this time of year, I've been on the look out for something different. And I found it!
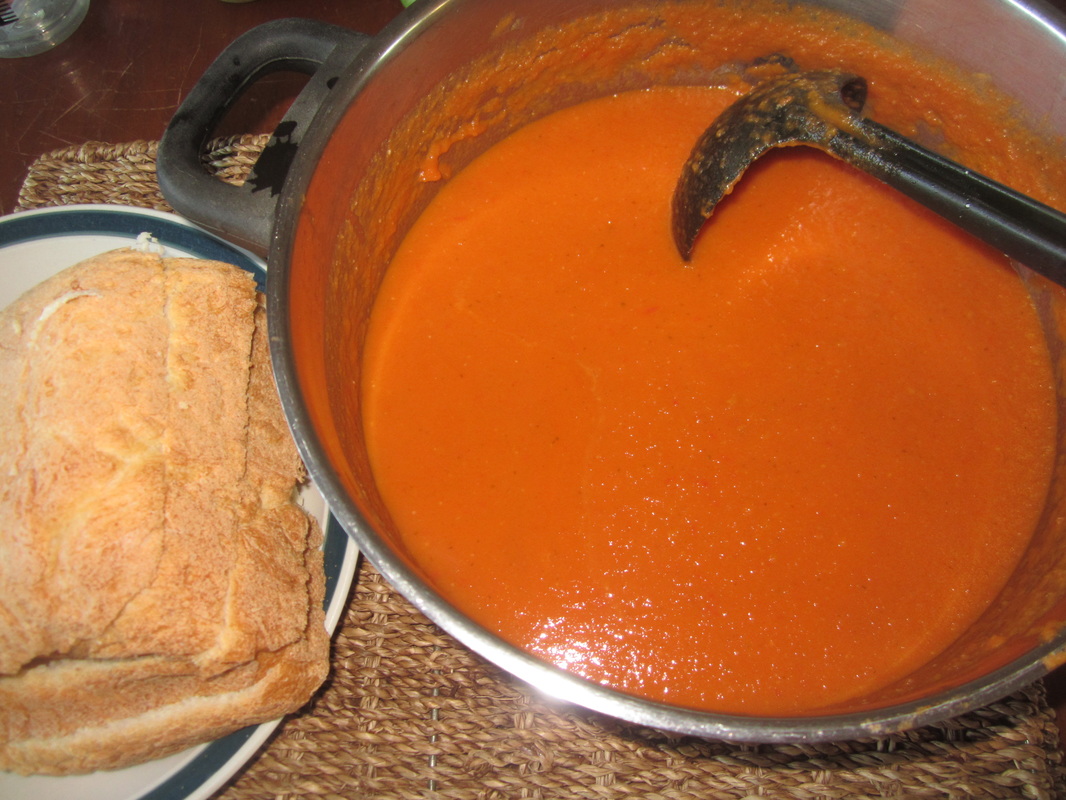
This week I came across this recipe: http://paleoleap.com/tomato-soup/ and made it for dinner. And it was good! The chicken stock I used was brewed that day in the crockpot (since I was all out of previous batches in my freezer). This recipe is full of nutritious delights, warm, comforting and soothing, but has no gluten or dairy (ok, I ruined that by serving mine with fresh-baked homemade bread and butter, just because I really wanted to), and is not full of the spices that I and some others struggle with. You could, however, dress it up or add other ingredients to suit your fancy.

In fact, the recipe was so good that the following day I made a very big batch for my freezer. 

Update: Feb 2018 I made another double batch of the soup, which is still wonderful! This time I decided to de-seed the tomatoes first, as I had read that the seeds can give a slight bitter taste to soups, and because I wanted to save lots of seeds from my heritage tomatoes for next year. To de-seed, cut washed tomatoes in half horizontally, scoop seeds into a seive over a bowl with a teaspoon. Use a wooden spoon to force all the juice and pulp through the seive, leaving the seeds. Add the juice to the soup pot. If saving the seeds, place into a jar and cover with water. Ferment for 2 days, then rinse and spread on a paper towel to dry before storing (they may stick to the paper - you can just cut it up into bits and plant seeds, paper and all). 

You'll love this soup - go make yourself a batch. You'll be very glad you did! I'm posting the recipe below for my own reference - nothing worse than a favourite recipe disappearing off the internet one day - with instructions for slight variation in order to make in bulk and freeze. Since this recipe contains chicken stock, it is best suited to freezing.
Picture
Ingredients: (I double this when cooking for the freezer)
5 large tomatoes, roughly chopped (optional, deseed before chopping)
1 large white onion, roughly chopped
2 carrots, peeled and roughly chopped
3-4 garlic cloves, crushed and finely chopped
1 TBSP tomato paste (I buy organic tomato paste in 3kg tins and freeze in portions - way cheaper!)
3 cups chicken stock (can use vegetable broth)
1/4 cup fresh basil, chopped (I used a combo of cinnamon basil and green basil)
1/4 cup coconut milk or cream
2 TBSP coconut oil or other cooking fat
Salt to taste
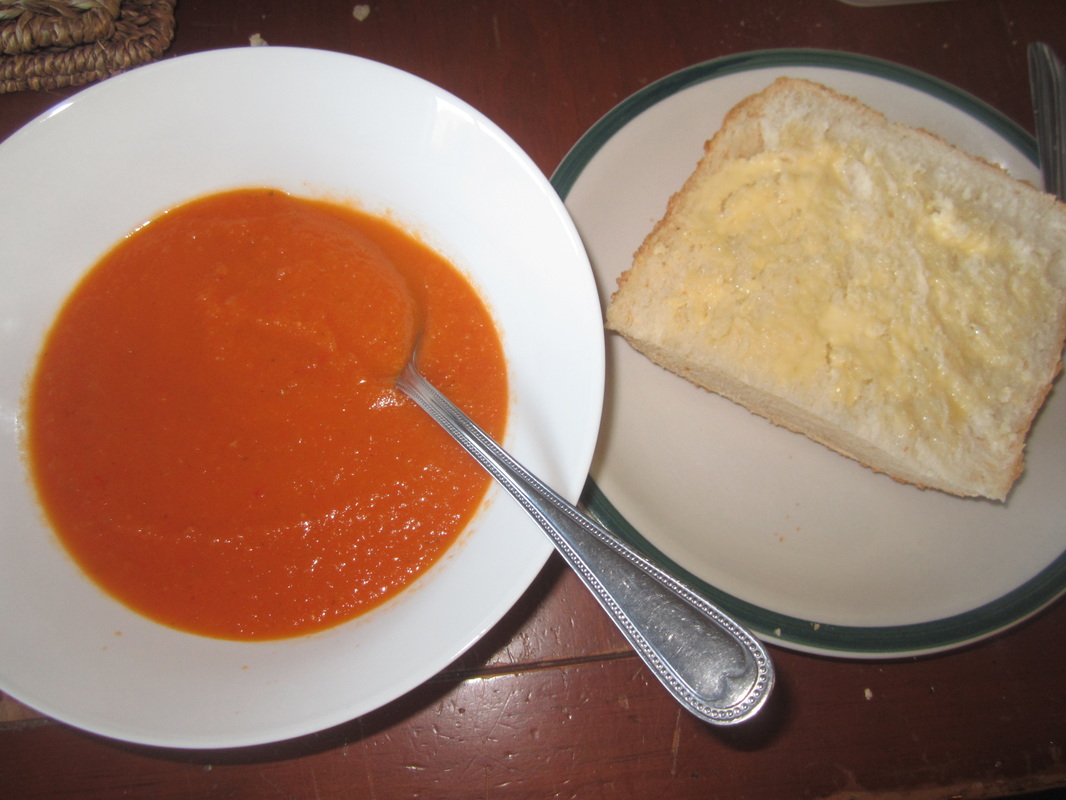
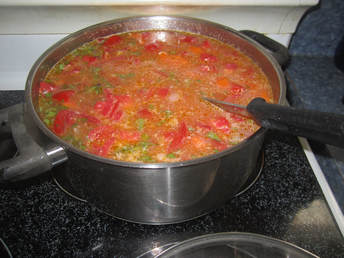
Picture
Picture
Method:
Heat coconut oil or fat in large pot over medium heat. Add carrot and onion, and cook until soft - about 10 mins. Add the garlic and cook another minute or two. Add the tomatoes, tomato paste, chicken stock and basil. Season to taste and stir everything together. 

Bring to boil and then simmer over low heat for 30 mins, uncovered. 

If serving all of the soup immediately, stir in coconut milk or cream now - otherwise leave out (see below). 

Process the soup in batches through a food processor until smooth. Return to pot. 

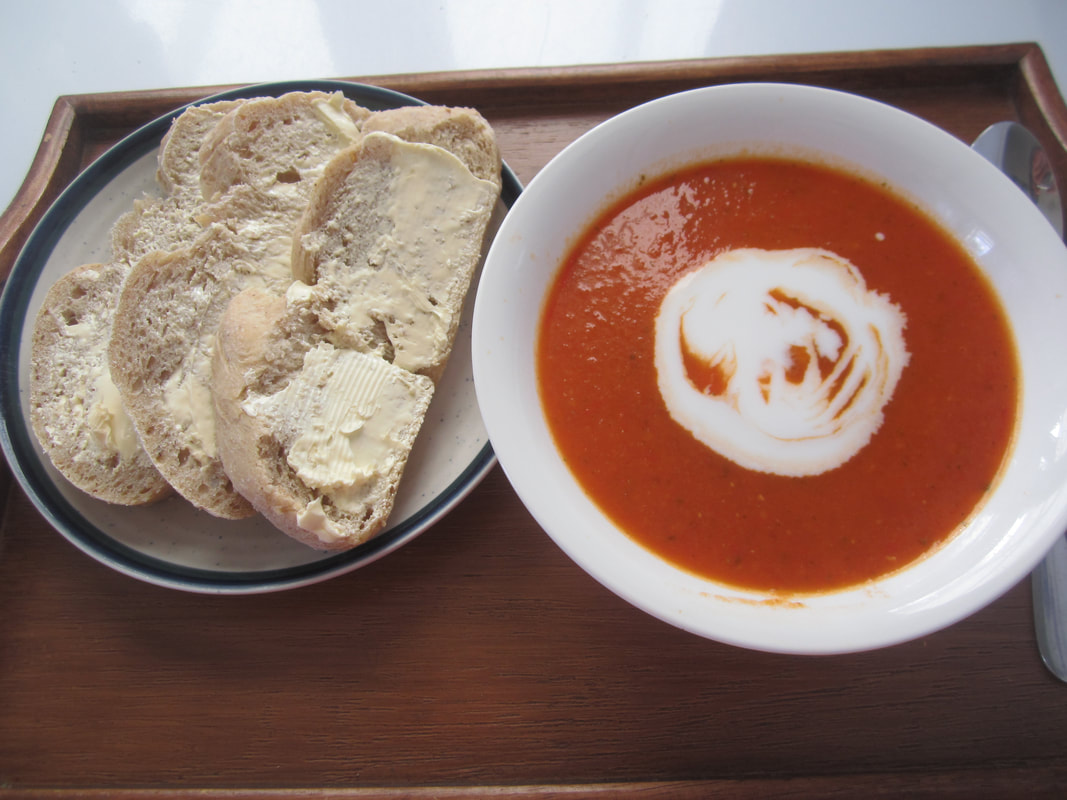
Serve, or as in my case, serve up the bowlful you want to eat now, stir in 2-3 dessertspoons of coconut cream, and devour with fresh bread. :-). Set rest aside to cool, then pour into suitable containers and freeze. To serve, defrost, reheat, then stir in milk/cream. 
Picture
0 Comments

Mediterranean Lamb Chops

29/3/2016

0 Comments

 
This easy but delicious meal has become a fast family favourite. It can be varied or dressed up in so many ways too.
Picture
Ingredients:
*  2-3 lamb chops per person
* Marinade for 4-6: 3 TBSP olive oil, 3 tsp dried chives or oregano, 3 TBSP lemon juice, 4-6 cloves garlic (crushed and chopped)
* 200g pumpkin or kumara per person, peeled and cut into chunks
* Onions, peeled and cut into wedges (1 per two people)
* Sea salt to taste
* Extra olive oil
* 1/2 cup rocket or baby spinach leaves per person (optional)
* Crumbled feta cheese (optional)

Method:
1) Preheat oven to 200C
2) Mix up marinade in a bowl, dip each chop into it and turn to coat. Place chops into a container, pour on any left over marinade, and refrigerate for 30 mins.
3) Place chunks of pumpkin and/or kumara in a single layer in a roasting dish, and spread onion wedges among them. Drizzle with a little olive oil and toss to coat. Sprinkle generously with salt. Roast in oven for 25 mins.
4) Pull out roasting dish. Lay lamb chops in a single layer over the top of the vegetables. Return to oven, and bake for 20 mins, turning chops over after 10 mins.
5) Remove from oven, sprinkle rocket or spinach leaves over the surface, and sprinkle with crumbled feta, if using. Allow to rest for 5 mins - leaves will wilt.
6) Serve

Other options:
* Vary the vegetables - I sometimes substitute beetroot or potatoes for some of the pumpkin/kumara, and sometimes I add other veges such as carrots or zucchini. I love to toss in some whole peeled garlic cloves too. Use whatever is in season.
* Ditch the wilted greens - if you like, serve with a side salad or other cooked greens instead.
* Substitute fresh herbs for dried in the marinade  - rule of thumb is 1 TBSP fresh herbs for every 1 tsp dried.
Picture
0 Comments

 Beans and (Wild) Greens - Recipe

29/3/2016

0 Comments

 
Gotta love free food! All over my (messy) garden are lots of edible plants that have self-sown or self-grown. Things I didn't plant that are otherwise known as "weeds," or some cases the progeny of things I did plant, a few generations back. If I were to wander around and see the edible foods out there right now that I did not plant (though in some cases there are others of the same species I DID plant this season), some of them would be: nasturtiums, dandelions, parsley, rainbow chard, perpetual spinach, green silverbeet, pumpkins, calendula, tomatoes, potatoes, peas, lemon balm, chickweed, dock, blackberries, deadnettle, beetroot, sage, watermelon, cucumbers, parsnips, borage, alpine strawberries, popcorn, buckwheat, dahlias and probably some others I've forgotten.
Picture
To be honest, there are a few of these things I don't particularly like to eat. (There's a first-world problem right there - being blessed with enough choices we can choose to turn down perfectly good food!) Fortunately most of the things I don't like, the poultry do, so they don't go to waste. But sometimes it's good to eat a little of our less-than-favourite foods, knowing they are high in nutrients and good for us. So this week I picked the first of the late dwarf beans I planted, along with some dandelion leaves and some self-sown silverbeet and chard. The usual irony is, the self-sown stuff is way healthier and happier looking than the bed of rainbow chard I planted on purpose. Maybe I'll cut all of that and give it to the ducks, and just keep eating the "weeds" :-). In the basket you can also see a cucumber that grew itself in my barrel of kumera, and some self-sown nasturtiums I was going to use to garnish the dish I'm about to describe, but I forgot to put them on. Oh well, gazillions more where they came from! Just for the record, the part of this wee bunch I'm not fond of is the dandelion greens! I was careful to pick younger leaves from plants that haven't yet started to flower. Still, I do find them rather bitter. But in this dish, actually edible.

A great way to cook green beans - with or without the leafy greens.

To cook them, I slightly modified a method I've recently discovered for cooking green beans that I rather like:
Ingredients:
Green beans (or in my case, green, yellow, and purple beans), washed, topped 'n tailed and cut as preferred.
Dried onions
Dried garlic
Soy sauce (organic and gluten free, of course)
Olive or coconut oil
Optional: leafy greens, washed and roughly chopped
Method:
Heat a little oil in a frying pan. Add some dried onions and garlic (I use about 1 tsp of each), and saute briefly until they start to brown (DON'T walk away for even a second or they will burn!). Add washed, chopped beans and soy sauce to taste, and stir fry for a few minutes until just tender. Add chopped greens and stir until wilted. Serve
This time, I served the beans & greens with some kumara that had been coated in oil, dusted with salt, and roasted in the oven, and some fried home-grown lamb sausages. Yum!
Picture
0 Comments

Roast Wild Venison - Loaded and Bacon Wrapped!

27/3/2016

0 Comments

 
I decided to use one of the remaining legs of venison in the freezer that one of my son's provided us with. Venison can be a bit gamey and/or tough, so it's worth a little extra effort to make it tasty. I looked at a few ideas, and combined some of them to come up with the delicious, special dish! Side dishes of sweetcorn, green beans & Egyptian onions, and roasted new spuds made this a very yummy, almost fully home-grown or wild-caught meal.
Picture

Venison

Step 1:
Defrost leg of venison. Sprinkle leg lightly with salt, then rub with brown sugar. Refrigerate for at least an hour. (I left it overnight as I had cause to change my mind about which night we were having this).

Step 2: Preheat oven to 180C (350F)
Place in a food processor and pulse to mince (not puree):
3 Shallots (or 1 sweet onion)
3-4 peeled garlic cloves
6 leaves fresh basil
Sprig fresh rosemary - strip leaves from stalk and discard stalk
1/4 cup sweet red wine
Picture
Picture
Picture
Step 3:
Lay venison on chopping board. Rub onion/herb mix all over meat, then press it onto meat. It will then be wrapped in bacon, secured with toothpicks. I found the easiest way to achieve this was to lightly grease a roasting dish with olive oil, then lay some bacon in it. Press onion/herb mix into one side of roast, then lay that side down on the bacon. Press more mixture onto the roast, then lay more bacon over the top, wrap around the leg, and secure. Pour an extra 1/4 cup wine over the roast.

Cover roasting dish, and bake in oven for 2 hours. Then remove, uncover, turn leg over carefully, and place back in oven for a further 25-30 mins to brown, uncovered.

An hour into initial cooking, add new potatoes, turning them in the juices to coat.

When cooking is finished, remove meat and potatoes, and reduce pan juices in a pot on the stove - spoon over meat and veges when serving.
Picture
Picture
Picture
Picture

Tonight's Side Dishes

New potatoes - a combination of some purple ones my neighbour gave me to grow, and some white potatoes of a variety I'm trying this year. All were grown in grow bags in my greenhouse. This is the yield from three bags - not a great yield - but the spuds grown in them were left overs from planting my main barrels, so bonus spuds. And they tasted SO good - especially the purple ones which are DELICIOUS! I went and harvested them after I put the roast in the oven, then scrubbed them and added them to the dish. Can't get any fresher than that! Turned out to be just the right amount for the four of us at home tonight.
Picture
French Green Beans - these lovely little tender green beans don't get any bigger than this - all they need is the stalk end trimming, and a quick wash. No other prep needed, and they're always sweet and tender. Picked this afternoon from the garden. Tonight I chopped up an Egyptian Walking onion, and sautéd it with the beans in some coconut oil, with a dash of tamari sauce.
Picture
Picture
Sweetcorn - picked this afternoon and simply boiled in salted water for about 10 mins. I decided to use up the small cobs tonight. They were actually really lovely and easy to handle at this size. Pity you can't grow them that way on purpose! :-)
Picture
Picture
So there you have it - wild-caught venison, prepared with home-grown shallots, garlic, basil & rosemary, and served with home-grown sweetcorn, beans & Egyptian onions, and new potatoes. The purchased ingredients were just the wine, bacon, oils, salt, sugar and tamari sauce. Soooooo good!
Picture
0 Comments

    Archives

    October 2024
    April 2020
    February 2018
    January 2018
    April 2017
    January 2017
    September 2016
    April 2016
    March 2016
    February 2016

    RSS Feed

    Categories

    All
    Baking
    Basics
    Breadmaking
    Breakfast
    Dessert
    Dinner
    Dressings
    Drinks
    Fast Food
    Ferments
    Food From The Garden
    Left Overs
    Lunch
    One Dish Meals
    Quiches And Slices
    Salads
    Side Dishes
    Slow Cooker
    Snacks & Treats
    Soups
    Vege-nut Stuffer

Powered by Create your own unique website with customizable templates.