Thrifty Kiwi
Like our Facebook page
  • Home
  • Blog
  • Homesteading
  • Gardening
    • 2025 Garden
    • 2021 Garden Blog
    • 2019-2020 Garden Blog
    • 2017-2018 Garden Blog
    • 2016-2017 Garden Blog
    • Kiwi Urban Homestead 2013-2015 Garden Blog
    • Pest & Diseases
  • Recipes
    • Autoimmune Protocol
    • Meals and Snacks
    • Preserving
    • Household Cleaners
    • Health & Beauty
  • Skills
    • Menu Planning & Grocery Shopping
    • Money & Budgeting
    • Preserving How-Tos
    • Housekeeping
    • DIY
    • How to Find Stuff Free or Cheap
  • Animals
    • Critter Blog
  • About
  • Contact

Bacon & Zucchini (or Marrow) Slice

12/10/2024

0 Comments

 
On old family favourite, this versatile recipe can be changed up to suit what you have on hand, or your family's needs. I'm going to give two versions - the original recipe, and the version I made yesterday which leaves out the onions, is dairy free, and adds other veges and herbs. 

First, a note about marrows - marrows are overgrown zucchini, and if left on the plant long enough to form a tough skin, they store well, just like other squash. Yesterday I made this slice with a marrow I picked back in about March, which has been kept in a produce tray indoors ever since. I have another one that is still in perfect condition too, to use another day. 

Because of the thicker skin, when using marrow for this recipe, cut it lengthwise, remove the seeds, then weigh it with skin on, but peel before grating. With zucchini, I top and tail then weight whole, and grate whole - the green skin gives a lovely fleck to the finished slice, but with marrows the skin is too tough. 

Once you cut open a marrow, grate all of it up - what you don't need for this recipe, place in zip lock bags, flatten and label and stick in the freezer (I do this in 2 cup amounts usually). You can also make this recipe from frozen grated marrow, with or without defrosting (if not defrosting, break it up with a spoon, and then add a little cooking time). Frozen marrow can also be added to soups and stews or used in muffins and other baking. 

The slice is delicious hot or cold, can be served with salad or cooked vegetables, and is perfect with those little additions of your choice - eg some cucumber relish, plum or feijoa sauce, or balsamic vinaigrette. 

Original Recipe

4 large serves
Ingredients:
500g zucchini or peeled marrow, grated (see notes above about weighing)
5 eggs
1 onion, diced
3 slices bacon, diced (can substitute cooked meat or chicken). Bacon does not need to be pre-cooked. 
1/3 cup olive oil (or vegetable oil if you prefer)
1 cup flour
1.5 tsp baking powder
1 cup cheese, grated
Salt and pepper to taste

Method:
Place all ingredients in a large bowl and mix well. Spoon into greased baking dish and smooth surface. Bake at 180C for approximately 30 mins until set. 

Serve hot or cold. 
Picture

Variation

The above recipe can be varied in many ways. Currently I'm eating low-FODMAP (though can tolerate some wheat), so this is how I made it yesterday, and it was extra delicious!
Ingredients:
400g marrow, peeled and grated
​6 eggs
1 carrot, peeled and grated
1 green capsicum, deseeded and fairly finely diced
3 slices bacon, diced
1/3 cup olive oil
1 cup flour (can be gluten free)
1.5 tsp baking powder
1 cup dairy free grated cheese
generous sprinklings of herbs of your choice - I used oregano and parsley
Salt, and pepper if desired

Method:
As above - mix to combine, spread into greased dish and bake approx 30 mins at 180C. 
Personally, I always double the recipe and bake in a mid-size roasting dish (closer to 40 mins), using leftovers for the next day's lunch. 
Picture
0 Comments

A Meal from the Garden - Bits & Pieces

7/1/2018

0 Comments

 
Today for lunch I whipped up this yummy dish from bits and pieces from the garden. What follows is not a recipe as such, but just the way I did it this particular time. I hope it inspires you to look at what you have on hand, and come up with your own yummy meal. :-) The only thing I don't have in my garden right now is onions, but I had part of one in the fridge to use up. I could have otherwise substituted shallots from the garden. 
Picture
First, I considered what was to hand - some left over roasted potatoes, part of a red cabbage, one zucchini, a tomato, 1/2 an onion, and some sugar snap peas I'd left a bit long on the plants. 

I prepared them - slicing the spuds and the onion, dicing the tomato, and slicing the zuccinin. I took some fine slices off the cabbage - I didn't need too much as I didn't want to overwhelm the rest of the dish-to-be. 
Picture
Picture
Picture
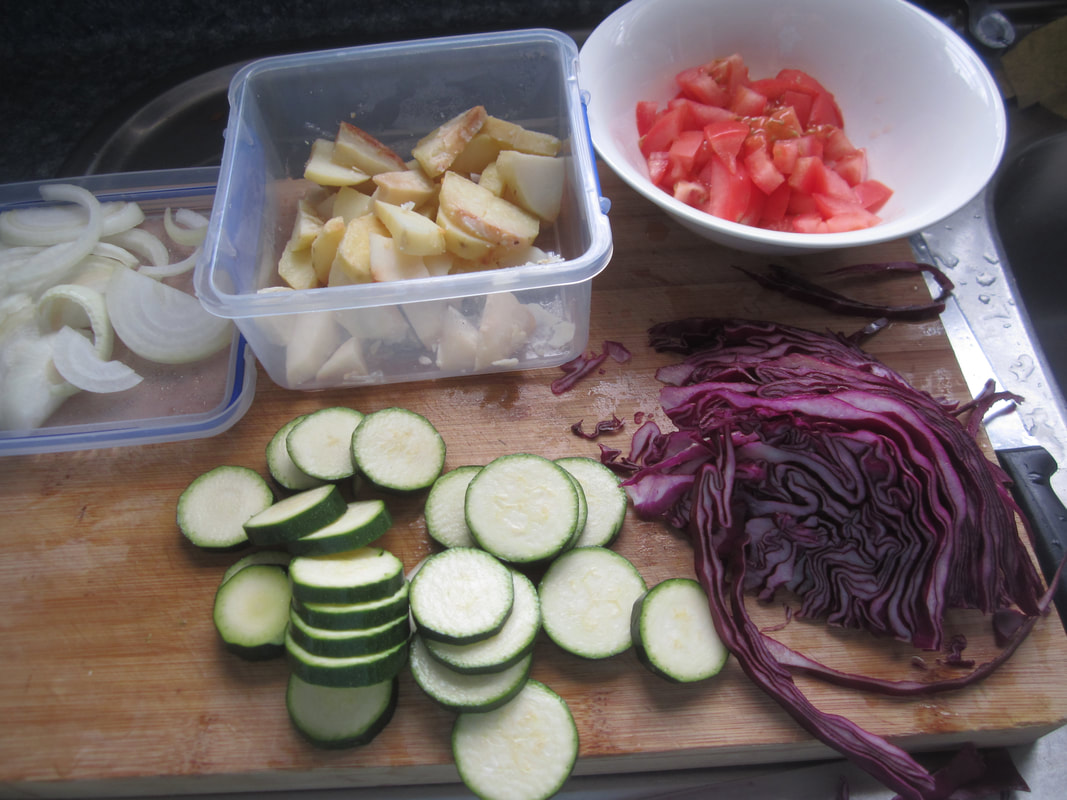
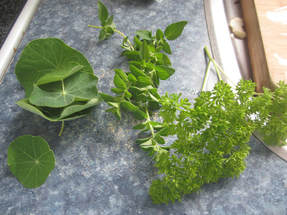
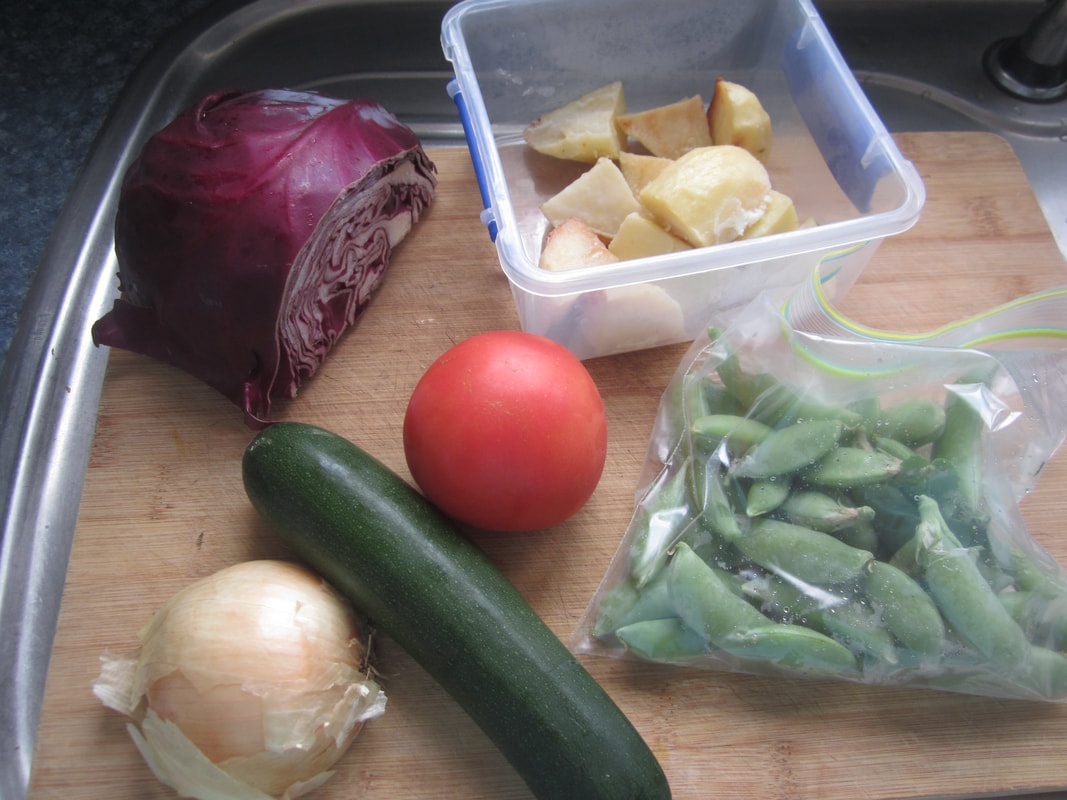
Next I popped back out in the garden to select a few herbs that would be good - a sprig of parsley, some oregano, and some young nasturium leaves. These I washed then finely chopped the celery, diced the nasturitum, and pulled the oregano leaves from the stalks then lightly chopped. 
Picture
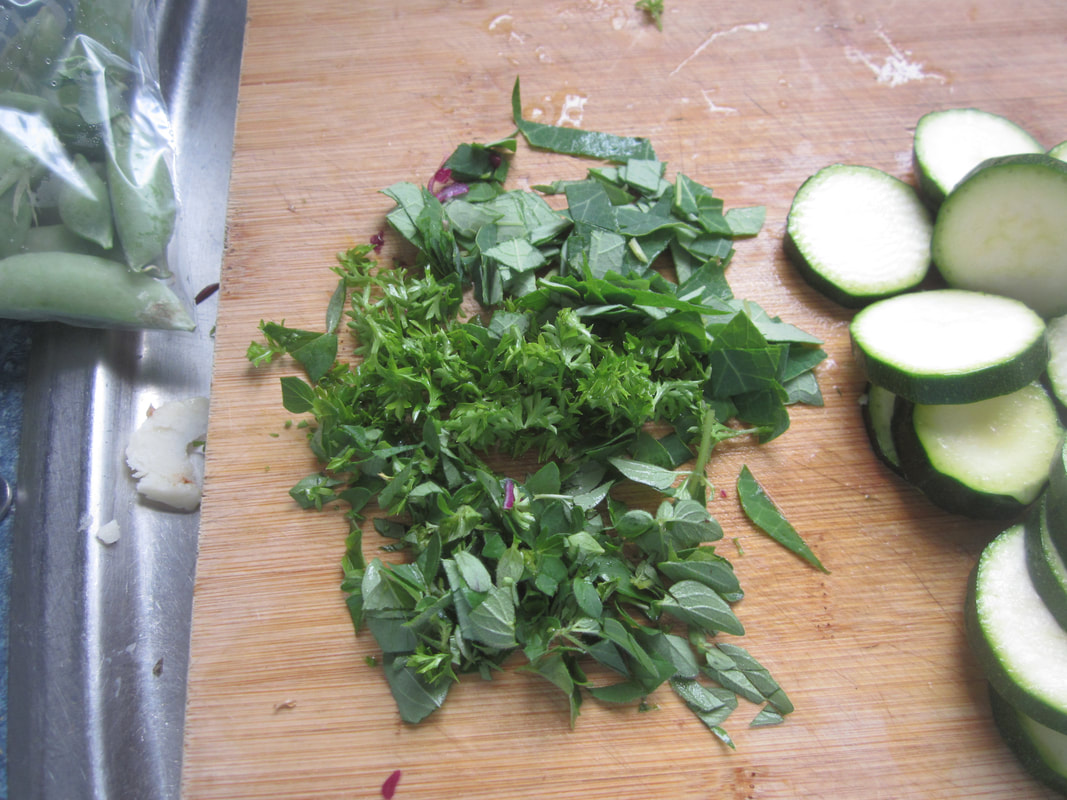
Time to get cooking! I heated a spoonful of coconut oil in my frying pan, added the onion, and sauted until it began to caramelise. Next the spud pieces went in, and were stir fried until beginning to brown. Then I added the zucchini slices and some salt, and sauted for a few minutes. While these steps were happening, I shelled the peas, separating the pods into two piles - the ones that were still young and crisp, and the slightly older ones that were tougher (the latter I discarded to the chicken's bucket).

After a couple of minutes, I added the cabbage, tomato and herbs, as well as the tender pea pods (reserving the peas for now), and stirred to combine. I added 3 TBSP of homemade beef stock from the fridge, mainly to add some moisture to get the zucchini softening more quickly, and put on a lid for a couple of minutes, turning the temp down. I then took off the lid, and continued to cook with frequent stirring, until the excess moisture had evaporated, and the veges were just tender. 
Picture
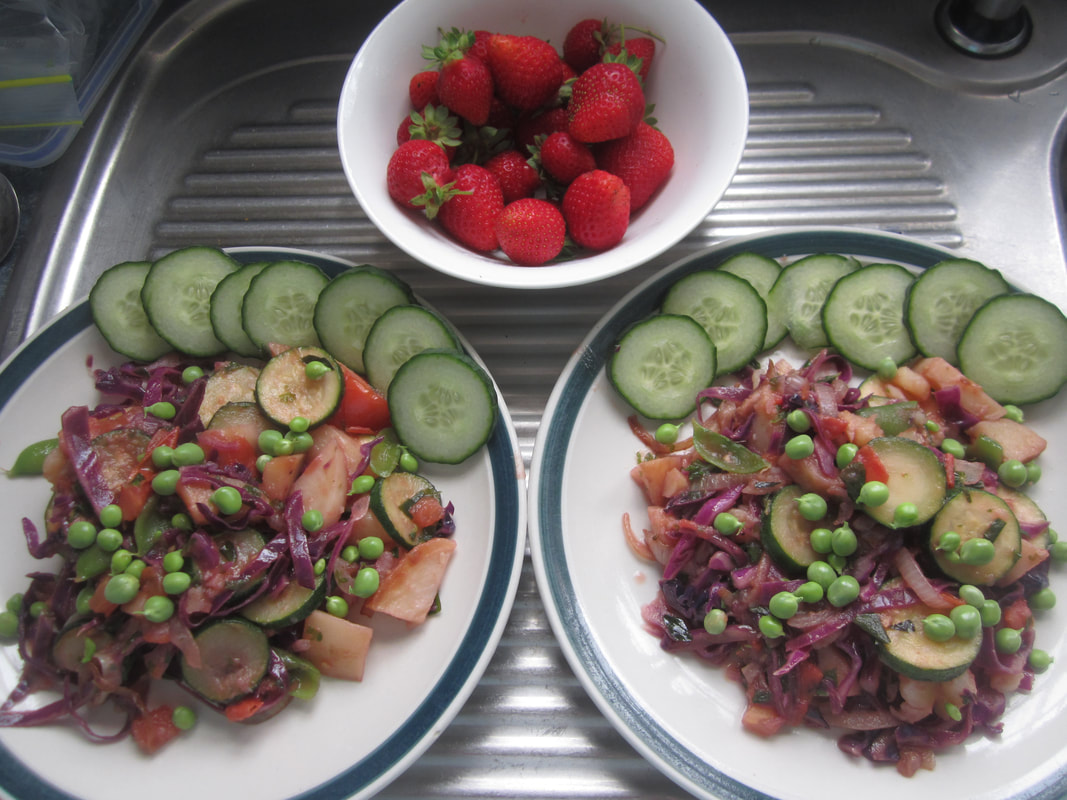
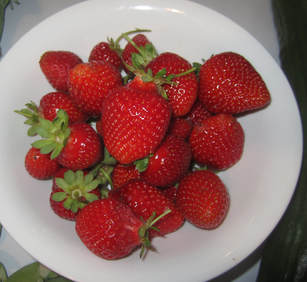
​I spooned them onto plates, sprinkled with the raw, sweet, tender peas, and added some sliced cucumber to the side. A bowl of fresh strawberries picked last night was served afterwards.

Yum, yum, yum! That's real food folks - filling, nourishing, fresh and tasty. And is there anything better than a sweet, fresh, ripe strawberry? The melting sweetness is rich and satisfying! Food for body and soul!
Picture
0 Comments

A Complete Meal Cooked in One Roasting Dish

9/1/2017

1 Comment

 
I like easy, wholesome food, and I love minimising the mess and dishes! Tonight I cooked chicken thighs, roasted veges, and zucchini - and it was all done simulatenously in one roasting dish! The only other dishes incurred were the peeler, knife, chopping board and tongs. And only a few minutes prep time is needed. 
Picture
Method:
1) Preheat oven to 180C/350F
2) Peel and cut up kumara, onions, garlic (and/or any other desired veges suitable for roasting)
3) Place the prepared vegetables in one half of the roasting dish, drizzle with olive oil and toss to coat. 
4) Place thawed chicken pieces in the other half of the roasting dish. 
5) Lightly salt chicken and vegetables. 
6) Bake for 30 mins, then turn chicken and veges over, and bake another 10 mins
7) Meanwhile, slice zucchini evenly. Removing dish from oven, pile up the vegetables at one end. Spread the zucchini slices into the middle of the dish, as close to a single layer as possible. 
8) Bake for another 15-20 mins, turning zucchini slices after 10 mins.
9) Remove from the oven and serve. 

Sooooo yummy! The juices from the chicken give everything else a wonderful flavour!

​For variations to cook for a big family, see below...
Picture
I've used a small roasting dish here - since most of my kids have left home, I'm preparing much smaller quantities of food than I used to. If I were doing this for a crowd, I'd have to make some adjustments - in that case I would prepare veges for roasting, spreading them out in the roasting dish which they would no doubt fill. I would then put an old cake cooling rack on top of the roasting dish, and put the chicken pieces onto that. This would allow them to cook at the same time as the veges, and the juices from the chicken would drip onto the vegetables, giving them a beautiful flavour. Cooking time would be about the same, with turning half way through. I'd prepare greens separately, or I'd put whole small zucchini into the roasting dish with the other vegetables about 15 mins into the initial cooking time and just roast them with everything else. And yes, I have done it via this alternative method a number of times - works great!
1 Comment

    Archives

    October 2024
    April 2020
    February 2018
    January 2018
    April 2017
    January 2017
    September 2016
    April 2016
    March 2016
    February 2016

    RSS Feed

    Categories

    All
    Baking
    Basics
    Breadmaking
    Breakfast
    Dessert
    Dinner
    Dressings
    Drinks
    Fast Food
    Ferments
    Food From The Garden
    Left Overs
    Lunch
    One Dish Meals
    Quiches And Slices
    Salads
    Side Dishes
    Slow Cooker
    Snacks & Treats
    Soups
    Vege-nut Stuffer

Powered by Create your own unique website with customizable templates.