Thrifty Kiwi
Like our Facebook page
  • Home
  • Blog
  • Homesteading
  • Gardening
    • 2025 Garden
    • 2021 Garden Blog
    • 2019-2020 Garden Blog
    • 2017-2018 Garden Blog
    • 2016-2017 Garden Blog
    • Kiwi Urban Homestead 2013-2015 Garden Blog
    • Pest & Diseases
  • Recipes
    • Autoimmune Protocol
    • Meals and Snacks
    • Preserving
    • Household Cleaners
    • Health & Beauty
  • Skills
    • Menu Planning & Grocery Shopping
    • Money & Budgeting
    • Preserving How-Tos
    • Housekeeping
    • DIY
    • How to Find Stuff Free or Cheap
  • Animals
    • Critter Blog
  • About
  • Contact

Feijoa Fizz

20/4/2020

2 Comments

 
A simple, delicious and healthy drink made from the skins of feijoas; this is a great way to use an otherwise "waste" product.
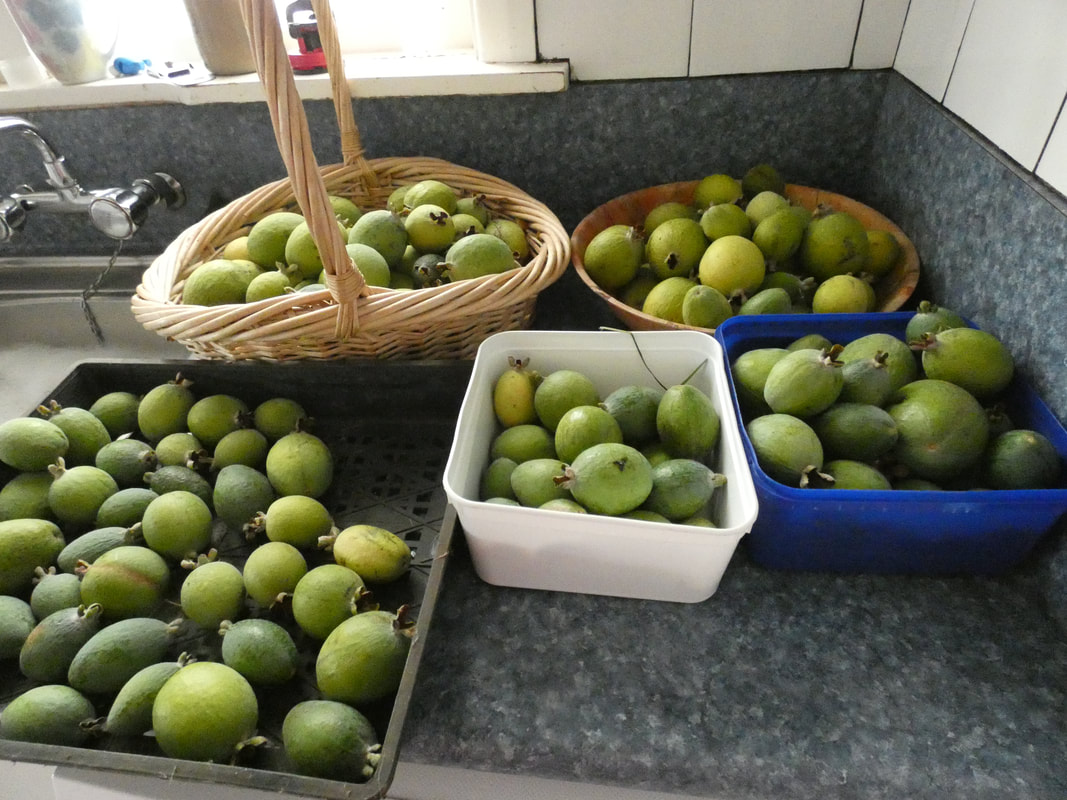
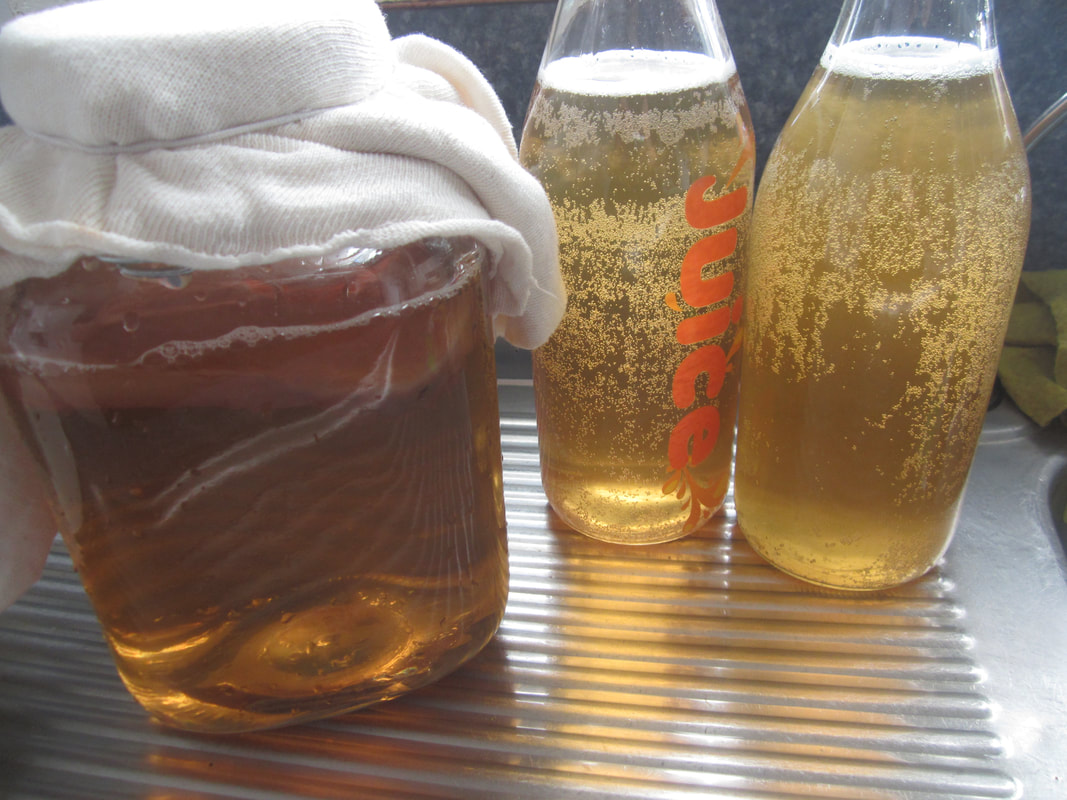
It's feijoa season, and my four young trees (about 5 years old) are producing well. This year, with lockdown, I can't share them easily with family and friends. I've preserved feijoas in a number of ways in the past - including freezing, dehydrating, baking and so on. This year I'm keeping it simple - bottling the flesh and using the skins to make my favourite fermented drink. 
Like all naturally fermented drinks, this one relies on the natural yeasts and bacteria present to feed on the available sugars, creating a flavourful and probiotic result.

Feijoa fizz is delicately flavoured and tasty - the more time you give it in the final step, the more delicate the flavour and fizzy the result. The one pictured on the right was made a year ago. When poured, it had a good size head on it, but that had dissipated a bit before I took the pic. 

Note of warning, if you use this brew to flavour kombucha, the resulting kombucha is typically extremely fizzy, and caution should be used when opening a bottle! It tends to act like coke + menthos! But it's good!
Picture
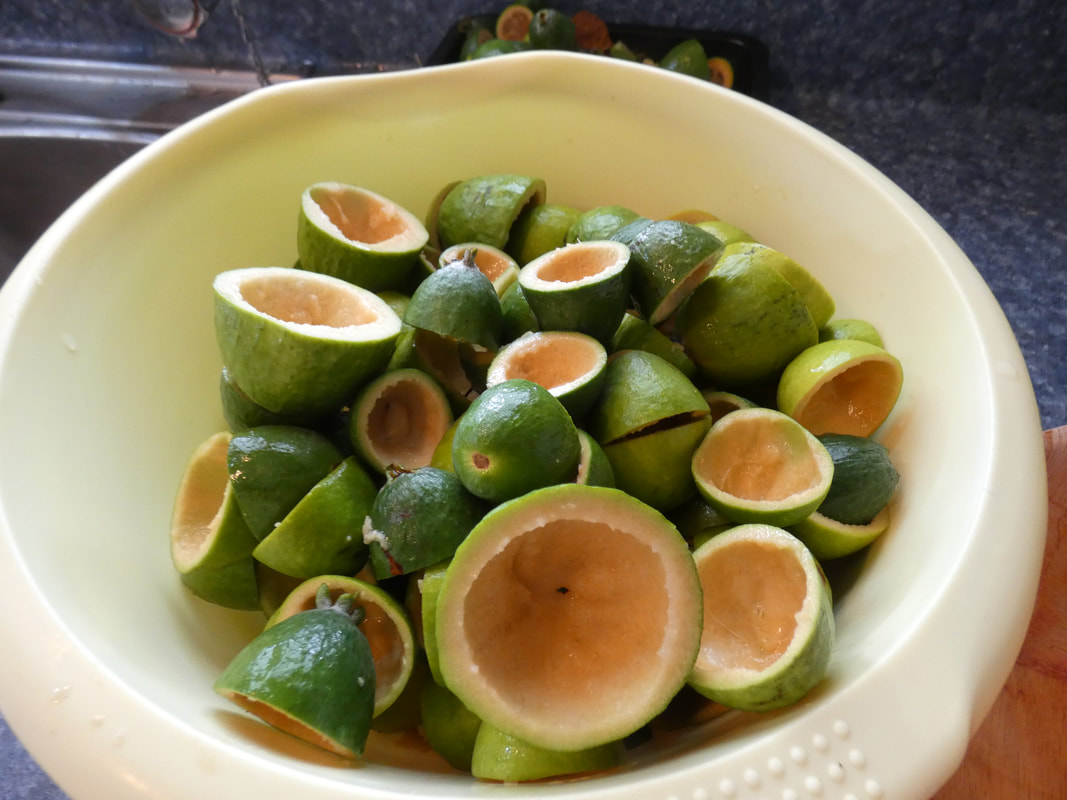
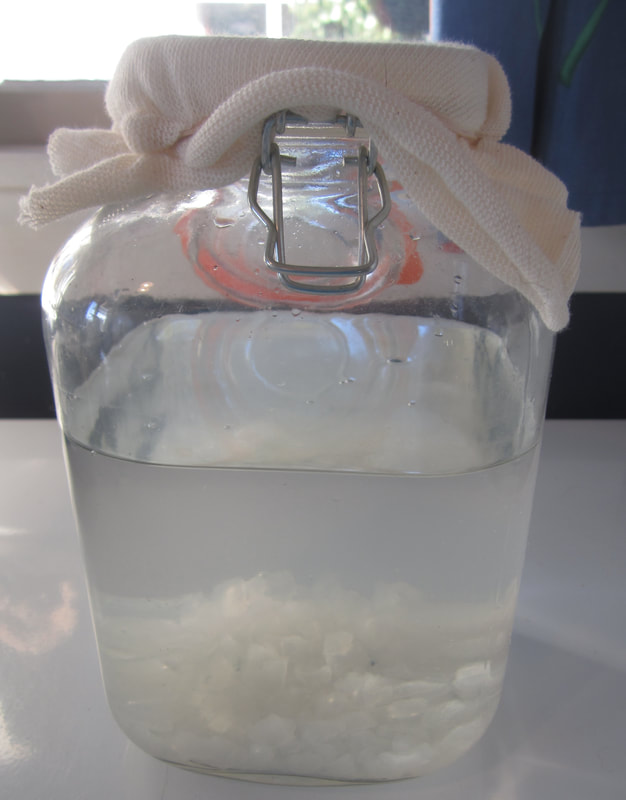
The method couldn't be simpler:
1) Rinse the feijoas before using the flesh however you choose (don't scrub or use soaps, vinegars etc - you don't want to remove the important surface microorganisms which make the ferment work, just rinse off any dirt etc). 
2) Fill a jar (I use a one litre Agee jar) with feijoa skins. 
3) Pour filtered or bottled water into the jar until it is nearly full. Don't use chlorinated tap water as it will kill the all important organisms. 
4) Add 1-2 TBSP white sugar
5) If you wish, add something to the top of the jar to help hold the skins under the surface. I find a silicon muffin liner perfect for this. 
6) Loosely cover with a lid
7) Place on the bench and leave for 2-3 days
8) Pour liquid into clean container, discard skins, rinse jar and tip liquid back into it. Top with more filtered water until nearly full. 
9) Stir in 1 more TBSP sugar, cover. 
10) Leave on the bench for another day or two, then decant into clean bottles and refrigerate.

If you use bottles that have previously held a fizzy drink (so withstand pressure and seal well) then you should get a nice, fizzy result after a time. The feijoa fizz will store for ages - the ones I made last year are super yummy now - and the flavour does develop as time passes. Results will vary though. 

I like to use some of my feijoa fizz to flavour kombucha when I set it up for it's second ferment. 
If I get a strong batch, I may drink it diluted with water or soda water. 
Usually, though, if I'm just patient, the flavour becomes mild, fizzy and yum, so long as the bottle has a good seal. 

This year I have made a couple of jars using skins that were lightly peeled from the fruit before bottling whole - this means a lot more skin in the average jar, so a stronger result. Usually though, and for most of my jars this year, I halve feijoas, scoop out the flesh, and use the remaining skins and flesh to make the ferment. 
Of note: some recipes for this drink suggest covering the jar with muslin or a tea towel, to allow air to circulate. I find if I do that there is more likely to be mould form on the top. It's not a huge deal - it can be scooped off and discarded, but by using a lid, I don't have this happen and the results are still excellent.
Picture
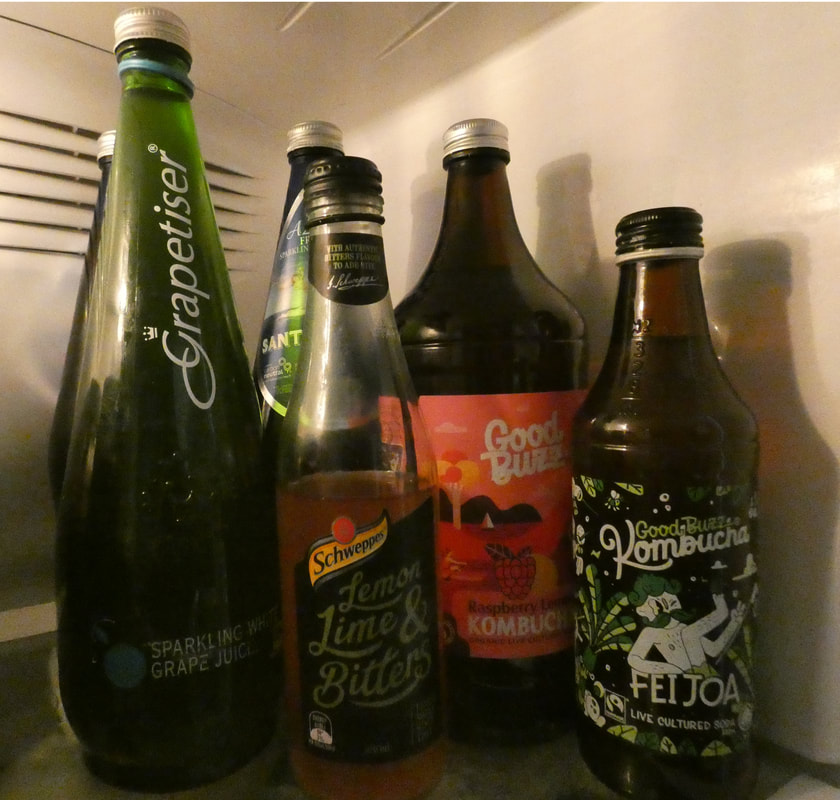
I save and reuse glass bottles such as these for feijoa fizz and kombucha - these ones are all filled with the first batch of feijoa fizz. Having a couple of smaller bottles to pour some into gives me ready taste samples of different batches, without breaking open the main larger bottles I may want to leave for longer. 
Picture
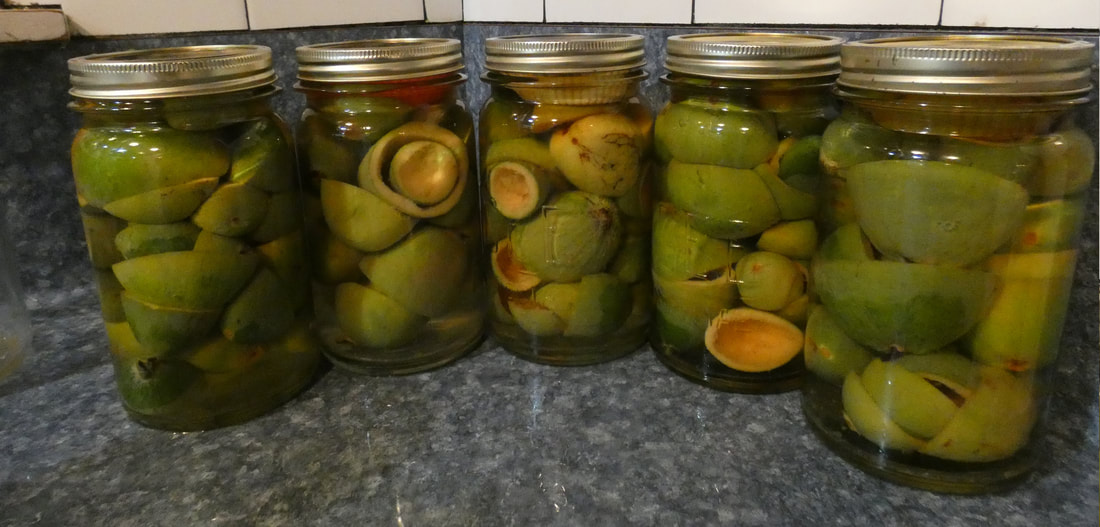
Above: how I normally make this drink. 
Below: experimenting this year with feijoa peelings
Picture
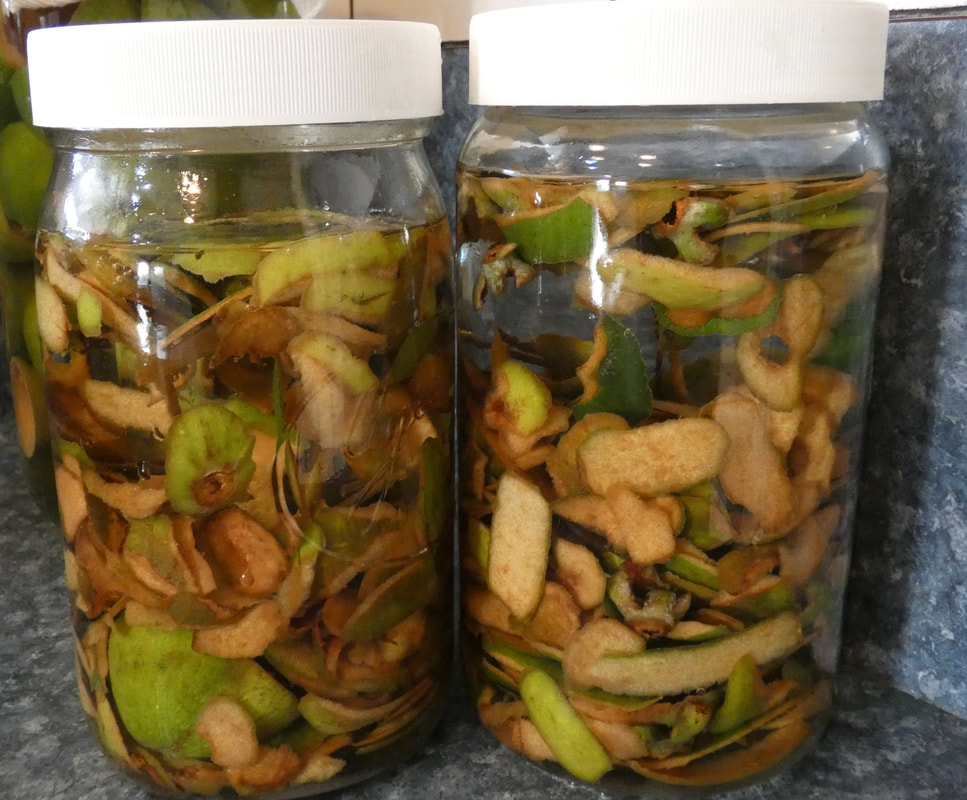
Below: these outer jars were decanted from the two above; you can see the stronger colour from the thin skins. The middle jar was made in the regular way (halves scooped out). When it was first decanted, the colour was uniformly light. On the second day, it was darker at the top as you can see. This is typical; over time the colour may progressively darken before becoming lighter again down the track. It doesn't matter what the colour, though the flavours may vary.
Picture
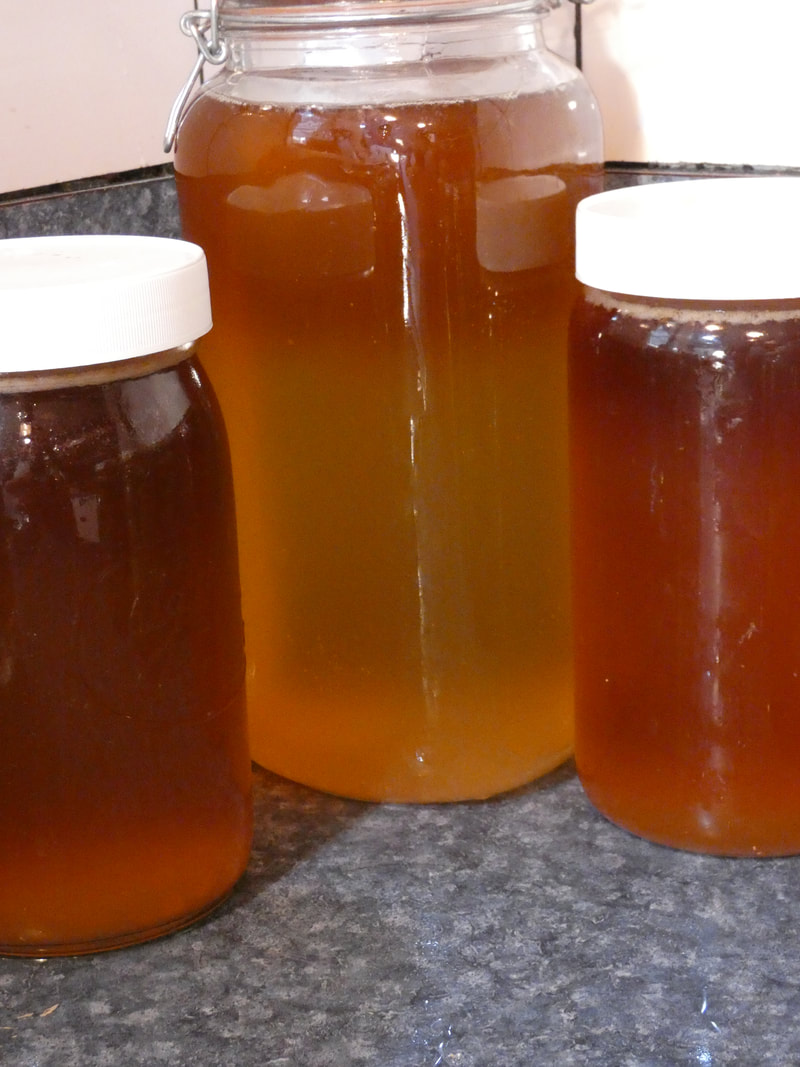
Below left:  Lots of lovely fruit - more falling every day.
​Below: The bowl full of skins was from my first batch of bottled stewed feijoas - no waste here as I turn it into lovely fizz! And after the fizz is brewed, the skins go into the compost to feed my garden. 
Picture
Picture
2 Comments

Water Kefir

4/2/2018

2 Comments

 
A friend was kind enough to give me some water kefir grains the other day, so I set up a batch fermenting. Water kefir is fast to make, lightly sweet, tasty and refreshing (reminiscent of lemonade, but not acidic), and of course full of all that probiotic goodness. There are various ways to do this (look on the internet for lots of suggestions) - I followed my friend's advice and am very happy with the results. 
Method:
Dissolve 3/4 cup sugar in 2 litres filtered water. Place in large glass jar with kefir water grains. Cover with cheesecloth or similar, rubberbanded in place. Set on the bench and ferment for 3 days. 

Strain kefir through a sieve, catching the grains to start the next batch. Bottle the liquid into glass bottles, cap, and ferment for a further 3 days at room temp. Transfer to fridge and enjoy. 

Over time, the grains will multiply - when you have too many, then discard some, or put into a container with some liquid to cover, and distribute to friends so they can start their own kefir ferments!

Note: like all ferments, this can get quite fizzy, and the old overflow/explosive bottle is possible. So don't keep it in your linen closet! A chilli bin is a great, contained place to put bottles for the second ferment, whether for kefier, kombucha, or similar. 
Picture
2 Comments

Kombucha

3/1/2018

0 Comments

 
A fermented drink made with tea, sugar, and a SCOBY, kombucha has many variations and is a healthy probiotic. I use green tea these days. SCOBY stands for "symbiotic culture of bacteria and yeasts." If you don't have one, you can grow your own by using purchased raw kombucha drink from a health store, and mixing it with a brew as below - over time, a SCOBY will start to form. SCOBYs constantly grow and thicken - every now and then one peels it apart and discards a layer. Or gives that layer to a friend as their own starter SCOBY - that's how I got mine. :-) 
NOTE: always work with very clean hands and equipment - you don't want to contaminate the SCOBY with unwanted species of bacteria.
To make Kombucha:
Boil 2 litres of filtered water. 
Pour into a heat proof bowl. 
Add 4 green tea bags (or 3 to 6 regular tea bags; you can also experiment with a mix of fruit flavoured or herbal teas) 
Add 3/4 cup sugar; give it a stir
Cover and brew for 20 minutes. 
Remove bags
Cover and leave to cool to room temperature. 

Now you're ready to set up a brew or switch a ready to drink brew and set up the next batch. 

Your first brew:
Pour the cooled tea into a large glass vessel. Add a SCOBY or some ready-made kombucha. Cover with muslin cloth and a rubber band, or loosely cap. If using a SCOBY, move to the second stage (below) on about Day 3. If you are not starting with a SCOBY, leave the first brew until a SCOBY forms, then set up a new batch as below. 

Setting up a new batch; Beginning second ferment:
The next step does two things; sets up a new batch to brew, and moves the first batch into the second stage - another ferment which will result in a yummy, fizzy brew (all going well) and is where you can also add new flavours. 

To set up the new batch:
Remove the SCOBY from the top of your brew and set on a clean plate. Fill a coffee cup with 300ml of kombucha from the jar. Pour the rest of the kombucha into clean bottles (noting further instructions below). Rinse glass vessel, pour in new tea brew and mug of kombucha, gently place SCOBY back into vessel - it may sink temporarily, but will soon come back to floating on the top. Cover as above, and set on the counter out of the way. 

Note: if you leave the brew to ferment for too long, it will consume all the sugar and eventually become vinegar. If I have too much kombucha to drink already, I will leave the brew for a couple of weeks before refreshing (to save sugar and tea), just keeping the SCOBY alive. Sometimes I'll leave it even longer because I want vinegar. 

If you do happen to make a batch of vinegar, keep it in old plastic bottles and use in cleaning, as a hair rinse or similar. Kombucha vinegar has many uses!

The second ferment: 
When I first started making kombucha, I only did one ferment, I used more sugar (2 cups) and I varied the brew length by tasting it. This way is more effective, and the second ferment makes a HUGE difference. 

When I pour the kombucha into bottles (above; also note info on the right about choice of bottles), I most often first add an inch or two of one of the following to the bottles:
  • Feijoa Fizz 
  • Fruit juice - usually apple, or cranberry, but any will work
  • Homegrown grapes that have been juiced then stored in jars in the freezer - I put through a sieve when I'm ready to use it and just use the resulting juice in the kombucha
The point of the added juice etc is two-fold - it adds a bit more sugar, giving the kombucha itself something to continue feeding on, and it adds a nice flavour. 

If you use the right kinds of bottles for this ferment, then you should get a lovely, fizzy result. I store these bottles in a spare chilly bin - basically as insurance in case any "explode" - a friend who taught me how to make kombucha this way used to keep hers on the floor of her linen cupboard - she came to regret that!

The bottles are stored for the second ferment for about another 3 days (or up to a week), and then moved to the fridge. Take care when opening them - they can froth vigorously.

Picture
Picture
Picture
The picture above is of kombucha the way I first made it - using 2 cups sugar, fermenting it and tasting from day 3 onwards until it was not too sweet, then bottling and putting in the fridge (no second ferment). Sometimes I got a good fizz in that brew, but it was not as consistent as how I do it now.

Will add more up to date photos when I can.
Choosing your bottles:
The best bottles to use for kombucha are glass bottles with lids that are designed to withstand pressure. I recycle bottles and lids that have been purchased with fizzy products in them - eg commercial kombucha, sparkling wine, sparkling water etc. 

Bottles that have held non-carbonated products will NOT hold in the forming gases, and so the resulting brew is less likely to be fizzy.
0 Comments

    Archives

    October 2024
    April 2020
    February 2018
    January 2018
    April 2017
    January 2017
    September 2016
    April 2016
    March 2016
    February 2016

    RSS Feed

    Categories

    All
    Baking
    Basics
    Breadmaking
    Breakfast
    Dessert
    Dinner
    Dressings
    Drinks
    Fast Food
    Ferments
    Food From The Garden
    Left Overs
    Lunch
    One Dish Meals
    Quiches And Slices
    Salads
    Side Dishes
    Slow Cooker
    Snacks & Treats
    Soups
    Vege-nut Stuffer

Powered by Create your own unique website with customizable templates.