Thrifty Kiwi
Like our Facebook page
  • Home
  • Blog
  • Homesteading
  • Gardening
    • 2025 Garden
    • 2021 Garden Blog
    • 2019-2020 Garden Blog
    • 2017-2018 Garden Blog
    • 2016-2017 Garden Blog
    • Kiwi Urban Homestead 2013-2015 Garden Blog
    • Pest & Diseases
  • Recipes
    • Autoimmune Protocol
    • Meals and Snacks
    • Preserving
    • Household Cleaners
    • Health & Beauty
  • Skills
    • Menu Planning & Grocery Shopping
    • Money & Budgeting
    • Preserving How-Tos
    • Housekeeping
    • DIY
    • How to Find Stuff Free or Cheap
  • Animals
    • Critter Blog
  • About
  • Contact

DIY Worm Farm (cheap!)

25/10/2013

5 Comments

 
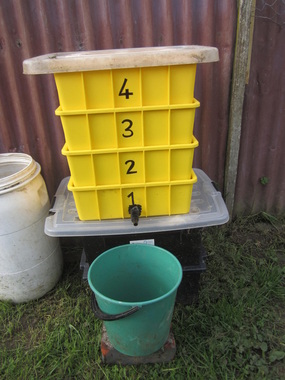
The four major ways I build my soil by adding nutrient rich materials are: composting, worm farming, manure "teas" and mulching. Being short of dollars, I like to make things myself as cheaply as possible. Here I will show you a worm farm I made recently for less than $30. Worm farm bins sell for between $50 and $130
Picture
This particular set up is excellent because not only does it provide wonderful worm "tea", a happy home for the worms and rich vermicast for the garden, it has the added bonus of providing a bin full of vermicast minus worms without the usual tedious process of spreading the vermicast in the sun, scraping off a layer, and repeating as the worms move away from the light. That process is all taken care of in the proper running of the worm farm, as you shall see.

Materials:
  • Four stacking bins - these bins need to stack in such a way that the bottom of one bin will sit just on the surface of material in the bin below when it is full. I purchased these four bins, which were on special at Hammer Hardware this month for $5.99 each. You can also find them at the Warehouse, or use larger black bins from the Warehouse for about $8 each.
  • A small piece of hose, or a plastic tap fitting (optional). Either will work - inserted into a hole you make in the bottom bin to drain off liquid into a container. The plastic tap cost $4.75

Picture
Method:
  • Number the bins 1,2,3,4 (optional)
  • In bin 1 (bottom bin), drill a hole near the bottom of one side, and insert hose or tap to act as drain. Do not put any other holes in this bin.
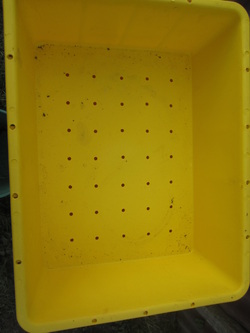
  • In the bottom of bins 2, 3 and 4, drill a large number of holes. These holes should be slightly larger than the diameter of a large tiger worm - we used a 7mm drill bit because that was what was handy.
  • Stack the bins one on top of the other, and stand on some bricks or similar to elevate it enough to place a container under the drain.

Picture
How to use the bin:
  • You start using the worm farm one bin at a time. Begin with Bin 2. Place some suitable bedding material in the bottom of the bin - finely shredded newspaper, old hay or straw or even a small amount of soil.
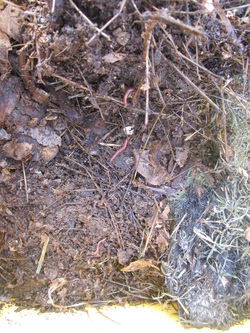
  • Add about a cup full of tiger worms to get started. Ask a friend with worms to donate you some, or they can be purchased. Do not use ordinary earthworms - they are not suited to worm farms.
  • Feed your worms regularly - little and often. They do not like citrus or onions, and meat or dairy is not recommended as it will attract dogs, cats and rodents, who will destroy your worm farm. Otherwise pretty much anything that was once alive can go into your worm farm - grass clippings and manure are excellent. I also add tea bags, vege peelings (I often whizz these first with a little water in my food processor - the worms can use it faster this way), finely crushed egg shells, shredded paper and so forth.
  • Place a layer of paper, cardboard, sacking or carpet on top of the bin in use, to keep it moist and dark, just how worms like it.
  • You can cover the whole bin, but there is really no need - the empty top bins will act as lids for now, the worms cannot drown so long as the drain is open. I place an old brick in the top bin to keep them all anchored down in the wind. However, if heavy rain is likely, I usually do cover the bins with a plastic lid.
  • Once Bin 2 is full, start adding food to Bin 3 only. The worms in Bin 2 will slowly work their way up into Bin 3 all by themselves.
  • Continue until Bin 3 is full, and then begin the process with Bin 4. At this time, take Bin 2 out of the pile, and it place it right on top, uncovered, so it is getting sun shining into the bin. Any remaining worms will migrate down into Bin 4 away from the light and towards the food, and then you will be left with a lovely, clean bin full of vermicast!

Remember:
Avoid releasing tiger worms into your vege garden. They will not do well there, as they like to be in close confines for breeding. Also, one commercial worm farmer told me they will eat the roots of your veges, as they are voracious eaters and always looking for fresh organic material.

Ensure your worm bin does not get too hot or too cold, too dry or too wet. Contents should be moist but not sopping - if too wet, check drainage and add more dry bedding - newspapers, straw etc. If too dry, wet it down. I position my worm farm in a warm, sunny spot in winter, and a shady spot in summer. Worms like it warm but not hot, and don't like too much light. Beware black bins in the summer sun - you don't want to cook your worms!

Don't add more food than they can consume - start slow, and as numbers build up (which happens rapidly!) feed more. I check the bin a couple of times a week, and add more food when what was there is mostly gone. They will also slow down in the cooler months, so feed less then.

I have had zero problems with worms escaping or drowning in the bottom bin, unlike with a regular purchased worm bin set up (I have one of those too, leant to me to get started last year). I think it is because if a worm sticks it's head down through the holes in the bottom worm bin, it encounters nothing but air, and so doesn't bother to crawl downwards. With the regular bins, there is a hole-filled tray that sits between the worm bin and the water-catchment bin, and worms were forever crawling between the two and then falling into the water. Plus the liquid is not sitting in the bottom bin, but draining off, so there is no food/manure-smelling liquid to attract them downwards. At least that is my experience with it so far.
Picture
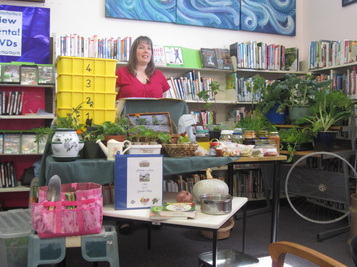
Please note: I cannot claim credit for the design of this brilliant worm bin system - I saw the idea in a book I LOVE called Green Urban Living by Kiwi author and gardener Janet Luke.

5 Comments

Display & Talk Levin Library Wednesday 23rd October!

22/10/2013

2 Comments

 
I'm will have a display set up from 2pm tomorrow (Weds 23rd) at Te Takere, Levin library. Happy to chat about all things gardening! Seedlings and eggs also for sale. Then at 6pm I'm giving a talk in the Open Media Room. I will share about my garden, how to get started growing food, and lots of great tips and ideas for gardening on a shoestring budget! Come along if you can. This poster is one that will be displayed tomorrow.
Picture
2 Comments

Weekly Round-up #3: Lots of ideas! (First 3 weeks of October)

20/10/2013

0 Comments

 
The last few weeks have been incredibly busy, so I haven't had a chance to post a weekly round-up since the end of Sept. Being in the running for NZ Gardener of the Year is lots of fun! I've been interviewed and photographed by two reporters, and have an email interview to respond to this week. I've given one talk and am preparing for another, with others booked in the future, and I had a group tour my garden this afternoon. In the meantime.....what's been happening in my garden? Lots!
Picture
My greenhouse had become crowded and messy, and the weeds were growing all around, not to mention if was very wet in places after all the rain, so I emptied it completely, laid thick newspaper down after pulling the worst of the weeds, and then covered it deeply in the remains of the sawdust/calf manure that my son collected last year. For now, that makes a tidier floor and supresses weeds; when the new glasshouse is built in it's place, it will make great soil for planting.

Then I put back shelves and tables around the sides, along with a new table I acquired cheap from the op shop, covered in a trailer tarp. Pallets underneath provide storage space for bags and boxes.

Picture
There are seedlings everywhere! While the greenhouse plastic is now pretty much only held on by virtue of the pallets I've leaned against walls and placed on the roof, it's still providing a sheltered, warm place for germinating and growing seedlings. Which is just as well, as we've had continuous strong, cold winds!

The greenhouse is now a pleasure to work in. Looking forward to the new glasshouse when we can afford framing timber, but for now I enjoy pottering in here!

Picture
I gained a lot of hazelnut cuttings through Freecycle, and am attempting to root them. I soaked them first in Willow Water - which encourages roots and boosts their immune system. I've read since I got them that hazelnuts don't root well from cuttings, so we'll see how this goes.

Am also going the same with some grape cuttings also gained through Freecycle.

Picture
I gave a talk at the local library which went well......it was more in the "show and tell" style. I wanted to show people ways you can begin to grow food without spending much money. There are so many things you can do free or very cheaply, especially when you learn to keep your eyes open for possibilities!

Picture
I've built and planted the first of the pallet beds that will run alongside the sleepout, containing leaf lettuce and similar. The pallet is on top of cardboard to suppress the grass, and will eventually be surrounded by paths covered in pine needles. Using a pallet works well for shallow-rooted plants such as strawberries and lettuce. The timbers help to keep the roots cool, and act as solid mulch, reducing weeds. The location of this pallet is such that it will get morning sun, but be shaded by the building in the afternoons, when the sun is hottest, which is great for lettuces which prefer it cooler.

Picture
With help from my husband, I put together this excellent small worm farm set-up, based on a design I saw in a book called "Green Urban Living" by Janet Luke. Excellent book too - lots of great ideas, lovely photos etc!

Picture
My son helped me put together my new pallet compost bins - two bins are up so far, with the third to be done in the next day or so. I'm going to leave the middle bin empty for now, so I can walk into that space and reach the grapes that will be on the grapevine behind it over summer; the first bin has the nearly finished compost in it that was in a pile where the wheelbarrow is sitting, and I will build a new pile in the third bin. By the time the grapes have been harvested, I'll be ready to use the middle bin.

Picture
Yesterday I set up a drum of water with a sack of fresh manure soaking in it to make a manure tea for the garden. The sack is suspended off a piece of timber, and every time I wander past, I life one end of the timber like a lever, dunking and swishing the "tea bag" sack. It's already looking like a pretty good brew!!

Picture
What do you see here? A pile of old bicycle wheels you say? I see all sorts of trellises! One wheel suspended horizontally on top of a pole, with strings coming down would be great for peas or beans to grow up. 2 or 3 wheels attached one above the other to a pole or waratah with cable ties would make a cool trellis too. Or I love an idea I saw on Facebook - lots of wheels cable tied together forming a quarter of a sphere over a steel frame - making a curved trellis to grow a vine on, and a lovely shaded play-hut for kids underneath, or if you did it bigger, a great place for a garden seat! Lots of ideas - watch this space!

Picture
I finished clearing this bed, added compost, Rok Solid and Blood & Bone, and then have sown it in buckwheat as a cover crop. The buckwheat will be ready to cut or pull in only 4 weeks, when it will be a great mulch as I plant the bed with tomatoes. Buckwheat is also great for the bees, who love the flowers, and if you were to grow it longer is an excellent, tasty and gluten-free grain. The net curtains are laid over the bed until it sprouts to keep off the blackbirds which have been constantly digging in my garden of late!

Picture
I've mulched the tyres with sheep's wool from last year's shearing. It makes a great mulch - supressing weeds, holding moisture, releasing carbon and nitrogen as it breaks down, and looks and smells pretty nice too.

Picture
This red currant bush is looking SO healthy! I've promised myself I will NOT water it with chlorinated (tap) water this summer - if I do the leaves turn brown and the whole plant looks awful!

Picture
I planted broad beans with spinach in alternate rows - the spinach will shade the soil, and the broad beans will shade the spinach - making them both happy! I put a wide stake at each end of the broad bean rows, and wrapped string around them and down each side of the broad beans, which supports them in the wind. I'll add more lines of string as the plants grow. I did criss-cross with string too, thinking the cats were digging up my plants, but it's birds, not the cats, so that hasn't been very effective.

Picture
When you have noxious or really tenacious weeds in your garden, tossing them in the compost bin is a bad idea; they just keep growing. I have creeping buttercup and couch grass in mine; I pull it out roots and all and place in a black plastic bag in the sun for a few weeks until the heat kills them. Then I can compost them. The other alternative is to place in a drum of water for a couple of months, in which time they rot down into a really excellent brew for the garden; the remaining solids can be composted. I need to get some more drums before I can do that.

Picture
I planted out 3 zucchini and 3 spinach plants - a bit early for the zucchini, but I decided to risk it (I have more sown in the greenhouse in case a frost gets these ones, but if not I'll get an early harvest). The wind is wicked, and quickly flattens seedlings, so I've protect them with plastic bottles with the top and bottom cut off. This also keeps snails off while they get established.

Picture
I visited a local stables and asked if they had any spare horse manure - they pointed at a huge pile of stable cleanings, and so far my darling kids have brought home 18 trailer loads, which we're piling on the front lawn (on top of paper/cardboard to suppress the grass) so it can finish composting, and then we will spread it out and plant veges in it. It really needs some extra nitrogen added, so I may contact a local lawn-mower crew and invite them to dump some loads of grass clippings here. There is still a lot more manure/sawdust to collect, which is getting done a little at a time when someone is free.

Picture
I even cleaned out my garden sink - and Fluffy immediately decided it was a new place for her to sleep! This cat just LOVES to sleep in my garden beds - so this is an improvement as far as I'm concerned; the peas she kept lying on haven't really recovered!

Well, that's it for this post - I hope I've inspired you with some new ideas!

0 Comments

Pickled Beetroot

17/10/2013

4 Comments

 
Picture
My family and I have long enjoyed slices of canned beetroot with summer salads and sandwiches, in home-made burgers and so on. It used to be something I regularly purchased from the supermarket in summer, but no more! That's because beetroot is super easy to grow, and making your own bottled beetroot is super easy too! Plus, of course, when you make it yourself, you know just what's in it (no nasty preservatives for us, thanks!), bottling (canning) it in a glass jar means no plastic can lining contaminants, and growing and preserving it oneself saves money. Not to mention you get a free bonus - beetroot greens (leaves) are super yummy and nutritious, and they freeze really well - cooking them for dinner involves dumping the frozen greens in a pot of boiling water and cooking for only 2 minutes!

Pickled Beetroot

Ingredients:
3 cups vinegar (I use malt)
2 cups water
2 cups sugar
2 tsp plain salt
prepared beetroot (see below) - note I used about 2 1/2 times above ingredients for about 6 kg of beetroot.

Method:
Bring all ingredients except beetroot to boil in large pot. Add prepared beetroot in small batches, return to boil, then bottle using the overflow method.
Picture
How to prepare beetroot:
  • Pick fresh beetroot, shaking off worst of dirt, then rinsing
    under running water.
  • Twist off leaves, leaving about an inch of
    stems attached to beetroot (to prevent excessive bleeding). Do not remove long tap root at the bottom.
  • Scrub the beetroot well to remove any remaining dirt.
  • Place clean beetroot in a large pot, cover with water, bring to boil and then simmer until tender (about 40-60 mins).
  • Drain and allow to cool

Picture
  • Slip skins off, removing tap root and remaining tops at the same time.
  • Slice beets evenly and place in bowl
  • They are now "prepared" and ready to be bottled.

Picture
Picture
Freezing Beet Greens
To prepare beet greens for freezing, pick through leaves and remove any that are damaged. Wash remaining leaves carefully, shake off excess water. Chop leaves roughly, then bag and label before placing in freezer. Simple!

Of course, beet greens can also be eaten raw (in salad or sandwiches) or cooked fresh - freezing is for when you've harvested lots of beetroot and so have more greens than you can use at once.

4 Comments

Come along to hear me speak on Saturday

8/10/2013

0 Comments

 
Want some inspiration, motivation and great ideas for growing your own food on a shoestring budget? Come along to Foxton library this Saturday (12th October) at 1pm to hear me speak! We've got great give-aways too! Everyone will walk away with something to help them get growing - ideas, seeds, or a basket full of goodies. There will also be a table of plants and free-range eggs for sale.
Picture
0 Comments

1st October Garden Photos and Update

4/10/2013

0 Comments

 
Picture
Sept/Oct is a time of change - the last of the winter vegetables are looking ragged or going to seed, some cool season crops are growing well, but it's time to clear most of the beds and prepare them for summer crops.

The bed of brassicas in the foreground of this photo needs clearing - one cabbage has gone to seed, the caulis are past their usefulness, and the brussel sprouts are also bolting.

Next to it is the bed of lettuces, spring onions and leeks. The leeks are starting to come into their own, but the lettuces are bolting. I'm going to pull the rest of these out this week. The spring onions around the lettuces are also starting to grow flower stalks - I will use some up, then freeze or dehydrate the rest.

Picture
This was the beetroot bed - they've all been harvested and bottled (recipe coming soon). I finished clearing the bed, and added various nutrients before giving it a light mulch with grass clippings. If we want our food to be nutritious, then we need to make sure it is growing in soil that is healthy and full of nutrients. So far I have added blood and bone, Rok Solid (ground rock organic fertiliser that contains some 60 essential nutrients), soft lime (calcium from it more easily absorbed than regular lime) and the lawn clippings (extra nitrogen). I will also add some manure or manure tea as soon as I have it available.

I haven't decided exactly what I will be planting in this bed yet, but I'm leaning towards planting each bed in rows of different plants, mixing some flowers in with the food crops too.

Picture
The strawberry bed is flowering well. The kids keep asking when we will have strawberries to eat. Won't be long kids! The chives in the middle are looking very healthy, and have a few flowers developing too. I'm looking forward to those flowers, as they will help to attract more bees to the bed, resulting in even more strawberries. The combination of the pine mulch and the chives in the bed seems to be serving well to keep the snails away. I've found many snails in other beds nearby, but the only one I've found on this bed was crawling along the wooden edge, and staying away from the plants.

Picture
Inside the garlic bed. I've been pretty disappointed in how many garlic cloves have sprouted. As you can see, the ones near the front left are doing much better than the rest, and from memory those were from a different batch of garlic as the first lot ran out. There are some popping through here and there on the rest of the bed, but I don't know how well they'll turn out. I'm tempted to pull them out and plant something else, or just put in some brassicas in the gaps and see if the garlic that is growing will keep the white cabbage butterflies away. Hmmmm. Will be moving the netting over to the strawberries soon.

Picture
This bed is a bit of a "miscellaneous" bed - nearly everything in it was stuck in there because I ran out of other places to put it - a few left over silverbeet seedlings are now huge, a couple of left over brussel sprouts - now gone to seed and to be pulled out - a few celery plants, doing well, and some left over peas I sowed here when I had filled another bed, and then forgot about, which are now sprouting fairly happily. Oh, and two left over leeks right at the back, which are looking very good. I think we'll eat one and let the other flower and set seed for saving. Really I'd like lots of silverbeet elsewhere, not here, but these plants will feed us for the next few weeks until other things have grown big enough to eat, so here they stay for now.

Picture
Another brassica bed - looks pretty full and healthy, but it all needs clearing. The last of the broccoli is flowering, which is good for the bees, so I may leave that row in for a while. The brussel sprouts (the row along the side closest in the photo) is all trying to bolt - will see how many sprouts I can pick off them before they just need pulling out. There is one more purple cauli to pick on the other side, and a couple of celery plants I put in recently that are doing ok and will be left in. Otherwise this is a bed that needs clearing, improving, and replanting.

Picture
This bed full of brussel sprouts are all bolting. There are sprouts forming on the stems. Will take off the tops and see if I get edible sprouts, otherwise they will all need to come out. They are under-planted with parsley, which will then grow big and cover most of the bed.

I have seen the first of the white butterflies flitting through my garden this week, so the days for brassicas are strictly limited now anyway.

Picture
Now, here's an interesting thing. My peas are doing pretty well, despite the plague of snails eating the back ones. But suddenly mushrooms have appeared all over this bed. I don't think they are edible ones, and I was contemplating what to do about them when I just happened to read a book that mentioned how mushrooms play an important role in breaking down old wood, and in cleaning the environment of toxins and other nasties. Mushrooms can transform, for example, a pile of treated wood or sludge from an oil spill into, eventually, healthy, growing soil teeming with life! I had noticed before I planted the peas that the sawdust mulch in this bed looked odd - it hadn't broken down, and had the consistency of bran with white cotton-y threads running through it. Turns out that is the vegetative state of mushrooms (the mushrooms themselves are the fruit). They are, no doubt, breaking down the sawdust, so I think I'll just leave them to do their thing in this bed. I did notice when clearing the beetroot bed (shown above with grass mulch) that one patch of it looks similar, but the rest is nicely broken down and looks dark and rich. So maybe there are patches where the sawdust I have used was from a different type of tree or wood, and it needs the action of mushrooms to break it down?? Nature doing its thing!

Picture
I WILL thin the carrots this week, really I will! The kale at the front has aphids all over it, so I'm thinking I'll just pull them out and feed them to the chickens. There is some merit in allowing a few aphids to remain in the garden as a food source for beneficials, but I think it's time this kale went. The white butterflies will get it soon otherwise anyway.

Picture
The raspberries and boysenberries are looking great! They're both starting to flower too - yummy berries coming soon! I've planted some extra raspberry canes in a bin behind this bed, and mulched the path behind it with pine needles, as well as this bed. Now to figure out how best to net them all in due course...

Picture
On the 30th I started digging up 10 square metres of my potato patch (finished digging it over on the 2nd). Now I need to make trenches, add amendments, and plant my spuds, which are well sprouted in the greenhouse.

Picture
Around the garden there are exciting things to see and
discover....

The grapevine and blackcurrants are bursting into leaf.....My three year old red currant and gooseberry bushes are showing signs of their first every flowers and developing fruit...the apple and quince trees are beginning to blossom, bees are working the various flowers....

Picture
I dug up the black currant cuttings that have been quietly growing in the corner by the caravan and potted them up as I don't have a good permanent spot decided on for them yet. Here are some of them, just coming into leaf.

Picture
My daughter dug this new bed along side of the path we use to the back gate. I was going to put raspberries here, then realised it's just too wet for them. So I raised it a bit, and have planted four small feijoas along there - will underplant with flowers as soon as the seedlings are ready. The feijoas can get quite big, but I plant to keep them clipped into a hedge in time.

The bed behind where I had zucchini last year is looking a bit bare. The miscellaneous silverbeet plants are making a good recovery now the chickens can't get into the yard. I have plans for this area - more on that soon.

Picture
The herb patch is needing some work - parsley is doing well, the lime tree has suddenly dropped its leaves, and the lemon needs feeding. I'm thinking of moving the Chilean Guavas I planted under the apple tree - not sure where yet. The passionfruit hasn't started growing again yet. I'd like to create a herb spiral, but haven't decided on a location, and this garden area needs mulching.

Picture
The tyre full of greens is still looking healthy, though the lettuces are starting to bolt. There are some beets and peas in there doing well too. I'm looking forward to clearing this out so I can move the tyre to another location and put up a fence.

Well, that's it for this month's photos. I'll create a separate post with some more photos of different parts of the garden, along with all the ideas and plans I have for them.

0 Comments

September Harvest Totals

3/10/2013

0 Comments

 
Picture
In September I harvested 31.41 kg of food from the garden, bringing the year to date total to 655.419 kg (that's 1357 lbs for my American friends!)

The September pickings included:
1.05 kg broccoli
3.592 kg purple cauliflower
16.812 kg beetroot
5.184 kg lettuce and parsley for salads
1.288 kg silverbeet
256 g brussel sprouts
304 g spring onions
2.606 kg cabbage

Plus small amounts of chives, calendula, baby carrots and peas

0 Comments

    Author

    This page is my blog formerly known as Kiwi Urban Homestead.

    I'm a Kiwi homeschooling mother of 5 living in a small town. After growing 1000 kg of produce in my back yard in 2013, I'm now expanding my edible gardens even further.

    Archives

    February 2016
    December 2015
    October 2015
    September 2015
    June 2015
    May 2015
    April 2015
    March 2015
    February 2015
    January 2015
    December 2014
    November 2014
    October 2014
    September 2014
    August 2014
    April 2014
    February 2014
    December 2013
    November 2013
    October 2013
    September 2013
    August 2013
    July 2013
    June 2013
    May 2013
    April 2013
    March 2013
    February 2013
    January 2013
    December 2012

    Categories

    All
    Bees
    Butchering
    Chickens
    Compost
    Corn
    Diy Projects
    Events
    Everything Else
    Firewood
    Freebies
    Frugal Fortnight
    Garden Diary
    Getting Started
    Greenhouse
    Harvest
    Harvest Totals
    Health
    Herbs
    Home Made Cleaners
    Homesteading Skills
    Jungle Taming
    Livestock
    Media
    Monthly Garden Pics
    Moon Planting
    Musings
    Pests And Diseases
    Planting
    Preserving The Harvest
    Recipes
    Salads
    Soil Improvement
    Specific Crops
    Tomatoes
    Weekly Round Up
    Worms
    Yates Vegie Challenge
    Zucchini

    RSS Feed

Powered by Create your own unique website with customizable templates.