Thrifty Kiwi
Like our Facebook page
  • Home
  • Blog
  • Homesteading
  • Gardening
    • 2021 Garden Blog
    • 2019-2020 Garden Blog
    • 2017-2018 Garden Blog
    • 2016-2017 Garden Blog
    • Kiwi Urban Homestead 2013-2015 Garden Blog
    • Pest & Diseases
  • Recipes
    • Autoimmune Protocol
    • Meals and Snacks
    • Preserving
    • Household Cleaners
    • Health & Beauty
  • Skills
    • Menu Planning & Grocery Shopping
    • Money & Budgeting
    • Preserving How-Tos
    • Housekeeping
    • DIY
    • How to Find Stuff Free or Cheap
  • Animals
    • Critter Blog
  • About
  • Contact

Weekly Round-Up #2 (Last week of September)

30/9/2013

0 Comments

 
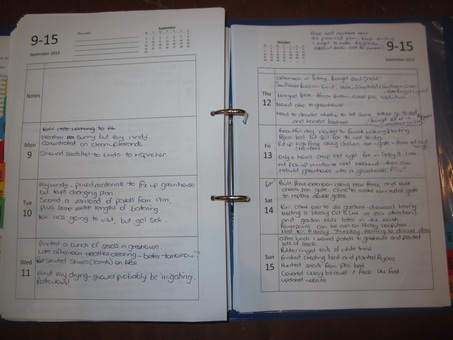
It has been a week of wild weather - gale force winds nearly every day, along with heavy showers. Most of the garden work that has gone on this week has been in the greenhouse, where my seeds are happily sprouting.
Picture
I moved the two choko plants in pots that have been growing in my foyer out to the greenhouse, as they have been slowing down inside, probably because I haven't been putting them out in the sun often enough.

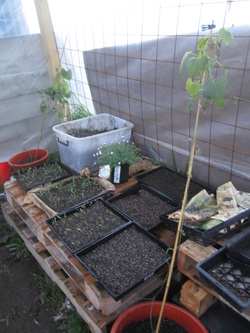
I've been collecting free pallets over the last couple of weeks, for various projects I have in mind - building compost bins, vertical gardens, pallet gardens for lettuce and so forth. They also make handy tables in the greenhouse. Various veges and flowers are in various stages of sprouting on them. I also splurged and bought myself an attractive plant called "Paper Cascade" which has beautiful crimson and white buds, followed by straw-flower like flowers. I have just the spot I want to plant it.

Picture
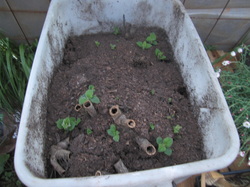
I put the yacon crowns in a bin of compost to over-winter in the shed. They are starting to sprout, so I moved the bin to the greenhouse. It won't be long before I lift them out, divide the crowns and plant them in the garden. Only I'm not sure where I'm going to put them yet - they grow up to 8 feet tall, so need to be somewhere they won't shade other plants, plus like a warm, sheltered spot. They did well outside the bathroom last year, but there will be a lot more plants this year, so I need more space.

Picture
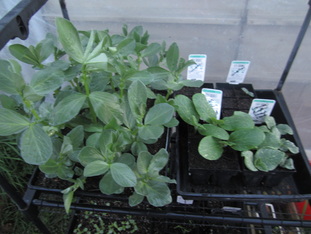
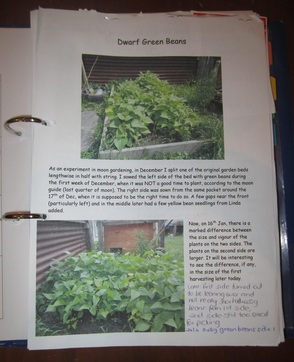
These broad beans are getting very large. I need to plant them out as soon as possible. The pumpkins and green zucchini are also sprouting well, cucumbers and gherkins are being a lot slower off the mark.

Picture
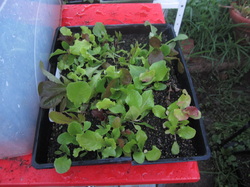
Leaf lettuce are getting large too - these are going to go into a pallet bed as soon as I have it ready.

Picture
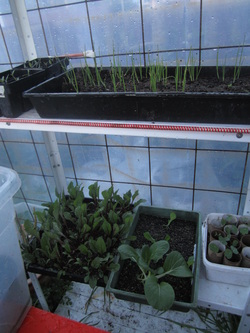
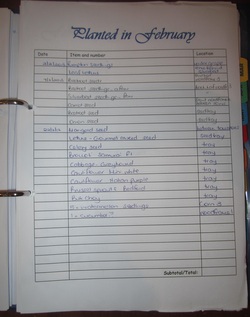
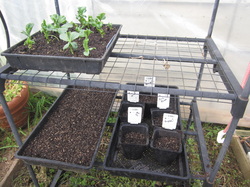
There are many more trays and punnets of seeds all over the place - here we have onions and tomatoes on the upper shelf, beetroot, buk choy and nasturtium on the lower. The beetroot also needs planting out as soon as I have a bed ready for it.

Picture
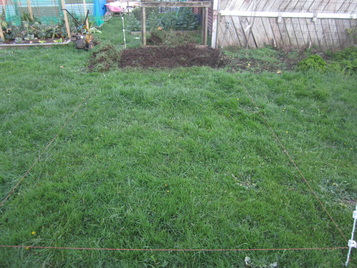
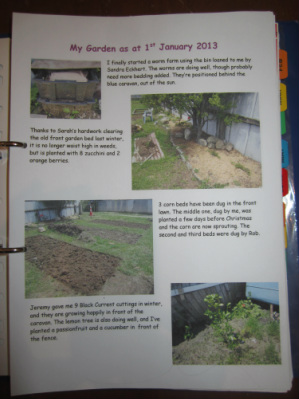
Today I marked out a 10 square meter patch of lawn and started digging it over in preparation for planting seed potatoes which are well sprouted. I had hoped to get them planted by today, but between last week's weather and getting ready for the homeschooler's ball which was held on Saturday, I haven't had time to get the prep work done. Today I got about a quarter of the bed dug over - hopefully I'll get the rest done tomorrow. I'm digging it by hand, with a spade, despite the rotary hoe in the background. Couch grass and creeping buttercup are my two worse nuisances in the garden - rotary tilling just cuts them up and spreads them. The turf and weeds I remove will be put into black plastic bags and left in the sun until dead, after which I will add them to the compost. 

Potatoes are one crop I keep seeing so much conflicting advice about: sprout them, don't sprout them, sprout them in the dark, sprout them in a sunny place, don't plant before Labour Weekend (late Oct), any planted from Oct on will probably fall victim to psyllids, use the no-dig method, the no-dig method doesn't work, plant in tyres, don't plant in tyres, use plenty of manure and lime the soil, don't use manure or lime or you'll get scabby potatoes, yada yada yada! Hmmmmm! I think I'm going with my general plan this year - try everything, and figure out what works for ME!

Last summer I planted potatoes using the no-dig method. I planted late though, and didn't get very many decent sized spuds. However, the method DID do a wonderful job of clearing and making the soil nice in that area. It's just a pity my son now has car parts spread all over it for his restoration project, and I can't plant there again just yet!

This year, I'm going to dig over this patch of lawn, make traditional trenches, and add grass clippings (for nitrogen), sheep manure, blood and bone, Rok Solid (ground rock with a huge range of minerals) and gypsum to the bottom of the trench before planting the seed potatoes and slowly hoeing them up.

Picture
My greenhouse has about blown itself to bits in this week's gales. We never finished adding more framing and battening to finish it off, and after pricing the materials decided we needed a cheaper option. I bought a big load of cheap windows off Trade Me last week, and we're going to use those to completely rebuild the greenhouse into a glasshouse just as soon as we can. Meanwhile I've had to improvise to keep the greenhouse from completely disintegrating by putting pallets on the roof and things against the side, so the seedlings remain sheltered until we can plant them out and rebuild. Then I will reuse the greenhouse plastic to make some cloches, growing frames etc.

Picture
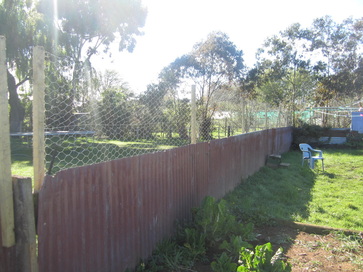
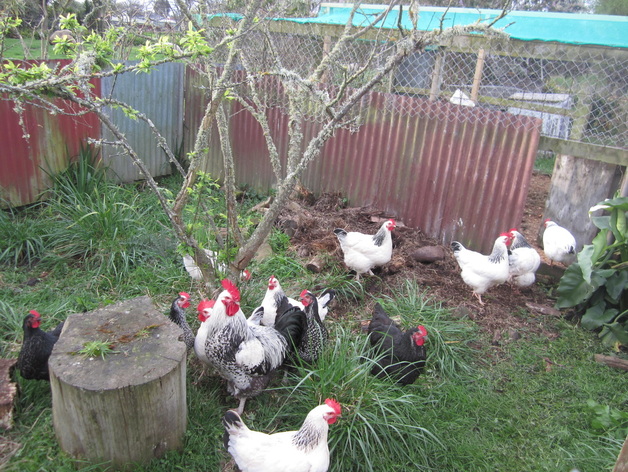
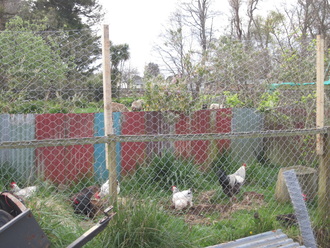
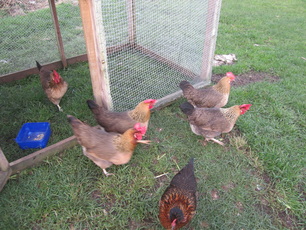
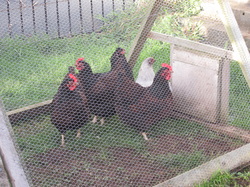
In order to keep the chickens out of the garden, we've also been working on raising the fence between the yard/garden and the paddock where the chickens free-range. My husband and I raised the back fence last weekend, and my eldest son built me a wonderful new gate to replace the disintegrating and hard to shut old ones. My husband laced the wire with help from our daughter, and hung it on Friday. No more chickens in my garden! Yay! We've talked about raising the fence for ages; it turned out to be much quicker and simpler than expected, using some fencing battens and a left-over roll of wire netting. My younger son had the intelligent idea to hammer a nail into the top of each batten before putting it up, so that we could then roll out the wire and hang it on the nail, holding it up while we went along and attached it properly with fencing staples. Worked brilliantly!

Picture
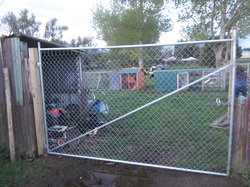
My lovely, new gate - light and easy to swing open, strong and tall to keep the chickens and sheep out of the yard. Excellent work family! The extra tall bits at each end are so we can string wires across if the chickens ever decide to fly up onto the gate, as they might do when there is a solid surface to land on.

0 Comments

NZ Gardener of the Year Finalist! (Please vote for me!)

30/9/2013

2 Comments

 
A couple of weeks ago I received a phone call that was a huge surprise! My daughter had nominated me for the NZ Gardener of the Year competition (and forgot to tell me). The call was to tell me that I had won the Best Vege Gardener section, putting me in the running for Gardener of the Year, and could they send a journalist around the next day to take photos and write an article for the next issue of the magazine?!

The photo and articles about each of the finalists appears in the October issue of New Zealand Gardener magazine, in stores today. The winner is selected by public vote, which can be done via a form in the magazine, or online voting at http://nzgardener.co.nz/vote-for-your-nz-gardener-of-the-year-2013/. If I were to win, the prize pack would allow me to put in place a number of things that will enable me to do so much more toward my twin goals - feed my family, and help others in need while inspiring them to grow some of their own food! If you are a NZ resident, would you please consider voting for me? And please tell all your friends too!

Below is a copy of the page from the magazine (more info re voting below):
Picture
Voting closes 29th October. One vote per person.
If you're voting online, then only one vote per IP address is permitted (so multiple members of one household could only vote if using a different network or location).

New Zealand Gardener magazine is one of my very favourite magazines! I have a subscription, and can't wait to get it each month and read all the great articles! There is always lots of great info on growing your own food, DIY ideas, organics and much more, and a couple of very humorous articles too. You can even use FlyBuys points to subscribe! This month has a great articles on courgettes (pg 26), though the quote from Nigel Slater "I have always had my doubts about any vegetable heavy enough to use as a murder weapon" had me chuckling. The vertical garden design guide (pg 94) has several ideas I love, but the Herbal Liqueur article (page 98) isn't really my cup of tea, as I don't drink alcohol, but for many others it has some great ideas! I can't wait to read the rest of the magazine, but I'm saving it for after I've headed outside today and dug my potato patch.
2 Comments

My Garden Diary

28/9/2013

2 Comments

 
Picture
When I set the goal to grow 1000 kgs of food this year, I realised I would need somewhere to record my harvest weights as I went along, and so I decided to use a garden diary. But I quickly realised that a garden diary is an essential tool that helps me in so many ways!

I started off with a very lovely, purchased 2013 Garden Diary from NZ Gardening Magazine. I love to look at it for ideas and all the lovely photos, but there was nowhere enough room for me to record everything I wanted to. After gluing and taping in extra photos and notes, I realised it would be simpler to just create my own. So I grabbed a spare ring-binder, sat down at the computer, and put together what works for me. What's in my garden diary? Join me for a wee look inside my 2013 Garden Diary....

Picture
Right in the front of my dairy is a Moon Calendar planting guide. This one is simple to use, and was printed free from NZ Gardener magazine's website. They have since changed their site, and it's no longer on there, so you can now download it HERE.

I use this guide to tell me when is the best time of the month to plant above-ground crops, root crops, or just concentrate on other garden chores.

I use tab dividers in my binder - each with a month of the year on it - to make flipping from month to month easy.

Picture
In the front of each month's section are photos and notes from the 1st of the month showing me what was happening in my garden then. I started doing this for myself, and later began putting photos on this blog each month, so now I just write the blog post, print a copy, and put it in my diary.

These photos and notes are very helpful - it is encouraging to look back and see how the garden has grown month by month, and it's also a useful memory jogger down the track - for example if I want to remember in which month certain plants were at their peak, or started to have problems. Or to track the growth of biennial or perennial plants.

Picture
Next in each section is a monthly planting guide, which I get emailed to me free from www.gardengrow.co.nz. These lists are a great starting point to guide one in what to sow or plant for your region. As my experience increases, I learn more about the best plants and timing for MY garden, but this guide has been invaluable this year.

Picture
I use a two page per month spread like this to track daily weather conditions, monthly rainfall, and anything else I care to note. The green lines show me at a glance the days of the month best for planting above-ground crops, and the orange lines highlight the root crop planting days. I print these pages free from the internet - there are several sites with variations available. I got mine HERE

Picture
I use these diary pages to make some notes each day on things I've done, anything of note, something I learned, or just about anything else! Again, free pages are available from the internet. I got mine HERE.

Picture
In some sections of my diary there are also pages of notes on particular crops or experiments in my garden, such as the Green Bean Experiment, or my Sweet Corn crop.

Picture
Picture
I created some pages on my computer. The first is one to record what I sow or plant during the month. I find I refer back to these pages often, especially any time I wonder just how long ago I planted a particular crop.

Picture
And pages to record my harvest weights...

Picture
A "To Remember Next...." page is handy to jot down info that is relevant to that particular month of the year, so that next year I will hopefully see timely pointers.

Picture
I have additional pages for tracking egg production from my chickens, and information relating to my sheep. The great thing about a garden diary is you can personalise it to anything YOU need to help you on your own homestead.

Picture
A Notes & Ideas page is handy to jot down those great tit-bits that I pick up here and there along the way.

I hope you have enjoyed this wee tour of my Garden Diary! I do find it a very handy tool to keep track of and plan my garden. I also tend to add in other notes and pages printed from the internet, but have to limit myself as my binder can only hold so much! I already had to change it up from a regular size binder to a larger one!

The local knowledge you start to acquire as you do things like track your weather is an enormous help in the garden. For example, I have noticed over the last few years (due to lambing in spring) that we always have storms and gales in September, which is the month of the Equinox. Knowing this, I can plan accordingly, ensuring things are anchored down well, plants that need it are well staked, animals have shelter etc. A local friend told me recently that strong winds are also normal for the end of November. I hadn't particularly noted that before, but she is right to point out that things like corn and broad beans, which are normally very tall by then, are likely to be blown over if not well anchored or staked. Forewarned is forearmed! Keeping track in a garden diary helps you become familiar with your own typical weather patterns, and reduces how often you're caught by surprise.

Personally, I wouldn't be without my garden diary!

2 Comments

One Pot Beef & Pasta Dinner

22/9/2013

0 Comments

 
Picture
We all have those days we want something quick and easy, with a minimum of dishes. One-pot meals are very handy for those days - everything is cooked in the one pot. Dawn's Chicken and Rice is another one pot meal; this is my favourite one-pot beef dish. Like most of my recipes, this one has plenty of flexibility and can be varied. I'll share how I cooked it this week, plus a couple of variations.

Ingredients:
500g (1 lb) minced (ground) beef
1 onion, chopped
2 tsp oregano
1x 400g (14 oz) can butter beans, mashed
1x 400g/14oz can diced tomatoes
1 cup tomato sauce
2 carrots, chopped
2 stalks celery, diced
2 tsp organic soy sauce
6 cups water
500g (1 lb) pasta spirals
2 cups frozen peas or 4 cups frozen green beans

Method:
Brown mince and chopped onion, breaking up the meat as it cooks, until no longer pink. Stir in oregano, carrot, celery, tomatoes, butter beans and sauces. Add the water, and bring mixture to the boil. When boiling, add pasta and stir gently to submerge. Cover and simmer for 15 mins until pasta is just tender. Stir in frozen veges and cook a further 5-10 mins.

Watch closely near the end of the cooking time, to ensure it does not get too dry and burn or stick - if necessary add more water. Or if it is too wet, leave the lid off for a while.

Serves 8
Variations:
  • Originally when I made this, I would use twice as much beef, and leave out the butter beans and canned tomatoes, adding an extra cup of water.
  • The original recipe I adapted this from used instant stock instead of soy sauce, no tomatoes or beans, and when the pasta was cooked, two extra cups of water were added, mixed with two packets of instant soup mix - mushroom or tomato. I don't use these because of the MSG and additives.
0 Comments

Dawn's Chicken & Rice

22/9/2013

0 Comments

 
Picture
This is a very simple, tasty meal that is quick and easy to cook. The original recipe came from my friend Dawn, when my famiy was struggling with food allergies and I needed new ideas. It is salicylate, glutamate, dairy and gluten free, and only moderate in amines. If you don't have food allergies, that last sentence won't mean anything to you, but it will be helpful to those who do!

Many variations are possible with this recipe - add other veges, spices or anything you like, though even the basic version is very tasty and a family favourite.

When I made it this time, it was a last minute dinner decision, based on repeated recent requests from the kids. I grabbed two small cabbages that were threatening to bolt from the garden. My stock and cooked chicken were both frozen, but the beauty of this is that I could put them together in a separate pot and heat gently to defrost in a few minutes, then just pour them in when I needed them.

How to Make Chicken Stock

An essential ingredient of Dawn's Chicken & Rice is chicken stock. Store-bought stocks often contain MSG and other chemicals, which I avoid for my family. Besides, stock is SO easy to make, and very frugal! Every time I cook a whole chicken, I save the frame and bones to make stock.

To make chicken stock, simply place chicken bones into a large pot or crockpot. You can make the stock with nothing else but water, or for a richer more flavourful stock, add onions, some carrot peelings and celery leaves or stalks. Cover with water and add a dash of something acidic - lemon juice or vinegar. The slight acidity causes the calcium and other nutrients to be drawn out of the bones - when you've finished boiling the stock, the remaining bones will be soft and crumbly due to this process (at which time they can be added to the compost or garden). Bring to the boil and simmer for a minimum of 2 hours, or up to 48. 2 hours is good for those in a hurry, or those with amine allergies. Longer is otherwise better.

Strain off liquid, and if you like then also pick off any remaining meat from the bones, shred it, and add it to the stock. Freeze stock in portion sizes suitable for your own uses. I freeze 8 cup containers to use with Dawn's Chicken & Rice, and 2 cups portions for most other things.

Dawn's Chicken & Rice

Ingredients:
1 cabbage
1 cup oil
4 cups rice
2-4 cups shredded cooked chicken
8 cups chicken stock
Salt to taste

(Optional: diced onion and/or carrot, cooked with cabbage below)

Method:

Finely shred sufficient cabbage to ¾ fill stock pot. Heat 1 cup oil in pot. Add cabbage, and cook over med-high heat, stirring frequently, until volume reduced by half. Reduce heat. Add rice, stir thoroughly so rice is coated with oil. Add chicken stock, salt and shredded chicken. Stir to combine. Place lid on and simmer over low heat for approx 15 mins or until liquid is all or mostly absorbed. Serve. Serves 8
0 Comments

The Purple Cauliflower Mystery

22/9/2013

0 Comments

 
Picture
This year, I've grown purple cauliflower for the first time. Purple coloured veges add some interest both to the garden and to the plate, and also veges with the redder hues to their leaves are reputed to be higher in nutrients in winter than green veges and so something we should all eat more of in the colder months (think red cabbage, purple lettuces etc).

But there is one thing I don't understand....

When I grow purple cauli, it's head is a beautiful purple colour. But when I cook it, it turns a pale green! And yet when the cooked, now pale green cauli is served on rice, it stains the rice purple!

It's a mystery to me! Any scientists out there who would care to explain?

Picture
Pictured here - a mixture of purple cauli and regular broccoli, cooked (the paler florets are the cauliflower).

0 Comments

Any Way You Like It Stew

22/9/2013

0 Comments

 
Picture
I'm calling this "Any Way You Like It Stew" because this recipe is so, so versatile! You can literally take the basic recipe and use it for ANY meat (beef, lamb, chicken, rabbit, duck, goat, venison, you name it - even the cheapest cuts work great) and you can cook it ANY way you like - in a pot on the stove, in a slow cooker, or in the oven! You can also add any veges you like to it, make it gluten free if you wish, and serve it with many different side dishes. Once you know how to make this, you really can have it any way you like it!

I found some cheap blade steak bought on special weeks ago hiding in the freezer, so made this yummy dinner.

Basic Stew/Casserole Recipe

Picture
Ingredients:
2 onions, diced
2 cloves of garlic, crushed (optional)
1 kg (2 lbs) meat of choice, cut into cubes (I used beef this time).
2-3 carrots, diced
2-3 stalks celery, diced
1 tsp rosemary
1 tsp salt
2 tsp organic soy sauce (beef stock powder may be used instead)
600 mls (1 pint) boiling water
Cornflour or similar to thicken (see variations below)

Picture
Method:
Meat may be browned with onions and garlic before assembling, but I only do this when cooking in pot on stove, and occasionally if I'm cooking it in the oven. Otherwise, I assemble all ingredients raw and then cook together in oven or crockpot.

Place ingredients in order given into crock pot or oven proof dish and stir to combine. Cook in crockpot on auto or low for approx. 6-7 hours, or in covered dish in oven at 180C (350 F) for 1.5 hours. Stir 2-3 times during cooking.

The photo to right shows assembled ingredients before cooking. The picture above shows it after cooking.

If cooking in pot on stove, brown meat with onion and garlic, then add remaining ingredients. Bring to boil, cover, and simmer on low for 1.5 hours, stirring occasionally.

Thicken before serving. Serve with mashed potatoes or rice and green vegetables. Serves 6-8

Stew Variations

  • When I first used this recipe, many years ago, I used to add flour at the beginning of the assembly process to produce a nice gravy at the end, but I learned over time that cooking it without the flour means you don't get any bits burning at the edges, and the dish stays a lot cleaner. It is also easier to thicken it just the right amount at the end. However, if you wish to include flour at the beginning, place meat, onion and garlic in dish, add 1/2 cup flour and stir to coat everything, then add rest of ingredients and proceed as
    above. These days I thicken at the end with a cornflour/water mixture, or with rice flour/water.
  • If using a gamey meat to make this dish - such as venison or duck - add 2 TBSP of vinegar to the mix -
    this will tenderise the meat and completely eliminate any gamey flavour!
  • You can add any veges you like to this dish. For a long time, we couldn't use onions because of my daughter's food allergies, and so I used leek instead of onion. I often add diced pumpkin or
    kumera (sweet potato) to it, and my kids love it if I add hunks of potato to the dish as it comes out flavoured beautifully by the meat liquid. Play around and discover your own combinations!
  • You may have noticed that I use organic soy sauce in a many dishes, and never bouillon
    products. This is because stock powders and bouillon products are loaded with MSG and other nasties, and I will not use them. Soy sauce acts as a natural flavour enhancer and adds that "beef stock" taste but is safer. Soy is naturally high in glutamates, so may not be suitable for those with glutamate sensitivities, but my daughter, who is allergic to MSG and most glutamates can tolerate it in small amounts. Use organic soy sauce and read labels to avoid nasty additives. Another alternative is to make your own stocks and use those in recipes, which I do for several dishes.
  • Other cuts of meat may also be used - such as mutton neck chops. I often look for the cheapest stewing beef, or use meat from animals we butcher that is from the less-than-terrific cuts. When using neck chops, leave them whole rather than trying to cube them. Once they are cooked in this recipe, the meat will be fall-off-the-bone and melt-in-your-mouth tender!
0 Comments

Weekly Round-Up #1

22/9/2013

0 Comments

 
Picture
As Spring has sprung, and we are now entering the busiest time of year in the garden, I have decided to post a weekly summary of what has been going on over the past week, starting with this one.

Last Tuesday (17th) was the last day for sowing or planting above-ground crops for the month, according to the moon calendar. So early in the week I was busy sowing lots of seeds in trays and pots in the greenhouse. While in the past I have tended to focus on only plants for human food, the more I read and learn the more I realise how important it is to plant things that benefit bees and other beneficial insects as well. This month so far I have planted:
Fruit & Vegetables: I have sown seeds of heading lettuce, gherkins, cucumber, spinach, watermelon, green zucchini, crown pumpkin, freckle lettuce, leeks, silverbeet (green and coloured), tomatoes (three varieties) and I also planted four feijoa bushes, and set up a bin full of potting mix and compost in which I planted some extra raspberry canes, and dug up the black currants that have been growing in a corner from cuttings I was given last year, and moved them to pot until I have a permanent place for them.
Flowers & Herbs: I have sown bee balm, borage, thyme, dill, chives, marigold, nasturtium, zinnia, Mexican sunflowers, alyssum, snapdragon, phacelia and cosmos. Many flower and herbs are both edible or medicinal for us, as well as providing food or shelter for bees and helpful insects, such as ladybirds, hover flies etc.

On Wednesday morning I awoke to a very frosty morning, with the outside taps frozen, ice on the troughs and all over the plants. This is why tender warm season crops need to be nurtured under cover at this time of year!

This week, my strawberries are flowering well (the photo above was taken on Wednesday morning, and they are all frosted but strawberries are pretty hardy plants and it doesn't bother them). My dwarf peach tree is in bloom too. The raspberries have all burst into leaf, and are showing signs of developing flowers, and the boysenberries are just starting to leaf up. The first of the buds have burst on the grapevine. Mmmmmm can almost taste the summer fruits to come!

I finally got around to going to say hello to a guy up the street who grows and sells herbs and veges, and we had a nice chat about his garden. He told me that last year he had a bed full of gorgeous cabbages in the middle of summer, when everyone else around here has all their brassicas decimated by white butterfly. At first he couldn't understand why, and then finally realised that prior to the cabbages, the bed had been full of garlic! So guess what I'm going to plant this summer after I harvest my garlic bed?? Normally I don't even both with brassicas over the summer, but maybe........

Speaking of garlic, I have a bed planted in garlic, in two halves. Traditionally, one is supposed to plant garlic around the shortest day of the year, and harvest it on the longest. This year, June 21st was the shortest day. I planted the first half of the bed on June 7th with cloves from garlic I bought from the supermarket (not knowing anywhere else to get it). I planted about 48 cloves. Four or 5 sprouted a while later, but I nearly gave up on the rest until I read they can take up to 6 weeks to show, so I decided to be patient. I planted the second half on August 25th (about the last chance for the year) with cloves from garlic purchased at a local market garden. Those are now just about all showing through the soil, and more of the first half have come through, but in disappointing numbers. I'll give the first half a little longer before just planting something else in the gaps. I've never grown garlic before, but I've read they can take ages to show above the soil, but meanwhile are developing strong root systems underneath. We'll see. I've had to cover the bed in netting to keep the cats off - when it's no longer needed there, I'll move it over to the strawberry bed.

My Frugal Fortnight concluded successfully - I did manage to stay away from the store and not spend any more money on food, and we certainly ate just fine! I saved some $500 over the two weeks that way. On Thursday, I did a regular fortnightly shop, but am thinking of making it last a month, as we still have some things I'd like to use up in the pantry. Meanwhile, I have more recipes to post over the next few days.

Picture
By Thursday, the weather had turned bleak, with lots and lots and lots of rain over the last few days. Today (Sept 22nd) is the Equinox (day and night of equal length) and one expects unsettled weather at that time. Earlier in the month it was gales, now it's heavy rain. A lady I know who has grown a lot of food for years not far from here tells me gales are the norm for late November too (when tall plants are vulnerable if not staked). Local knowledge of what to expect is invaluable to gardeners - always talk to those around you who are experienced, and make note of what they can share, as well as keeping a diary of your own to record weather conditions so you will begin to see patterns.

When the weather is too nasty to work outside, it's a good time to work in the kitchen! I finally found time to begin harvesting and bottling my beetroot. I got half the bed done on Friday, before running out of time and energy. I will post my Pickled Beetroot recipe separately.

I've been keeping a record of how many eggs are being laid by which group of chickens over the past fortnight. As of yesterday, we've gotten 206 eggs over the last 13 days! That's a lot of eggs! I'm going to try out some methods of preserving them this week, but then I also need to start selling the on-going surplus, which will help to pay for the chicken feed. Free-range eggs anyone?

And lastly, I've begun planning a gardening talk I'll be giving at the local library on October 12th. If you're local, I hope you will come along!

0 Comments

Introducing.....Our Homestead Chickens

13/9/2013

0 Comments

 
The very first time I ever had chickens was 16 years ago when we moved into a house on a large farm and "inherited" a flock of mostly Brown Shavers. I don't remember how many there were, but I do remember our very citified cat was terrified of them! Since then, I have had various flocks of chickens at different places, though some houses we lived in we were not able to have livestock, so it has varied a bit.

The second time we moved into a place and inherited an existing flock of chickens, they included a matronly Barred Rock hen whom I named "Granny" as she appeared to be the matriarch of the flock. Eventually I decided to find out how old she was, and after numerous phone calls back through various owners I found the couple who had first rescued her from a battery hen farm - over 17 years earlier!! They couldn't believe she was still alive - and I couldn't believe she was still laying eggs! In fact, that year she went on to co-mother our very first batch of chicks (17 of them). 5 of the hens had gone broody and kept sharing the nesting boxes of eggs. When it came time to move them and the about-to-hatch eggs to a safer location, I felt sorry for them all and so moved them all together. When the chicks hatched, they shared them with no bickering. If they sensed danger, 4 would rush to a corner, spread their wings and call the chicks to them, uniting to hide them. The fifth hen would rush to the foreground and puff up, peck and cluck like an angry watchdog. It was adorable to see - and in my complete chicken novice-hood I didn't realise it was unusual!
Picture
Since we moved to this property 7 years ago, we've had chickens. When we arrived we inherited yet another small flock, the last of whom died recently. 5 or 6 years ago, we allowed our hens to raise some chicks with eggs from the neighbour's hens (we didn't have a rooster at the time). Two of them, bantam crosses, were my children's particular pets, and we still have those two. But otherwise, our flocks are now all new. 

Above is a picture of some of the main flock. The black hen to the right is a Light Sussex/Barred Rock cross that we raised from a chick along with four white Light Sussex chicks, all of whom were given to us by a friend, initially to raise for the freezer, but then someone else gave us a beautiful Light Sussex rooster, so I decided to keep the young hens and begin breeding my own for meat. The black hen went broody last year, and raised 5 chicks, of whom the rooster pictured was one. So he would be 3/4 Light Sussex, 1/4 Barred Rock, and I think he's really pretty. The hens you see here are all either the original Light Sussex hens, or offspring from the Light Sussex rooster - so some are purebred, and some are crosses either with the Barred Rock (she had another 3 chicks earlier this year) or my Brown Leghorns, one of whom raised 14 chicks this year. There are 15 chickens in this group - their purpose is for both meat and eggs; this year's pullets are just starting to lay.

Picture
All my chickens, except the bantams, are very adept at flying, and love to hop over the fences and into my gardens! Grrr! Normally they are free-ranged in the paddocks, but lately they've got into such bad habits that I've had to resort to keeping them in their coops until I can raise the fences. Today my son and I completed stage one of Operation Chicken-proof - we raised the side fence of this run area that is adjacent to the main chicken coop. We still need to put a top-half on the gate, and there is a short piece of fence at one end that we also need to raise, but I was able to let the chickens in here this afternoon. Clipping their wings makes no difference, by the way, to their ability to get over my fences! If a fence has a solid part to it near the top (such as a rail) they will happy leap up and check out the other side, then fly down. Chickens, however, dislike flimsy or flexible fence tops, so the new extension has upright fencing battens supporting the wire, but no top rail.

Picture
This week I put my 5 Brown Leghorns into one of our moveable runs so I can do an egg-count check. Well, almost moveable - my darling husband built this AWESOME coop to my specifications, with the intention they could be moved around the 8 garden beds I designed last year, but it turned out to be so heavy it's too hard to move that way. So I use it in the paddock, and will at some point design a lighter coop for over the garden beds. Ah well, you live and learn!

The chicken in the foreground is one of the Silky Bantam cross pets. The Leghorns were given to me by a friend, so I could put them in the freezer or get rid of them for her - she thought they were too old and not laying. I thought they were pretty and decided to keep them for a while and see if they were laying - that was 2 years ago (they are over 5 years old) and they are still laying very strongly. I really have more hens then I need, so no sure how long I'll keep these girls - or may keep just a couple for breeding purposes if it turns out last year's crosses are particularly excellent hens. These girls are very accomplished in flight too - and they taught the Sussex hens all their bad habits!

Picture
My neighbour is moving soon, and unable to take her hens, who are only 12-18 months old, so I agreed to take them. There are 3 Barnvelders and 2 Aracunas. They are together in another moveable house and run, currently helping turn over my front lawn which will become vege gardens soon. They lay well, but the Aracunas are the most psycho chickens I've ever come across! They go absolutely crazy if you try to pick them up, even in the dark. Getting them over here was a mission and a half - I went to pick them up one night, figuring they'd be calm and quiet like most hens in the dark. Boy, was I wrong - they went ballistic, flying at my head, flying into the fences, running around full-tilt in the dark, fighting anything they came across. Hopefully they'll calm in time.

All together I have 27 chickens. Discounting the rooster and bantams, who aren't laying, and four of the pullets who aren't laying yet, that leaves 20 hens who are potentially laying. This week I've been keeping an accurate count of how many eggs I get from which group - and it has ranged between 12 and 21 in total each day, plenty for us, and some with which I can supply others with fresh, pastured chicken eggs.

I don't intend to keep this many chickens though - really I just need a rooster plus 6 hens for breeding meat birds, and another 6 high laying ones for eggs. It can be tough sometimes deciding which ones should stay and which should go!
0 Comments

Spaghetti Bolognaise with Butter Beans

13/9/2013

0 Comments

 
Picture
I have a meat sauce recipe that is a family favourite, and we use it to make Spaghetti Bolognaise, Lasagne, Nachos, or simply serve it on rice or mashed potatoes. It is very simple and tasty, but ordinarily I would use 1 kg (2lbs) of mince to make it for my family. In the interest of my Frugal Fortnight I wanted to use half as much mince, and use up some of the canned beans in the pantry, so I did exactly that, using two cans of butter beans to ensure there would still be plenty of meat sauce to satisfy everyone. Both variations are explained in the recipe below.

Totally Yummy Easy Meat Sauce

Ingredients:
1 kg mince (2lbs ground beef)
OR 500g (1lb) mince and 2x 400g/14oz cans Butter Beans, drained and rinsed
1x 400g/14oz can chopped tomatoes
1 can of Tomato sauce (ketchup)
1 tsp dried Oregano
1 tsp Soy Sauce (I use naturally brewed organic soy sauce)

Method:
Brown mince in a little oil in a large pot. When well browned add other ingredients, using empty tomato can to measure tomato sauce. Bring to boil, cover and reduce to simmer. Simmer for 15-20 mins stirring occasionally. Serves 6-8
Note: If your children don't like the pieces of tomato in the sauce, then whiz together the tomatoes, tomato sauce, herbs and soy sauce in a blender before adding to the pot. That's how I always used to make this anyway.

Spaghetti Bolognaise with Butter Beans

Picture
To put together this meal, first put a large pot of water on the stove to boil. While this is heating, place side-dish veges into a pot ready for cooking, and make the meat sauce as above, using the smaller amount of mince plus butter beans option.

By the time you have the meat sauce simmering, the pot of water should be boiling, and you can turn on the pot of veges to cook (in my case I used frozen beans).

Add pasta to pot of water. Adding  a little cooking oil to the water will help prevent the pasta from sticking together. Boil with lid off for approximately 10 mins, until pasta is done. Did you know that the Italian chef way to tell if pasta is cooked is to throw a piece of it at the wall or ceiling? If it sticks, it's cooked just right! Teach that one to your kids - they'll LOVE helping you test the pasta!

To serve, pile some pasta on a plate, spoon meat sauce over the top, and sprinkle grated cheese on it. Serve with veges of your choice, or a mixed salad.

Other options: Use either variation of the meat sauce (or try your own combinations of meat and beans or lentils) on corn chips for nachos, layered with cooked lasagne pasta and cheese then baked for 45 mins to make lasagne, or simply serve it over rice or mashed potatoes. Also good on toast as a Sloppy Joe alternative.

0 Comments
<<Previous

    Author

    This page is my blog formerly known as Kiwi Urban Homestead.

    I'm a Kiwi homeschooling mother of 5 living in a small town. After growing 1000 kg of produce in my back yard in 2013, I'm now expanding my edible gardens even further.

    Archives

    February 2016
    December 2015
    October 2015
    September 2015
    June 2015
    May 2015
    April 2015
    March 2015
    February 2015
    January 2015
    December 2014
    November 2014
    October 2014
    September 2014
    August 2014
    April 2014
    February 2014
    December 2013
    November 2013
    October 2013
    September 2013
    August 2013
    July 2013
    June 2013
    May 2013
    April 2013
    March 2013
    February 2013
    January 2013
    December 2012

    Categories

    All
    Bees
    Butchering
    Chickens
    Compost
    Corn
    Diy Projects
    Events
    Everything Else
    Firewood
    Freebies
    Frugal Fortnight
    Garden Diary
    Gardener Of The Year
    Getting Started
    Greenhouse
    Harvest
    Harvest Totals
    Health
    Herbs
    Home Made Cleaners
    Homesteading Skills
    Jungle Taming
    Livestock
    Media
    Monthly Garden Pics
    Moon Planting
    Musings
    Pests And Diseases
    Planting
    Preserving The Harvest
    Recipes
    Salads
    Soil Improvement
    Specific Crops
    Tomatoes
    Weekly Round Up
    Worms
    Yates Vegie Challenge
    Zucchini

    RSS Feed

Powered by Create your own unique website with customizable templates.