In time I may get a chance to work my way through these two years of posts and fix all the links, but life is very busy, so no promises for now!
I hope you enjoy these posts :-)
Cynthia
| Thrifty Kiwi |
Like our Facebook page
|
|
The entries you will find on this blog page are all from my original Kiwi Urban Homestead blog. In making the switch to Thrifty Kiwi, I've managed to bring all of the old entries with me, but due to the change in web address, any internal links within articles will no longer work. So, if there is something you're looking for, you will probably find it by using the Categories links on the right side of this page (under Archives).
In time I may get a chance to work my way through these two years of posts and fix all the links, but life is very busy, so no promises for now! I hope you enjoy these posts :-) Cynthia
0 Comments
I went out to feed the chickens the other evening, as usual. Several of our hens have decided they are broody (wanting to sit on eggs and raise young). Two of them had set up housekeeping together in the back of a spare shed, behind a bale of insulation. This particular evening as I walked through the gate, I saw their heads pop up just enough to see me......they instantly decided they weren't coming for food yet, as they had to protect their nest of eggs from me, the egg thief (I was removing eggs and not letting them hatch them).....So, they puffed themselves up in a united front, clucking and generally saying "Go away!" in chickenese. Greatly determined, they looked quite formidable.....(pic taken a bit later when they had returned to the nest, as I didn't have the camera with me right at that moment).... So, as I did every evening, I picked them both up and gently tossed them out the shed, so they would go eat, and to break their broodiness.....only to find my fierce warrior hens were bravely protecting.......
It's entirely possible that I should not be allowed to drive any distance on my own. Because that's when I start thinking.....and getting ideas...... So there I was, driving along in my automobile, no baby beside me at the wheel.....pondering: Where to plant my zucchinis this year - they didn't do well last year and I wanted to make sure I had a good crop this year... And I thought of this patch of ground I hadn't decided what to do with yet.....and these rubbish bins I've got doing nothing....and that old ladder on the roof of the shed awaiting a creative project.....and that half bale of pea straw that needs using up......and that half finished compost in that pile......and I dreamed up this.......(details below):
I planted four zucchini plants in each bed. The idea of the bin with the compost and the holes is that I can water the zucchini by putting a hose into the bins, which will dissolve compost and water it out through the holes, watering the zucchini with compost tea (feeding them at the same time) as well as avoiding wetting the leaves (reducing risk of fungal infections). 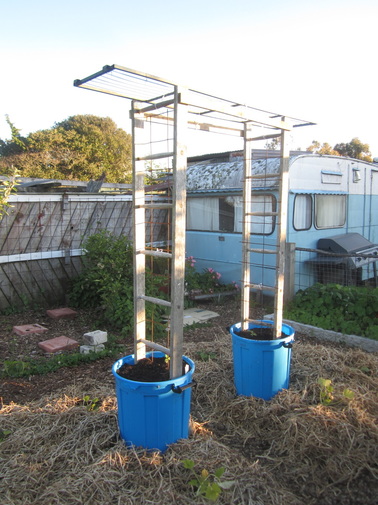 I used some offcuts of steel mesh and cable tied them to the ladder halves to give more of a mesh for something to climb, and topped up the bins with some spare potting mix before planting a cucumber in each bin, and some Petunia seeds as well. I found a spare greenhouse shelf, and cable tied it across the top to form the top of the arch. Hopefully the cucumbers will climb the ladders and cover the arch, the petunias will spill out over the sides, and zucchini will flourish! :-)
Lamb Shanks with Salmi Sauce 1) Make Salmi Paste: toss the following into a food processor, then process and set aside: a handful of walnuts, 2 anchovies fillets, a handful of Kalamata (pitted) olives, half a handful of capers, 6 garlic cloves and a handful of parsley. 2) Brown lamb shanks: Place lamb shanks in an oven tray, sprinkle with salt and lightly coat with olive oil. Brown them in oven at a high temperature on all sides. Turn oven to medium. 3) Add to the lamb shanks: a sprig of rosemary, and chopped carrots, garlic, celery and onions. Drizzle with a little more oil if needed, and toss with the shanks. Return to the oven for 10 mins, turning frequently to prevent burning. 4) Add liquids: Remove tray from the oven, add a splash of white white and a ladle each of vege and chicken stock. Cover and braise for at least 2 hours, check and turn the shanks every 30 mins, ensuring they do not dry out. 5) Make Salmi Sauce: when the shanks are done (meat is falling off the bones), place the shanks on plates. Scoop out the vegetable with a slotted spoon, then put the remaining liquid into a pot. Mix in 2-3 TBSP of the prepared salmi paste, and bring to the boil. It should thicken up, but if needed add a little cornflour paste (this does tend to cause the mixture to separate rather than remain smooth though - still tastes great). 6) Drizzle the sauce over the shanks, and serve with mushed roast veges and a fresh salad. Roast Vege Mush
Fresh SaladMake up a fresh salad with ingredients of your choice. I placed a selection of salad greens in a bowl, added a layer of chopped cucumber and a ring of tomato segments. I sprinkled it with calendula petals and garnished with pansies. Both types of flowers are edible.
Yesterday, an Italian chef with a restaurant in Northland kindly offered on the NZ Vege Gardeners Facebook page to share his knowledge with anyone wanting ideas of what to cook with ingredients from their garden. Inspired by his suggestions when I posted a list of homegrown ingredients I have to hand right now, I just made this delicious dinner! Thanks Cesare Stella! All ingredients except fish, bacon, coconut & olive oils, nutmeg and salt were from my garden.
10) Remove one piece of bacon from the fridge. 11) Remove packaging from Tarakihi fillets, and coat in brown rice flour. 12) Check on the pumpkin. If it's tender, remove from oven, set aside, and turn oven off, leaving door ajar to cool a bit. 13) Pause in cooking to feed the dogs and cats and get them out of my way. Wash hands. Now we're about to start the real cooking - and you've got to move fairly quickly - this is why all the chopping and prep is already done, so you can simultaneously cook two fast dishes! First, pop the pumpkin and garlic back in the oven to keep warm, and put some dinner plates in there to warm too.
Last summer I decided to conduct an experiment in my greenhouse, to see which varieties of tomatoes would grow and produce best, and in which of 5 growing mediums, in response to lively discussion on a Facebook group I am part of. I carried out the experiment, but was rather remiss about actually publishing the results, so here I will link each of the YouTube videos, plus add the results and my comments, so it's all in one place. If you are just after the results, scroll down. So, first, this video explains the experiment and set up (why You Tube insists on using the sheep for the thumbnail....??): On November 26th I made a video update, in which I commented that there was already some signs of plants in some mediums doing better than others..... I actually ended up sending an email to the company that produces the potting mix and compost, and as a result had a visit from one of their regional managers, who was interested to see what was going on. By the time he visited, the plants which were in the compost, which had initially done much better, were slowing down somewhat, and the plants in the potting mix, which seemed to have deficiencies at first, were doing much better. This is logical when you think about it - the compost provided initial burst of nutrition, which then got used up, while the potting mix contains slow-release fertilizers, which took a while to kick in. However, as the summer heat kicked in, and humidity in the greenhouse rose, the plants all got blight. Despite this, many of them continued to produce well. I shot two more videos, which I have combined into one you-tube clip: updates from 1st February 2015 and March 16th 2015..... A note regarding feeding the plants - initially I started off feeding the plants with fish suspension liquid, and then later some worm tea and/or Seasol. Anytime I fed them, I fed all of them the same. However I did not continue this regime for terribly long - getting too busy with other things. Obviously, if I had consistently fed the plants, they would likely have produced more than they did. But either way, they all got the same treatment, so for purposes of comparing growing mediums and varieties, there are still things we can learn from this very unscientific experiment. Tomato Experiment ResultsThe main results I was looking for were actual tomatoes produced. So, as I picked each time, I weighed the resulting fruits and wrote them down under the # of each bucket, and at the end collated the results. I'm going to group the results two ways - first by variety, and then by growing medium. Weights given are in kilos, and are the total harvested weight from the given plant in that bucket. The easiest way for me to do this is to create tables in Word then import them as images - apologies if they are a bit fuzzy. Total harvest by variety. (I) stands for Indeterminate variety - keeps growing like a vine. (D) stands for Determinate variety - grows into a bush, produces, then dies off. ConclusionsWhat conclusions do I draw from this experiment? Well, on the face of it, straight potting mix produced the most tomatoes, after a slower start, with straight compost not far behind. If the Roma in potting mix hadn't died, there might be a bigger difference.
No matter what growing medium one uses, though, consistent feeding over the life of the plant is the key to maximum returns! Of course, one can't really draw final conclusions from this little experiment - to do that, one would need to grow more plants of the same variety in each growing medium, and have some in different conditions (eg outside as well as in the greenhouse). What am I taking away from this personally? I won't be growing Roma or Silvery Fir Tree varieties again. Moneymaker is a good, reliable producer, but needs proper trellising set up to support it, and regular pruning/training. I don't personally like Box Car Willie as I don't like big, beefsteak type tomatoes. I do like Tigerellas, a stripey heritage variety, but again they need good trellising. Growing in the greenhouse for some reason (possibly the very high temps at time) prevented the plants from getting infested with tomato-potato psyllid, which devastated my outdoor plants. This summer I think I will grow just 2 Moneymakers in my greenhouse, in bigger pots filled with a quality potting mix, with better trellising and regular feeding. I will also grow some more smaller pots of determinate varieties Tiny Tim and Sub Artic Plenty. If I grow any outdoor tomatoes, they will have to be carefully covered in micro-mesh to keep out the psyllid. And maybe I'll also experiment with some other varieties. After all, where's the fun in gardening without some experimentation with new plants and/or ideas??
 I just read this really good blog post on how you can get started (or continue) homesteading even if you don't have a spare cent to your name. So many of the things suggested reflect what we have done or are doing here. Kendra does a great job of telling you the four (free) things you need to homestead without financial resources. Hop on over to her blog and read her inspiring article HERE, and then come back and check out my own list of some of the ways I've been able to find free resources or create garden structures for free, or with very little expense, below. Kiwi Urban Homestead - How to get Good Stuff for Free (or nearly free)Free Punnets, Seed trays & Plant Pots: When you're starting a garden, seed trays, punnets and plant pots are really useful, but if you're gardening on any kind of real food growing scale, they can add up to a lot of money. Sure, there are a lot of things you can sow direct into the garden, but many crops do better if started in trays or pots then planted out later. Fortunately, many, many people buy seedlings and plants from garden centres (they must do, or they wouldn't still be in business!) and then after they've planted out the plants, they're left with all those plastic punnets and pots. What happens to most of them? They end up in the landfill! I have collected used free pots, trays and punnets from the local dump, from the free bin at local garden centres, and by letting other local gardeners know I'm happy to take pots off their hands. Once, I scored a van-load of pots when my son happened to be at the dump and spot someone about to unload them into the pit! I was able to share them with other new gardeners. Some of those pots and punnets are pictured below in this pic from our new greenhouse, which was built with recycled windows. 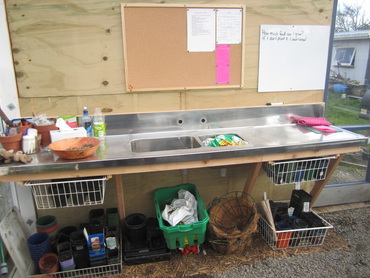 Freezer baskets - so many uses! I've scored quite a number of old freezer baskets from the dump, and they have a lot of uses. In the greenhouse, I mounted two on slides made from pieces of corner moulding to create drawers which hold my smaller pots under the bench, and used a couple on the floor to stack a selection of punnets and small pots in. I also use more baskets to hold small to medium sized pots of plant varieties - this makes it easy to move a group of them in one go by simply lifting the basket. I have also used freezer baskets in the garden upside-down over young plants to protect them from birds who like to dig them up until they get established. This was especially useful for my watermelon plants this past summer. 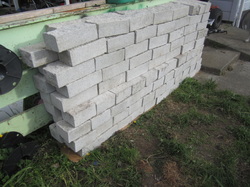 Freecycle finds: In the past year, I have scored from Freecycle the stainless steel bench/sinks unit used as a potting bench in my greenhouse, a load of brand new bricks used to create garden edging, and a kennel for our dog. Freecycle has regional groups throughout NZ - you sign up to receive emails of things listed by members, and you can list items wanted or to give away. A great way to keep good stuff out of landfills, and to share unneeded items with others. 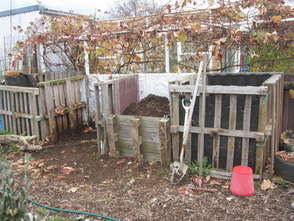 Wooden Pallets Untreated wooden pallets have so many uses on the homestead! I have used them to build a fence and gate to keep the critters from the garden, make pallet beds for growing salad ingredients, and to build compost bins. They can also be carefully dismantled and the timber used to make other things. There are tons of cool ideas on the internet for things made with wooden pallets, from garden seats to sheds and houses! To find wooden pallets, ask companies that ship lots of stock on pallets. They will likely have some that have to be returned or they get charged money, but also often have unmarked ones they're happy to give away. You want unpainted, untreated pallets for food growing uses.
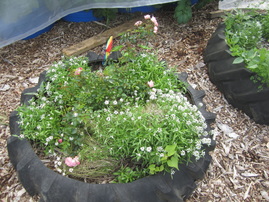 Tyres Tyres are expensive to dispose of, so easy to get for free, but for this reason I advise caution against acquiring very many of them. There is a lot of dispute about toxins leaching from tyres; my own conclusion after much reading is that there is unlikely to be any significant leaching from tyres that have done high mileage, and that are whole (rather than shredded such as for recycling). However, I do prefer not to grow food crops in them. It is also important to be aware that tyres will heat up and dry out soil contained in them in summer weather, and that the shape of the tyre can cause plants to grow a circling root system that stunts the plant. Therefore, I have my husband cut off the lower wall of the tyre when I am using small ones to plant things like wormwood or small bushes within, giving the roots more freedom, or the upper wall when I want to use a large tyre as a planter. I've used a row of tractor tyres to create a visual and physical barrier between the parking area of our driveway, and my front garden. Planted with carpet roses and alyssum they look pretty and attract bees and other beneficial insects. Tyres are free for the asking at tyre shops.
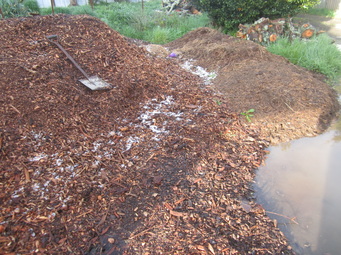 Free compost, mulch or soil building materials: the best way to improve your garden is to build the soil, using lots of home made compost, manures, mulches and organic materials. I regularly source the following free and locally: Sawdust mixed with horse manure and urine - local stables clean it out of the stalls and pile it up, and let me bring home as much as I want. I've used it as a mulch, a compost ingredient, or just piled it on top of cardboard to create a new garden area from lawn. It breaks down into really nice soil. Pine peelings mixed with calf manure - the local dairy farmers clean out their sheds once a year, and are happy to give it away. I haven't found this to be the best source or materials though - I mostly use it for extra carbon in compost piles, or on pathways. Dead leaves - these are the most fantastic compost ingredient or mulch. I visit local streets where thick layers of leaves fall in autumn and bag up and bring home as much as I can. I reuse animal feed sacks or plastic bags, and then use the stockpile as I build compost piles. My worm bins enjoys a generous covering of leaves too. Cardboard and newspaper - local supermarkets and stores have and endless supply of cardboard and newspapers. I use thick layers to suppress weeds when building new beds, or to start lasagne beds, or on pathways before covering with woodchip or other materials. Shredded paper is also a use compost ingredient, though I also use office paper that has gone through my shredded inside - avoiding glossy papers and inks. Pine needles - local forestry plantings have thick layers of pine needles just lying around - I collect these and use them to mulch my berry beds, which thrive as a result. They can also be used to mulch pathways, in compost etc. Wood chip - wood chip is to me THE premiere garden mulch and material - it's whole shredded trees, including leaves, bark, timber etc. It improves garden soil like nothing else. For the real low-down on woodchip, watch the free movie at www.backtoedenfilm.com. Local contractors who prune or clear trees from roadsides etc, and then shred them are the best source. Some will drop a load off for free. Others have wised up to the value of this great material, and will deliver it for a donation of beer for their social club. If you want to collect materials from private land, farms, forests, etc, do be sure and find out who owns it, and ask nicely first! Keep some spare bags and gloves in your vehicle too - you never know when you're find materials. I had to wait for my daughter to complete a competition in a rural town one day, and notice leaves lying under the trees by the edge of the park. I took home two sacks full. :-)
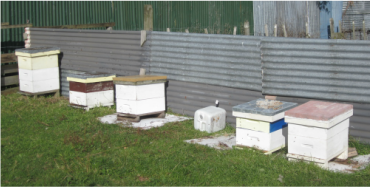 Free Bees & Honey - We've even managed to add beehives to our homestead without expense - our first two hives were given to us by a neighbour who was moving away, whom we had helped out from time to time. When one of those hives swarmed, we captured the swarm, which gave us three hives, and after splitting the queen cells from the brood and bees left behind by the swarm, our numbers increased to six. We have all the honey we can eat, and then some, increased pollination, surplus hives to sell and the proceeds provide more gear as needed. 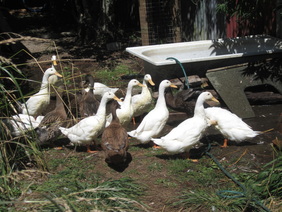 Free ducks, chickens, sheep and worms - I read on Facebook that a couple in a nearby town had too many ducks and were giving some away, and that's how I added David, Delilah and Jemima to our homestead. A few months later, Delilah hatched out 12 ducklings, and our duck flock grew. They are terrific at getting rid of slugs and snails in the garden, and fun to watch splashing in their pools. And they produce eggs and meat. We also started our chicken flock with chicks we were given for free. The great thing about livestock - once you have them, they multiply for free, if managed properly. I started my worm farm with an icecream container of worms supplied by the local librarian. Our sheep flock did take a small investment in the first 5 lambs, and later a ram, but I haven't paid for a sheep, or lamb/mutton to eat in the past 5 years. Neighbours with unused land have provided extra grazing, and in return our livestock keep their sections tidy. Animals are a real blessing on the homestead - providing so many useful resources.
Use Bonus Points: I use accumulated Fly Buys points to subscribe to NZ Gardener magazine and Lifestyle Block magazine - excellent sources of inspiration and information for the homesteader and gardener. There are various schemes around that reward you for things you're doing anyway, such as buying food or fuel, and with a bit of thought they can be turned into more free stuff for the homestead. Above all keep your wits about you, a smile on your face, and your eyes open! There are useful free materials everywhere - you just have to notice, and ask or collect. A smile goes a long way, as does treating other people well - lending a hand when they need it, being kind, sharing what you have. When you treat others well, they're all the more likely to think of you when they have something you might be able to use. Also, most gardeners are a generous bunch - willing to share knowledge, ideas, and seeds and cuttings. If you see something you'd like to grow, or want to know more about - ask!
Homesteading and gardening without money is possible - but you do need some patience, as when you can't just go out and buy materials, it can take longer to get things to where you want them. But in the end, it brings greater satisfaction! Of course, this is by no means an exhaustive list. If you've got other ideas or experiences for free items for the homestead or garden, please share them in the comments! :-) The days are getting shorter and colder, and it's time to gather in more of the summer's bounty. Bit by bit I'm getting things picked and appropriately used or preserved. A few days ago I picked...... 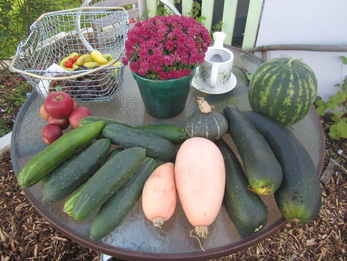 I went searching for hidden treasure in my garden - those things that might have been growing hidden away, and found three marrows and a small buttercup squash, as well as an unexpected telegraph cucumber that was just hanging around. I picked more cucumbers from the vine in my greenhouse - which has now just about done it's thing for the season; I have left one large fruit hanging on it for seed collection later. I also picked another Crimson Sweet watermelon from my melon bed - one more remains out there, not quite ripe yet, which I now have to provide with frost protection on cold nights. The two pale squash in the middle are Pink Banana Jumbo squash - they didn't get very jumbo though. The plants have died off, so they're not going to get any bigger! I picked a few apples from my triple-grafted apple tree, and a basket of Sweet Banana and Chocolate peppers.
A fresh salad, straight from the garden, is so yummy and good for you! The fresher the ingredients, the higher the nutrient levels, and you can't beat just-picked! Last night I made this salad with ingredients from my garden: This particular salad is based on mixed baby salad greens, and has parsley, celery, cucumber, chocolate capsicum, tomatoes and nasturtium flowers in it. The ingredients for a salad will of course vary from month to month, depending on what's in the garden, but the good news is that it's possible to have fresh salads all year round, and in fact it's even easier in winter than summer as lettuces and other popular salad greens prefer the cooler weather - lettuce always bolts in summer here. For easy, instant salad greens, I grow mixed leaf lettuce as "cut and come again" greens, by simply sprinkling mixed lettuce seed thickly over a bed, and letting them grow until they are about 15cm tall, at which point I start harvesting as much as is needed at a time with a pair of scissors, cutting the plants off about an inch from their base. The plants will regrow, giving about 3 harvests before they need replacing. A quick wash, and the salad greens are ready to serve. Here's my current bed, sown on March 10th... As it is now well into autumn, and winter is not far away, a number of the items I put in the above salad will no longer be available fresh in my garden. But there are still plenty of things that grow happily in the cooler months that are great in salads. Over winter, what I will find in my garden for fresh salads include:
Leaf lettuces of all kinds Spinach NZ spinach Miner's lettuce Beet greens (beetroot leaves) Beetroot (grated raw, or bottled) Carrots and carrot greens (the latter I use in small quantities, but they pack a nutritious and tasty punch) Peas Pea shoots and flowers Broadbean leaves Parsley Cornflowers (edible garnish, though they don't have much flavour of their own) Pansies Rose petals Calendula petals (always remove the petals from the middle section, which tastes bitter) Spring onions Onion greens Celery Silverbeet Various other herbs if I wish I will also be able to add, if I wish, dried, stored or preserved foods I gathered in summer such as: Garlic Onions Dried onion greens or spring onions Dried or bottled tomatoes Pickled cucumber Yacon Potatoes Sweetcorn I might also add some "wild herbs" (aka edible weeds) - the common edible ones in my garden include: Dock Dandelion Purslane Plantain Chickweed Fat hen (aka chickweed) I will also do some sprouting in my kitchen, and add sprouts to the salads, for extra nutrition. Including such as: Wheat grass (simply sprouted wheat, with the green part harvested with scissors) Alfalfa sprouts Pea sprouts Mung bean sprouts and whatever else catches my fancy to try It's wonderful to be able to go out into the garden with a bowl, and come back with the makings of a fresh salad! We all know we should eat more raw food, and a hearty salad with lots of variety in it is a great way to do so. What is in your garden that will provide you with salad over winter? It's not too late to plant most of the above items, or too take a fresh look at the things already growing you maybe had never considered adding to a salad before. Another tip to keep in mind - the closer to the kitchen you grow your salad veges and herbs, the more likely it is that you'll actually go out there and pick and use them regularly. So don't put your baby leaf lettuce bed at the far end of the garden - put it as close to the garden as possible! In winter time, leaf lettuce also do very well in tubs, baths or other containers, and in fact most salad ingredients are best picked small and fresh, so can nearly all be grown happily in containers of one sort or another. So whether you have a large or small garden, or no garden at all, there is no reason why you can't grow your own winter salads! Start with a bed or container, filled with suitable growing medium, lightly sprinkled with leaf lettuce seed, finger-rake the seed in, water, and wait for your lovely greens to grow! |
AuthorThis page is my blog formerly known as Kiwi Urban Homestead. Archives
February 2016
Categories
All
|