Thrifty Kiwi
Like our Facebook page
  • Home
  • Blog
  • Homesteading
  • Gardening
    • 2025 Garden
    • 2021 Garden Blog
    • 2019-2020 Garden Blog
    • 2017-2018 Garden Blog
    • 2016-2017 Garden Blog
    • Kiwi Urban Homestead 2013-2015 Garden Blog
    • Pest & Diseases
  • Recipes
    • Autoimmune Protocol
    • Meals and Snacks
    • Preserving
    • Household Cleaners
    • Health & Beauty
  • Skills
    • Menu Planning & Grocery Shopping
    • Money & Budgeting
    • Preserving How-Tos
    • Housekeeping
    • DIY
    • How to Find Stuff Free or Cheap
  • Animals
    • Critter Blog
  • About
  • Contact

Preserving Quince

23/4/2013

0 Comments

 
Picture
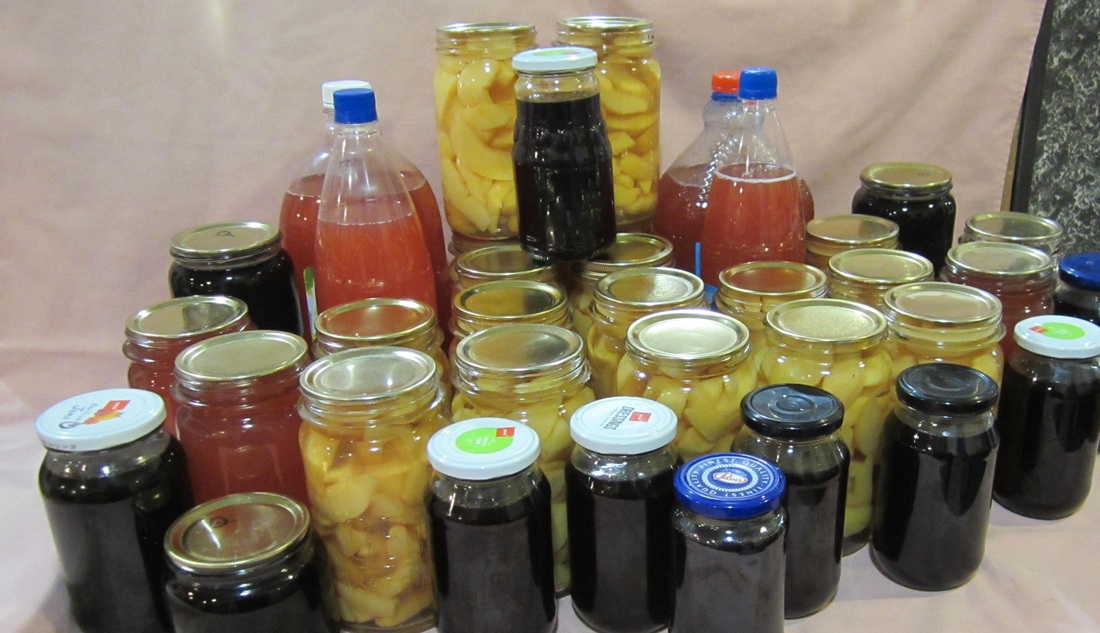
This year we were blessed with an abundance of Quince. Quince is an old-fashioned fruit, a relative of the pear, but with hard, astringent flesh that must be cooked to be edible. It is naturally very high in pectin, and in days gone by, every garden held a quince tree, and the farmer's wife used it to help set her jams and jellies, as well as for preserving of all kinds.

This year, I used the quince to make quince jelly (last year I made jam), bottled slices in syrup for later baking, and also dehydrated the pulp, intending to make a fruit leather, but it turned out more like chips. When I ran out of time, but still needed to get the final box of quince processed (after I'd given away umpteen boxes!) I boiled up the last of the quince and bottled or froze the resulting liquid to be later made into jelly.

Recipes and instructions are below...

Quince Jelly

Quince jelly is quite simple to make, and the steps can be done in stages if desired, so the process does not have to be completed all at once. Quince is pretty much never-fail for jams or jelly, as it's high pectin content means it sets easily. Quantities don't matter until you get to the step of adding the sugar. Use what fruit you have, and that part will work itself out.
Picture
Step One
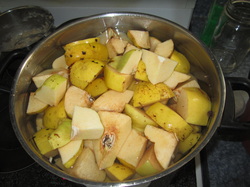
Wash the quince to remove the fuzzy coating. Chop whole fruit into relatively even size chunks. There is no need to peel or core, though if you are planning to keep the pulp for dehydrating, you may wish to do so.

Place in a pot and cover with water.

Picture
Step Two
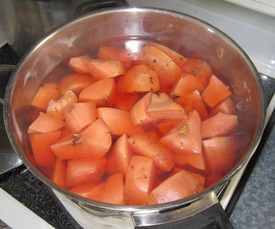
Cover pot, bring to boil, then simmer until fruit is tender, approx 1 hour, by which time it will have changed to a rosy colour - quince changes colour when cooked for prolonged periods.
Set aside to cool.

Step Three
Using a potato masher, mash the quince up in the pot of water as much as you can.

Picture
Step Four
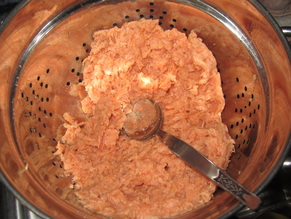
As with all jellies, the part you are after is the liquid from cooking the fruit. Usually you strain the contents of the pot through a cheesecloth, keeping the liquid. In practice, with quince I found it was easier to "roughly strain" the mixture through a metal colander first, removing most of the fruit pulp, and then strain the resulting liquid through a cheesecloth to remove any remaining pulp. IMPORTANT: do NOT squeeze the cheesecloth if you want the jelly to have a nice, clear look to it without cloudiness.
The photo above shows the pulp left in the colander, which I dehydrated (see separate instructions below).

Picture
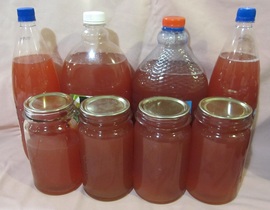
Optional:  If for any reason you are unable, or do not want to, proceed to making the jelly at this point, then the liquid may be refrigerated overnight, or poured into bottles and frozen for later use. It may also be preserved by bringing it to the boil, then pouring into hot, sterile jars and sealing. If you choose to freeze it, leave the top part of the plastic bottle empty, then squeeze out some of the air before screwing on the lid. This will allow for the expansion of the liquid as it freezes.

Picture
Step Five - making the jelly
1. Measure the volume of the liquid you are working with, and pour it into a large, heavy pot. For every litre (4 cups) of liquid, add 4-5 cups of sugar. Using less sugar will not change the sweetness of the final result - the jelly will set when it reaches a certain temperature, at which point its sugar content will be 65% or so - adding less sugar simply means you will have to boil it longer.

2. Bring the pot to the boil, then boil it uncovered until setting point is reached, stirring frequently to avoid burning. How long this takes will vary depending on conditions. Some recipes claim as little as 10 mins, but I've always found it takes about an hour (though I work in large quantities, which may have something to do with it).

Setting point is reached when a dribble of jelly dropped onto a cold plate goes wrinkly when touched and stays in one place.

3. While the jelly is boiling, prepare your jars - wash them, rinse out, place in a cold oven, then turn the oven on to 100C and sterilise for 30 mins. Keep the jars hot until you are ready to fill with jelly. Also boil lids or seals and rings in a pot of water for a few minutes before using.

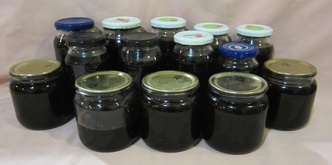
4. When the jelly is ready, fill the jars. I stand the jars on newspaper on top of a wooden chopping board, one at a time straight from the oven, as close to the pot as possible and ladle in the jelly, leaving an inch headspace before sealing with a lid or seal. A bottling funnel is a great help to getting it all in the jar rather than down the sides. I made my own by cutting out around the stem of a spare large funnel - it sits in the top of the jar and directs my preserves in the right direction. Set the jars aside to cool.

Bottled Quince

Picture
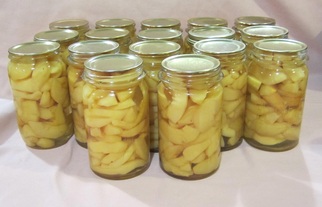
I bottle quince using the same overflow method I use for most fruit. It is described in detail HERE.

For quince, the fruit is washed, peeled, cored and sliced, then kept in a large bowl of water until I'm ready to process it. Don't worry if it browns a little - it turns white again when you cook it.

I heat a pot with a small amount of plain water in it, to which I then add a drained colander full of fruit at a time to cook before spooning into jars with a slotted spoon.

A separate pot contains the boiling syrup solution, which is ladled into the jars over the fruit. Quince needs a reasonably strong syrup - I use approximately 1 cup sugar to 4 cups water.

Bottled quince can be used as a preserved fruit on cereal or in baking. Our favourite use is to combine it with apples and make a fruit crumble.

Dehydrated Quince Pulp/Leather/Chips

Picture
I loathe waste! When making jelly, it seems a shame to throw out all the pulp (though the chickens appreciate it!). It occurred to me perhaps I could dehydrate it to make a fruit leather for snacks.


Picture
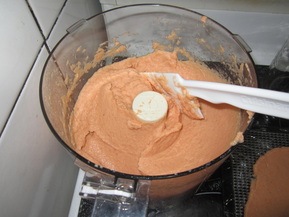
After straining the fruit pulp out of the liquid, from a batch which I had peeled and cored especially, I processed the pulp in a food processor to make it smooth. Lacking Tefal sheets for my dehydrator, I covered the racks with cling wrap, then smoothed the pulp out on them.
After dehydrating overnight, the "leather" was dry enough to remove from the cling wrap and finish drying on the mesh trays.

Picture
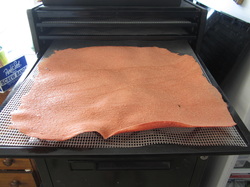
The resulting product was crisp rather than leathery, so I broke it into "chips" and sealed in bags. The kids eat it as a snack.

0 Comments

The Green Bean Experiment - Does Planting by the Moon Make a Difference? Is it OK for a Christian to use Moon Planting Guides?

6/4/2013

0 Comments

 
Picture
When I first began thinking about growing food this season, I was seeing quite a lot of mention of gardening by the moon in magazines and on the internet. Now, I'm not into astrology etc - in fact due to my Christian beliefs I avoid anything that leans in the direction of astrology or witchcraft, divination etc. Over the years I've tended to ignore "planting by the moon" ideas, subconsciously writing them off as at least "a bit weird."

But then I got to thinking...What IS planting by the moon really all about? Is it science or fantasy? Good or evil?Commonsense or nonsense?

Now, there are some folk who add the whole moon-planting idea to their own various beliefs and leanings and then talk about goddesses and so forth in the same breath. But just because some folk use a tool in a certain way does not mean that that is the only way it can be used.

So what is moon-planting? It is the idea that the cycles of the moon affect the sap and growth of plants in much the same way as it affects the tides of the sea, and that being aware of those cycles, one can recognise that there are certain times in the cycle which are best for planting different things, and other times when it's best not to plant at all.

Now, I doubt there is any educated person on earth who would dispute that the moon causes or affects the tides, right? Though no doubt at some point in history that idea was considered witchcraft.

Though it is an area of dispute still, it's widely believed that there is a correlation between lunar cycles and the behaviour or moods of humans and animals too. I know several people who work with mental health patients, and they attest that there is an obvious increase in restlessness and aggressiveness in their patients when the moon is full.

Now, if the moon can affect the water on the earth, and the behaviour of people, is it really such a stretch to think it could affect the growth of plants? If so, would this thinking be science, commonsense, or "weirdness"?

What does the Bible tell us about the moon?

Genesis 1:14 is part of a passage recording the creation of the sun and moon:

"And God said, Let there be lights in the firmament of the heaven to divide
the day from the night; and let them be for signs, and for seasons, and for
days, and years"

Psalm 104:19 "He made the moon to mark the seasons..."

Deut 33:13-14

"Blessed of the Lord be his land, for the precious
things of heaven, for the dew, and for the deep that coucheth beneath,
And for the precious fruits brought forth by the
sun, and for the precious things put forth by the moon" (Emphasis mine)

God created the moon to be seen at night, and the movements of the moon, along with that of the sun, show us the seasons, the days and the years. This is simple fact - time can be measured by the passage of both sun and moon. In Deuteronomy, the passage quoted above is part of Moses' blessing on Joseph and his descendants, that his land may be blessed with rain from heaven, water from below, precious fruit which the sun causes to grow, and precious things that are brought forth by the moon! Within this is a simple reflection of the fact that both the sun and moon affect the growth of vegetation and ultimately the crops they produce.

We all know our plants need sufficient sun to grow and produce crops. We know that different things grow  better at different times of year, due to the rotation of the earth in relation to the sun and so the differing lengths and strengths of daylight. Any reasonable gardener knows that to ignore the sun and seasons when planning and planting their garden is folly. Why, therefore, should we not accept that the moon also has a physical effect on the natural world, and use that knowledge to our advantage?

Now, before I really had worked my way through all of the above thinking, I decided to conduct an experiment to see if planting by the moon made any difference to the end results, or not. I devised and carried out "The Green Bean Experiment."

I took one of my raised garden beds, 2m x1m, and divided it down the length with a string. I planted one side (the left) with dwarf green bean seeds during the first week of December 2012, when the moon planting guide said I should NOT be planting anything. I sowed the other side from the same seed packet on Dec 17th, when it was supposed to be the right time to do so. Both sides sprouted, both sides grew. Was there any difference?

Well, it turned out there were a number of differences! The photo above was taken on Jan 16th. Before I go on, please note that I had later filled some gaps in the bed, especially near the front and to the left, with some yellow dwarf bean seedlings I was given by a friend. Those plants/beans aren't counted in these results. The differences between the two rows:
1) Germination - I planted the same number of seeds on each side. Row 1 had 9 plants grow, Row 2 had 14.
2) Size and strength - the plants in Row 2 appeared taller and more vigorous, but on closer examination I found this was mostly because the plants in the first row did not grow up straight, but were mostly leaning over, collapsed on the soil. The plants in the second row were stronger and straighter.
3) Production - I harvested and weighed the beans from each row separately. At the time of posting this, Row 1 has yielded 1.962 kgs of beans, and Row 2 has yielded 2.508 kgs of beans (though planted later so slightly behind in age/production time)

I concluded that planting according to the cycle of the moon DOES make a difference. Now, one of the reasons for not planting at the "wrong" time, is that plants put in then tend to bolt to seed. With things such as beans, where it's the seed pods you're harvesting, this hardly seems like much of a problem, but germination, size and vigour are all good reasons to use the guides as a helpful tool. I also started to take more note of the difference in my sweetcorn patches and when they were each planted in relation to the moon calendar - for info on that, see
HERE.

So, where does one find a good moon planting guide? There are several available, but my favourite is from New Zealand Gardener's website - you can download and print the guide; I keep it in the front of my garden diary. This one works as a wheel - each month you turn it so the symbol lines up with the date of the new moon, and it shows you what dates are best for planting root crops, above ground crops, or concentrating on non-planting chores. I find it's also helpful to have something that helps me plant my month like this, so I keep moving along with all the different types of garden chores, rather than focussing on one and neglecting the rest. You can download the chart
HERE.

Speaking of New Zealand Gardener magazine, if you're a Kiwi, you can subscribe to their magazine (and several other inspirational publications) by using Flybuys points - 320 pts gets you a year's worth of mags. They have a lot of useful ideas and tips.


0 Comments

Really Radish Relish

6/4/2013

0 Comments

 
Picture
When I was sowing carrot seeds in January, I decided to try a tip I had read - to mix a few radish seeds in with the carrot seeds, because carrot is slow to germinate whereas radish grows quickly - this would mark the location of the carrot seeds until they came up. Good idea - I thought.

Turns out that I, ahem, mixed a few too many radish seeds in. They grew quickly and well. Radish, after all, are one of the easiest things to grow. Unfortunately, my husband is the only one who likes to eat radish, and even he couldn't eat 4.5 kgs of radishes in a short period of time!

I have to admit though, they sure are pretty!

Anyway, not being one to waste homegrown food, even if it's not something I personally like, I began hunting around for some ideas of what to do with a bunch of radish. I finally decided on a Radish Relish recipe I found
HERE.

Turns out it's pretty yummy, even to a radish-hater like me!

I did a couple of things different than the recipe - first I roughly chopped the radishes, onions and celery, then I put them through the food processor to chop them more finely. When that was done, they looked like this:

Picture
And then, after mixing it with the rest of the ingredients and allowing it to stand for the required 3 hours, I brought it all to the boil, cooked it for 10 mins, then simply bottled it into hot sterile jars and sealed. Mine turned out a little darker and drier looking than the photo on the recipe page, but it works fine.

Oh, and by the way, the leaves of radish plants are a good salad addition.
0 Comments

Broad-leafed Plantain - incredible on bites or stings!

6/4/2013

0 Comments

 
Picture
Back in January, I read an article on the net about how wonderful broad-leafed Plantain is on beestings, as well as insect bites. As myself and all my daughters are allergic to beestings, I mentally filed that away for future reference.

Later, my daughter complained of itching from a nasty bug bite. I told her to go get some plantain, chew it up, and put it on the bite. She did so - complained it tasted bad, but commented that it really worked! Later she was babysitting for a friend, and their young children had several annoying mozzie bites. She told the kids about plantain, helped them identify and apply some leaves. Those children were so delighted that they've been pointing out the plant to their mother on their walks to school ever since.

A couple of weeks after I had read about plantain, I was working in my garden when I inadvertently leaned the handle of a tool against a paper wasp nest on a wall. A wasp flew out and attacked me with repeated stings on my forearm before I managed to get rid of it. Boy, did it HURT! Most painful stings I can ever remember.

My allergy is such that a sting on my hand would normally result in a huge amount of swelling to my hand, arm, shoulder, neck and chest. It renders the limb basically unusable for a time. I can control it with anti-histamines, but even with them there will be some swelling, and quite a lot of pain for several days. I usually have to take anti-histamines for 7-10 days after the sting, otherwise as soon as I stop I swell up.

On this occasion, on my way back to the house I did a quick walk around the garden and gathered a good handful of broad-leafed plantain leaves. Fortunately, it grows around here like a, well, weed. Reaching the kitchen, I rinsed the leaves, then chewed them up well (chewing releases the properties, and something about the action of saliva seems to make it particularly potent, though if you can't stand chewing them, you can grind them up with a mortar and pestle). I globbed the chewed up leaves onto the stings, and held them there for about 10 mins before rinsing my arm. Personally, I didn't think they tasted bad at all - just a little bit grassy.

The first noticeable thing was that the horrendous pain completely disappeared very, very quickly - within a minute or two.

I took anti-histamines anyway, as a precaution (having my right arm out of action for a week was NOT appealing!). I took another on Day 2, but a couple of days after that I realised I'd completely forgotten to keep taking them, and there was no swelling whatsoever! A couple of hours after the sting happened, there was limited localised puffiness and redness, but by the morning, the puffiness was gone. The redness lasted a few days, but it was not at all sore.

I was totally WOWED by the results!

Not long after that, a friend mentioned on Facebook that she had had a bumblebee fall into her boot and sting her on the foot, and now, 3 days later, her foot was continuing to swell more and more and hurt a lot. She was taking antihistamines, but to no apparent effect. I told her about Plantain, and suggested that even though a couple of days had gone past, it might still help with the pain and itching. She applied some, and then commented that the pain and itching had gone, and the swelling was going down. She was thrilled!

Broad-leafed plantain is a very common lawn weed in New Zealand. It grows everywhere in our paddocks too, and I notice it's particularly prolific in the damper spots - lower lying, or closer to some shade or water. It's easy to identify - the leaves grow out in a rosette shape close to the ground, and have a distinctive stem to tip ribbed effect. The dully-colored flower spikes grow on stems that stand up above the plant.

Another plantain is common here too - narrow leafed plantain. This also has healing properties, but the broad-leafed one is reputed to be most effective for stings.

In late February, I was weeding an area where there was quite a lot of broad-leafed plantain growing. Rather than waste it, I brought quite a lot inside, washed it and chopped it up, then filled a jar with it, and then poured olive oil in until the jar was full. It's been infusing ever since - I shake it up every now and then. Soon I will strain out the leaves, and mix the infused oil with beeswax to make a useful ointment for bites and skin irritation. The fresh plant is the most effective, but an ointment is also handy. I've already dipped my finger in the oil several times to apply it to bites on the kids arms or legs.

All the plantains have many incredible healing properties. Here's an amazing video that everyone should watch - it tells you simply and effectively how to use plantain to treat bites, stings, stinging nettle, skin ulcers and infections, as an antiseptic, to draw out pus and infection, to treat coughs, colds, allergies (such as hayfever), for digestive disorders, as a source of Vitamin B1 and more!


0 Comments

Garden Photos 1st April 2013

5/4/2013

0 Comments

 
Wow - the months are flying by! In early March, I sprained my ankle very badly, and for several days couldn't get outside at all. The rest of the month has involved moving slowly. Even now, almost a month later, there is still pain and swelling (yes it was xrayed, no it wasn't broken). I guess I just haven't taken time to rest as much as I should. But then it's harvest and preserving time - and also a busy month of visitors, weddings and more. We finally got some rain from 17-19th March - the first since early Feb. Everything immediately greened up and grew (especially the weeds!) Haven't had time yet for mowing or weedeatering (my ankle isn't up to it yet anyhow), so these pics are very "in the raw." But hey, I'm a real person with a busy life - this blog is about being honest that I, and my garden, are not "perfect" but still productive.
Picture
The Yacons outside my bathroom seem to be growing well. I planted some calendula seedlings in front of them. I've had a real problem with the dogs digging in the right hand end of the bed, and they'd started to get right in around the roots of the right hand plant. So before we went away for Easter, I had my son empty a bag of pinecones over that end of the bed as I'd seen a picture of a garden bed where the pinecones were used as much to keep dogs off beds. It's worked a treat - no more digging! I really must get in under that plant with a bucket of soil and sawdust though, to cover back up the partially exposed roots. My friend who gave me these plants is very excited to see what they produce, and has made me promise she can be present when I did them up.

Picture
The corn is in full flower and the cobs are swelling! Everyone is examining the cobs and licking their lips in anticipation of the first sweetcorn dripping in butter. While the middle bed remains the biggest and strongest, the second bed looks almost as tall now it's flowering, while the third is still obviously stunted in size by comparison. For more details on my corn experiment, see HERE.

Picture
My daughter's flower bed is still doing pretty well, though the flowers are fading a bit. I really must plant way more flowers in the garden, for the sake of the bumblebees who've done most of my pollinating, if nothing else! It's so easy to concentrate on food crops, but the flowers are very much needed too.

Picture
My tomato plants have been very vigorous - if I turn my back for a day or too, they're shooting out more strong laterals. This pic was taken just after I pruned and tied them once again. The stakes I have used were way too short, but I couldn't afford big ones when I planted these, so used what I had. This photo doesn't really show their size well.

Picture
Some of the tomatoes at the back of the patch. The nights are getting colder - I'm thinking I should quickly figure out a way to cover the patch and extend the growing season or frosts will be upon us before I get any tomatoes. Yes, I could do some things with green tomatoes, but I really do prefer my 'matas red!

Picture
These are my main garden beds. You may have noticed if you've looked at the Feb garden photos, that 5 of these beds are brand new! The frames for them were made by my husband last year, according to my design, but they've been stacked up out of the way. Now they're down and in the process of being filled with a mixture of sawdust/calf manure (got free by my son) and compost, and planting. Here's the part I'm really excited about - you'll notice that three of the beds have frames over them, and one has a cover on the frame. White cabbage butterfly is an extreme menace here - if I plant any brassicas they are instantly vigorously attacked. But, I needed to get them planted for winter veges before it gets too cold for any real growth. So I came up with a plan...after drawing various options and pricing them, my husband and I decided to make hoops from cheap 100mm steel rod, supported by stakes of rough-sawn 2x2, then cover with netting or whatever we can get our hands on cheap. The one that is covered so far, has a cover made from various net curtains I found by scouring op shops, and sewing them together. It won't last forever, but sufficient shadecloth is out of our budget reach right now, and it's enabled me to get planting. The hoop frames reach 1.5m high - seems like a lot, but in discussion with a mega-vege-growing neighbour, this was decided on because brussel sprouts, broccoli etc can easily reach over a metre high.

An update on the four original raised beds at the back of this photo:
1) Still filled with berry canes - need pruning and moving to the new berry cage I'm hoping we can build soon.
2) Full of kumera vines, plus a couple of leafing lettuce, and the kale I cut the tops off of have grown back vigorously. I'll cut them again as soon as the butterflies die out for the winter, and then let them regrow.
3) Carrots are doing really well!
4) Dwarf beans are still producing, though tops of the plants are dying off. For details on the competition between the experimental rows planted with and against the moon calendar, see HERE.

The 8 newer garden beds:
1) Back half is planted with peas, which are coming to an end. The chives I popped in there are doing well! The front is planted with freckle lettuce, much of which is starting to go to seed (it's heirloom, so I'm going to let some of it seed and save the seeds) and a row of yellow dwarf beans which are still producing vigorously
2) The maori corn I planted far too late is starting to flower - if it produces anything I'll probably use some for tasting, and keep the rest for seed for next year. With the corn are also peas which are doing pretty well, and in the front half are more carrots, which are growing well.
3) The beetroot that was in here has all been harvested. There remains a few silverbeet plants, a couple of leeks and a small tomato, all of which were left-over seedlings I shoved in there for want of anywhere else. This is now a bed with a frame over it, so I may either just use the silverbeet, or move it, so I can fill this bed with brassicas
4) The covered bed - planted in brassicas - see below.
5) Has hoops and has been laid out for square-foot planting of brassicss, but not yet planted due to lack of a cover. Meanwhile the brassica seedlings intended for this and the other not-yet-covered bed have been potted up and kept under protection so they can keep growing until I can plant them either with covers, or after the butterflies have died out.
6) Fully planted in beetroot last Friday night, half of it by torchlight before we left for a wedding out of town Sat morning.
7) Partly planted in leek seedlings by my friend who was housesitting for the weekend. Will plant more leeks and some onions in here.
8) Still waiting for last of compost etc to be added. Will probably plant in garlic.

Picture
When I first started planting the brassicas in here, according to normal spacing recommendations, my husband was watching and let out a big sigh "All that work for a dozen plants." That night I thought about it some more, and decided to use the square foot method as it lets me fit more plants in, and gives me a better planting guide. So I got out with a ball of cotton yarn, a ruler and gun stapler, and laid out a grid over the bed. I then moved a few of the already planted seedlings and added some more. Looking at this photo, the row on the right is brussel sprouts, the next one is broccoli, the next is white cauliflower in this half and purple cauli in the back half, and the left hand row is buk choy (Asian cabbage), which can be planted 4 to a square.

We're actually planning to add two more hoops in between the three already up, but time for planting was running out and this needed done.

Picture
Another pic of the covered bed, and the one next to it waiting for covers. Looks a bit like a covered wagon, huh?

Picture
I won this wee seed-raising house thing last year in a garden competition - it had a plastic zippered cover. But the plastic broke down quickly in the sun, and besides, it tended to get way too hot in there in summer. I've kept the frame and shelves and use it for seedlings - when I moved my brassicas here, I found a net curtain at the op-shop that had two layers - I cut the seam open at the bottom and it slipped over the frame like a big netting pillow case. TAKE THAT you nasty white butterflies! In there right now are trays on the top shelf with leafing lettuce, celery and leek seedlings, and the other shelves are filled with potted-up broccoli, cabbage and brussel sprouts.

Picture
I used these plastic boxes to start the brassica etc seeds in trays, but with it being summer, they were sometimes getting a bit hot. Because I was going to a conference earlier in March, and not wanting my kids to forget to let the heat out of them (and not being able to leave the lids off due to those butterflies) I moved the trays to the shelves pictured above. But once I potted them all up, there wasn't enough room on the shelves - so the bins are now filled with pots of cauliflower and buk choy, and tucked right under the grapevine where it's cooler for now. They're like self-contained mini-greenhouses. Now I have found some more net curtains, I'll soon replace the lids with filled netting covers and then I can move them back out into the sun.

Picture
The "herb garden" is growing steadily, though pretty overrun with the run-away tomato plants at the back, tangled with the pumpkin vine that decided to grow up the fence, both of which are completely shading a cucumber vine, and a passionfruit vine. Ah well, a lot of those will be gone soon. The parsley is doing well, and the oregano, thyme and lemon balm is growing steadily. My baby lemon and lime trees are looking good too. 

Picture
The comfrey continues to get bigger and bigger. I wonder if it's presence will deter the codling moth that likes to attack the apples. We lived on an organic property once that had a huge orchard  - there was comfrey growing under most of the trees, and no codling moth. I don't know if that was coincidence or not.....

Picture
My pumpkin vines suddenly developed a bad case of powdery mildew, after we started getting heavy dew. I did lots of reading online - most sites said it would affect the taste and keep-ability of the pumpkins, and to treat by removing the worst affected leaves and spraying the rest with a mixture of neem and baking soda etc. I did that (practically denuding my other patch in the chicken pen), but afterwards friends told me they get this every year towards the end of the season, and it doesn't seem to make any difference, so they don't treat it. Sigh. Well, the spray doesn't seem to have made much difference, so we'll see how the fruit turn out - some of them are certainly getting pretty big!

Picture
Picture
The zucchini's are still flowering and producing well - though the plants are starting to look a bit tired. I really need to pick more again though - some are getting pretty big. But knowing we were going away over Easter, I figured it was better to leave them on the plant where they may get big but would remain fresh, then pick them and have them break down before I could do anything with them. We've had over 82 kgs of zucchini so far this year, from a total of 16 plants. Plenty to eat fresh, make pickle, dehydrate, give away, and freeze. Wow, imagine if I'd planted them in spring, instead of at Christmas?!

Picture
The orangeberries are growing slowly. I wonder how many years it will before I get fruit from them?

Picture
The lettuce and silverbeet I planted behind the zucchini are finally getting some growth, despite all the onslaughts from chickens who come looking for breakfast first thing in the morning, and find this patch first.

Picture
Carrots are getting bigger - I really need to get in under them and add some more mulch as the tops are sticking out. Sweet juicy carrots from your own garden - hard to beat! Did you know the carrot greens taste a lot like carrot too, and are even higher in nutrients than the carrot themselves? Can be eaten raw, steamed, added to stir-fries, or dried and used as a herb or to make tea.

Carrots can be left in the ground over winter and pulled as needed. Frosts just make them sweeter.

Picture
The small patch of pumpkins in the front yard which were planted way late with seedlings given to me by a friend have small fruit on them. Not sure how big they'll get. Actually, these pumpkins have an odd mixture of colors and shapes - I have a feeling the seed they were raised from came from pumpkins that had been cross-pollinated. I'm glad I'm wasn't relying on seedlings from this batch for my main pumpkin crop.

Picture
The flowers of zucchini and pumpkin are large and beautiful - very attractive to bees, and also edible. They are a delicacy in some places, and popular at markets apparently. I didn't pick any to eat this year - I was too keen on leaving them for the bees. Next year perhaps I'll make more of a point of picking some of the excess male flowers and try them dipped in batter and fried.
0 Comments

March Garden Harvest

5/4/2013

0 Comments

 
Picture
In March we harvested a whopping 274.764 kg of fruit and veges from our homestead! That brings our year-to-date total to 338.149 kgs! March's harvest included:

259g berries
41.35 kg zucchini
2.398 kg Dwarf green beans
974 g Dwarf yellow beans
1.1 kg peas
63 g herbs
300g freckle lettuce
3.632 kg pears
810g baby carrots
2.054 kg pumpkin (one I accidentally cut from the vine)
5.874 kg beetroot
215.396 kgs Quince! There is an old quince tree here, and each year we get some fruit from it. But this year, it apparently loved the drought and produced a mega-crop! Is it cheating to include this in our totals? I don't think so - others I know who are going for a weight goal in produce include fruit from their trees. We don't really have fruit trees that produce well, except for this quince. I have a feeling we'll reach out target even without it's fruit, but it's a nice boost early in the year. What am I going to do with all that quince? There will be a separate post about that soon, in Preserving the Harvest category.

0 Comments

    Author

    This page is my blog formerly known as Kiwi Urban Homestead.

    I'm a Kiwi homeschooling mother of 5 living in a small town. After growing 1000 kg of produce in my back yard in 2013, I'm now expanding my edible gardens even further.

    Archives

    February 2016
    December 2015
    October 2015
    September 2015
    June 2015
    May 2015
    April 2015
    March 2015
    February 2015
    January 2015
    December 2014
    November 2014
    October 2014
    September 2014
    August 2014
    April 2014
    February 2014
    December 2013
    November 2013
    October 2013
    September 2013
    August 2013
    July 2013
    June 2013
    May 2013
    April 2013
    March 2013
    February 2013
    January 2013
    December 2012

    Categories

    All
    Bees
    Butchering
    Chickens
    Compost
    Corn
    Diy Projects
    Events
    Everything Else
    Firewood
    Freebies
    Frugal Fortnight
    Garden Diary
    Getting Started
    Greenhouse
    Harvest
    Harvest Totals
    Health
    Herbs
    Home Made Cleaners
    Homesteading Skills
    Jungle Taming
    Livestock
    Media
    Monthly Garden Pics
    Moon Planting
    Musings
    Pests And Diseases
    Planting
    Preserving The Harvest
    Recipes
    Salads
    Soil Improvement
    Specific Crops
    Tomatoes
    Weekly Round Up
    Worms
    Yates Vegie Challenge
    Zucchini

    RSS Feed

Powered by Create your own unique website with customizable templates.