Thrifty Kiwi
Like our Facebook page
  • Home
  • Blog
  • Homesteading
  • Gardening
    • 2021 Garden Blog
    • 2019-2020 Garden Blog
    • 2017-2018 Garden Blog
    • 2016-2017 Garden Blog
    • Kiwi Urban Homestead 2013-2015 Garden Blog
    • Pest & Diseases
  • Recipes
    • Autoimmune Protocol
    • Meals and Snacks
    • Preserving
    • Household Cleaners
    • Health & Beauty
  • Skills
    • Menu Planning & Grocery Shopping
    • Money & Budgeting
    • Preserving How-Tos
    • Housekeeping
    • DIY
    • How to Find Stuff Free or Cheap
  • Animals
    • Critter Blog
  • About
  • Contact

The Great Tomato Experiment - Summer 2014/2015

6/9/2015

3 Comments

 
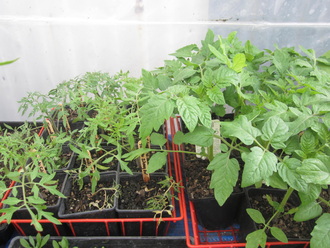
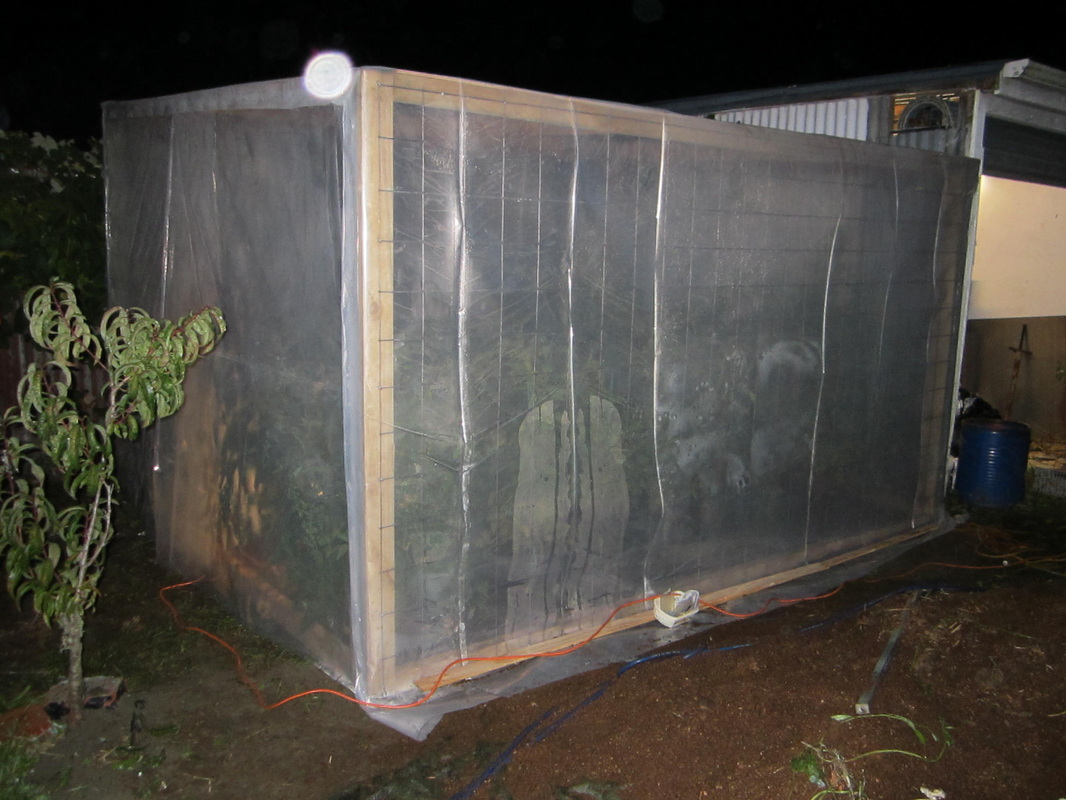
Last summer I decided to conduct an experiment in my greenhouse, to see which varieties of tomatoes would grow and produce best, and in which of 5 growing mediums, in response to lively discussion on a Facebook group I am part of. I carried out the experiment, but was rather remiss about actually publishing the results, so here I will link each of the YouTube videos, plus add the results and my comments, so it's all in one place. If you are just after the results, scroll down.

So, first, this video explains the experiment and set up (why You Tube insists on using the sheep for the thumbnail....??):
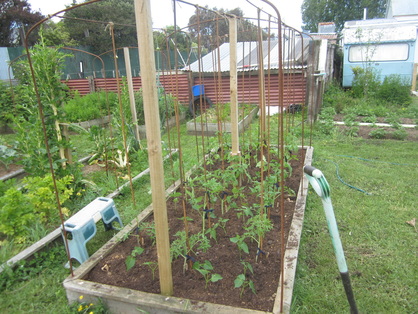
On November 26th I made a video update, in which I commented that there was already some signs of plants in some mediums doing better than others.....
I actually ended up sending an email to the company that produces the potting mix and compost, and as a result had a visit from one of their regional managers, who was interested to see what was going on. By the time he visited, the plants which were in the compost, which had initially done much better, were slowing down somewhat, and the plants in the potting mix, which seemed to have deficiencies at first, were doing much better. This is logical when you think about it - the compost provided initial burst of nutrition, which then got used up, while the potting mix contains slow-release fertilizers, which took a while to kick in.

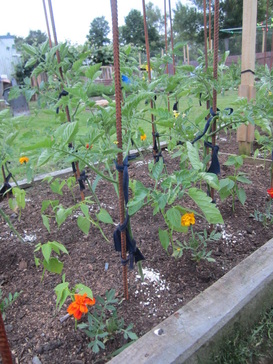
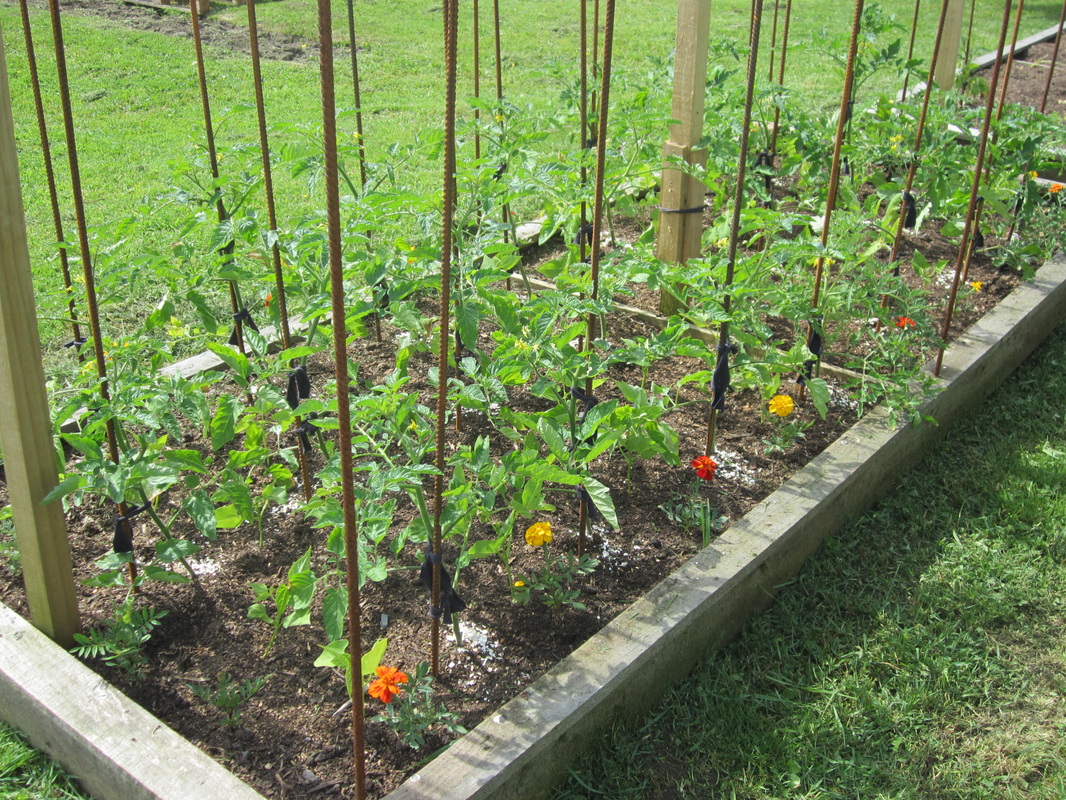
However, as the summer heat kicked in, and humidity in the greenhouse rose, the plants all got blight. Despite this, many of them continued to produce well. I shot two more videos, which I have combined into one you-tube clip: updates from 1st February 2015 and March 16th 2015.....
A note regarding feeding the plants - initially I started off feeding the plants with fish suspension liquid, and then later some worm tea and/or Seasol. Anytime I fed them, I fed all of them the same. However I did not continue this regime for terribly long - getting too busy with other things. Obviously, if I had consistently fed the plants, they would likely have produced more than they did. But either way, they all got the same treatment, so for purposes of comparing growing mediums and varieties, there are still things we can learn from this very unscientific experiment.

Tomato Experiment Results

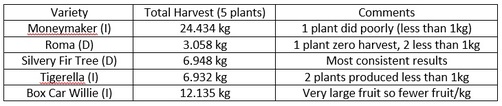
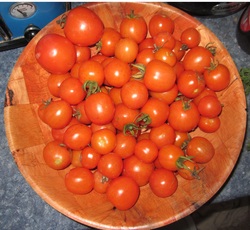
The main results I was looking for were actual tomatoes produced. So, as I picked each time, I weighed the resulting fruits and wrote them down under the # of each bucket, and at the end collated the results.

I'm going to group the results two ways - first by variety, and then by growing medium. Weights given are in kilos, and are the total harvested weight from the given plant in that bucket. The easiest way for me to do this is to create tables in Word then import them as images - apologies if they are a bit fuzzy.
Total harvest by variety.
(I) stands for Indeterminate variety - keeps growing like a vine.
(D) stands for Determinate variety - grows into a bush, produces, then dies off.
Picture
  100% Potting Mix
Picture
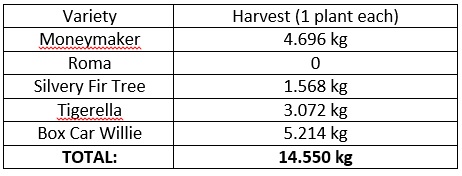
50/50 Potting Mix/Compost Mix
Picture
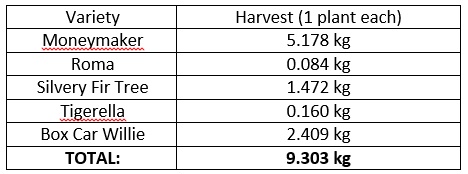
For this last set of buckets, a thin layer of topsoil was placed in the bottom of the bucket, then 1/2 the bucket was filled with fresh sheep manure, and the top 1/2 with compost.
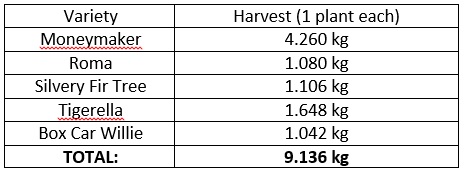
Picture
100% Compost
Picture
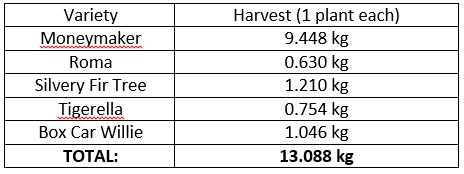
50/50 Compost/Topsoil Mix
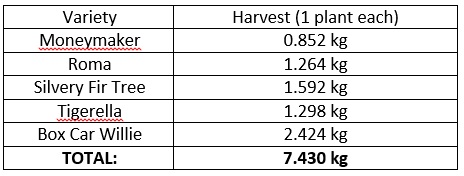
Picture

Conclusions

What conclusions do I draw from this experiment? Well, on the face of it, straight potting mix produced the most tomatoes, after a slower start, with straight compost not far behind. If the Roma in potting mix hadn't died, there might be a bigger difference.

No matter what growing medium one uses, though, consistent feeding over the life of the plant is the key to maximum returns!

Of course, one can't really draw final conclusions from this little experiment - to do that, one would need to grow more plants of the same variety in each growing medium, and have some in different conditions (eg outside as well as in the greenhouse).

What am I taking away from this personally? I won't be growing Roma or Silvery Fir Tree varieties again. Moneymaker is a good, reliable producer, but needs proper trellising set up to support it, and regular pruning/training. I don't personally like Box Car Willie as I don't like big, beefsteak type tomatoes. I do like Tigerellas, a stripey heritage variety, but again they need good trellising.

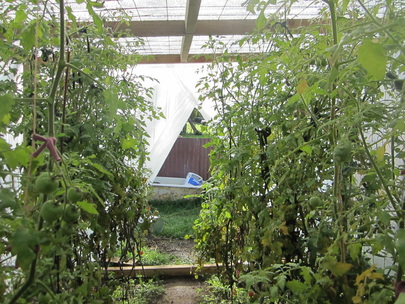
Growing in the greenhouse for some reason (possibly the very high temps at time) prevented the plants from getting infested with tomato-potato psyllid, which devastated my outdoor plants.

This summer I think I will grow just 2 Moneymakers in my greenhouse, in bigger pots filled with a quality potting mix, with better trellising and regular feeding. I will also grow some more smaller pots of determinate varieties Tiny Tim and Sub Artic Plenty. If I grow any outdoor tomatoes, they will have to be carefully covered in micro-mesh to keep out the psyllid. And maybe I'll also experiment with some other varieties. After all, where's the fun in gardening without some experimentation with new plants and/or ideas??
3 Comments

A Tomato Experiment

8/12/2014

0 Comments

 
What can I say? I have an enquiring mind! When the Vege Gardener's group I'm a part of got into a discussion recently about the best way to grow tomatoes successfully in pots, and various methods were suggested, I just had to - you guessed it - set up an experiment to see for myself! So, 25 cheap buckets, 5 growing mediums, 5 varieties of tomatoes.....Here are the first two videos - the set up, and then an update one month later. More updates in the near future, of course.
0 Comments

My Tomatoes will be Terrific! (Because I said so!)

26/11/2013

4 Comments

 
Picture
Last year I grew tomatoes. I thought I knew what I was doing, but actually I was clueless! My vines reached gigantic proportions, which shocked me. But upon reflection I realised that previously I'd only grown a couple of tomatoes, in pots. Well, technically they were my son's tomato plants, given to him by a generous friend. When he neglected them, I gave them a little attention. Turns out, two tomatoes in pots does not a tomato expert make!

But, I did learn a lot last year! I planted 38 plants in January (late, but I planted them anyway because a friend gave them to me). Another friend, viewing my baby plants all prettily tied to far-too-short stakes innocently asked "So, are you going to pinch out the laterals?" Ummmmmm.......laterals?? A little reading later, yes, pinching out laterals is a good idea. So I did. Sort of. Haphazardly. Those things grow inches every time you turn your back! One day they're so tiny they're barely there - so you figure you'll wait until next week when they're big enough to actually pinch. Next week they're the size of a small tree.....

We ended up building a plastic-house over the top of the tomato patch (that midnight adventure described HERE), and I did end up with tomatoes - I was still picking them in July. I didn't really know how to train them, so they ended up with a complex array of tying-up attempts as I struggled to keep them tidy and off the floor.

So, this year, I'm going to grow lots of tomatoes. And I'm going to diligently train them, and make them follow all the rules of good tomato plants. My tomatoes are going to be terrific. And tidy. Because I said so! LOL <Insert manically grinning emoticon>

Picture
Ok, being more serious now. Ahem. <Clears throat and assumes school-marmish demeanor>

I'm sure by this far into this blog article you're all aware I'm totally an expert tomato grower, and therefore are waiting with baited breath for me to impart all the wisdom of the great tomato oracles so you can grow terrific tomatoes too.

Well, an expert I may not be, but truth is, doing things wrong is often a great way to learn - it tends to send one to the books and real experts so you can figure out what to do better, and having that practical experience under your belt (even the messy, untidy, of dubious success type experiences) makes you better prepared to understand what they're really saying and apply it next time! (Which is why my 2013 gardening motto is "Just do it!")

So, I shall lay out for you what tomatoes I'm growing this season, how and where. And what the "rules" are.

But first, the why:

We eat a lot of tomatoes and tomato-based foods in our house. We like 'em fresh in season, and we like 'em any other way all year long. I have in the past bought a lot of tomato sauce, canned tomatoes etc, but have come to realise more and more that store-bought tomato sauces contain a lot of not-so-nice ingredients, plus they're packaged in plastic bottles. Plastic should not be in contact with food, especially acid food like tomatoes. And tin cans are lined with a plastic coating (because otherwise the food would react with the tin) which is high in BPA (one of the serious nasties of the plastic world - just look it up!). Unfortunately, non-BPA alternatives are not actually better for us. And acid foods like tomatoes cause BPA to leech into the food at a much higher rate. Fredrick Vom Saal, an expert endocrinologist at the University of Missouri, who studies the effects of BPA, will not personally eat canned tomatoes. Ever.

Besides, it's always much better, cheaper and tastier to grow your own! Despite my own ineptitude last year, I managed to harvest 35kg of tomatoes at a time of the year when they cost $10-$12/kg in the shops. Even after spending almost $300 to build the plastic house (which has since given me even more returns as a propagation house), I came out ahead. And they tasted soooooo good!

Tomatoes I'm growing this year...

Picture
Call me boring, but I like my tomatoes red. Of course there are some gorgeous looking heirloom tomatoes of many colours out there, but I'm not quite ready to try them just yet. The varieties I'm growing this year are:

*Money-maker (8 plants) - a nice all-rounder, good in sandwiches etc

*Cocktail (10 plants) - small and tasty - great for the kids and salads

*Silvery Fir Tree - a Russian heirloom (4 plants) - I've had this pack of seeds in my seed box for a while so figured out I may as well give them a go. What are they like? Red. Beyond that, I'm pretty clueless.

*Roma (48 ish plants) - a good bottling tomato, and I plan to do lots of that!

*Sweet 100 (1 plant) - because I got it cheap at a market

*Russian Red (1 plant) - because I got it cheap at the same market

*Tiny Tim (15 plants I think) - it sounded cute. And turns out it's a true dwarf, only growing about 30-40 cm high with lots of tiny wee tomatoes. Perfect to snack on in the garden or for the kids to help themselves to, so hopefully I can (mostly) keep them away from my main tomato crop.

Apart from the two market buys, all my tomatoes have been raised from seed in my plastic house. I wasn't too impressed with the silvery fir - the seedlings are a lot weaker, and I ended up discarding a number of them. All seeds were sown in accordance with the moon calendar.


The set-up

Picture
My tomatoes are being grown outdoors this year, in the main garden beds of my vege garden. I have 3 beds I'm setting aside specifically for tomatoes, and one that will be half planted in tomatoes.

To stake or not to stake - the vital tomato growing question which engenders endless debate and opinions! I spend some time thinking about that this year. I liked the idea of tomato cages, but the cost is prohibitive. You don't HAVE to stake tomatoes - you can just let them sprawl, and they reputedly produce more tomatoes that way. But it's messy, difficult to harvest, and creates a bit of a harbour for slugs and snails, which are a big problem in my garden. Using a permanent fence or trellis system to train the vines along is another option, one which I'm seriously considering for the future, but not possible in my existing beds for this year.

The other thing one needs to know about tomatoes: they come in two sorts - determinate and indeterminate. Determinate tomatoes only grow to a certain height, and then more or less stop. Roma and Tiny Tim are both determinate types. Indeterminates (most modern tomatoes) are also called "vining tomatoes" - they send out long shoots and keep growing and growing. The determinates are the ones often not staked by growers, but after some thought and research I decided that I would stake my Romas. The Tiny Tims will be the only tomatoes I don't stake this year.

I have planted one bed of tomatoes so far - in setting it up for my Moneymaker, Cocktail and Silvery Fir tomatoes, I first set up a frame-work of metal re-bar stakes, pushed quite deeply into the ground, and tied to a horizontal frame 1.5-2m above the bed. This is a good, solid set up. But it's not without price. Of course, I can re-use those stakes for a number of years (and will) and rebar is useful for so many things in the garden! But I can't afford to set up 3 beds that way this year, so for my two beds of Romas I will be creating the top horizontal framing, and then using a system of growing them up strings instead of stakes. This should work well for the Romas, especially as they are not as heavy as some of the other varieties.

Growing up strings is done by waiting until the tomatoes are about 30cm high, then pinching off the bottom two leaves. A length of twine is tied with a reef knot where the leaves were removed, and the other end is tied to an overhead support. Some sag is left in the twine. As the plant grows, the twine is twisted around the stems for support. I'll be using natural jute twine - I think it looks better, plus it can be composted at the end of the season.

My two market-whim tomatoes are each staked at the end of the extra bed, and the Tiny Tims will be planted out between them next month. These are running down the length of one half of the bed - the rest of the bed is planted in parsley and silverbeet.


Thou shalt... 10 "commandments" for growing terrific tomatoes

Picture
1. Thou shalt remove laterals. Most tomatoes do best when grown up a single main stem, which is staked or supported. A tomato plant will naturally send out many lateral shoots (one from each of the points were a leaf grows off the main stem). Pinching out the laterals keeps the plant tidier and more manageable, and keeps it's energy focussed where you want it - on forming flowers and then fruit. I won't be pinching laterals on my Tiny Tims, but will on all the others. My experience last year made me realise how essential it is to be diligent about this, so I plan to be attending to it once or twice a week without fail!

2. Thou shalt support the tomato plant. As discussed above, I'm using stakes and suspended twine to train my plants up. Regularly tying them to the stakes, or twisting the twine about them, is essential. I'll do this when I check for laterals.

3. Thou shalt remove lower leaves. Early in the process, I take off the lower leaves. You don't want any leaves drooping down and touching the ground as that can increase the chances of pests and disease. Also, keeping good airflow around the plants is important to reduce the likelihood of fungal disease. Later, as the fruits are maturing, it's also common practice to remove more leaves so that the sun reaches and ripens the tomatoes.

4. Thou shalt limit the number of trusses on each plant. A truss is a cluster of fruit (tomatoes) that grows where the set of flowers was. Many experts advise that if you limit the plant to 4 or 5 trusses, it will produce better, bigger tomatoes. If you allow it to keep setting trusses after that, they will diminish in quality and size.

5. Thou shalt pinch out the top of the plant. When the plant has set 4-5 good trusses, I will remove the top shoot to stop it growing further. That way the plant can concentrate it's energy on developing those trusses. Plus it means I'm not going to be tangled in endless lengthy vines I would need a huge scaffolding to continue training  up!

6. Thou shalt feed the plants. Tomatoes are very hungry plants, and need lots of good sustenance if they are to remain healthy and produce good fruit. Feeding begins by good soil preparation, incorporating lots of compost or aged manure. Then at planting time, I place a mixture of dolomite, gypsum, blood and bone, Neem and sheep pellets under each plant. Last year I used fish heads, chopped bananas and crushed egg shells. Tomatoes need lots of calcium - so not only did I put dolomite under the roots, I've also sprinkled crushed eggshells around the plants on top of the soil. Side dressings during the growing season of such things as blood and bone, tomato food, compost, manure teas and sulphate of potash help to keep plants strong and healthy.

7. Thou shalt supply plenty of water. Tomatoes need a lot of water, and a plant that wilts due to lack of water becomes weaker and more prone to problems. If rainfall is low, water regularly, as well as doing all you can to conserve moisture in the soil.

8. Thou shalt protect the soil. Bare soil is bad! It loses moisture and nutrients and leads to all sorts of problems. This year I'm under-planting my tomatoes to create a "living mulch" - the bed planted so far is under-planted with dwarf beans. Being a legume, they will also fix nitrogen into the soil, feeding the tomatoes. Look up tomato companion plants and select something low-growing and suitable, preferably something you can also eat as a bonus crop. I will be trying summer savory in another bed. Mulching with straw or similar is also a good way to protect the soil. One of the beds that is being prepared for my tomatoes is currently sown in buckwheat as a cover crop - shortly I will pull the buckwheat and lay it on the soil where it will serve as a mulch and soil improver. And the perfect mulch? An inch or two of good compost!

9. Thou shalt be diligent to prevent or deal with pests and diseases. I grow everything organically, so don't use any chemical sprays etc. But there are plenty of organic ways to protect your tomato crop. I'm growing marigolds around the outside of the beds, as they deter many pests. Feeding your plants and keeping good airflow helps to keep them healthy - a healthy plant is naturally disease resistant. Removing and destroying any diseased plants or plant leaves is sound practice. Encouraging beneficial insects such as parasitic wasps and ladybirds is a very good idea - providing plenty of suitable flowers and habitat in your garden is the way to do that. They will control a variety of pests such as aphids. Home-made sprays can be used. Spraying with a "compost tea" can be extremely beneficial. (For excellent info on the making and using of compost, read Mike McGrath's Book of Compost). Some growers swear by Liquid Copper painted on when laterals are removed to prevent disease. Others insert a piece of copper wire through the stem of the plant to provide protection. I shall try one or the other, or both. Last year I had a huge problem with leaf-roller caterpillars. Regularly checking for and squashing any caterpillars helps. Neem sprays are useful for this and a variety of pests (as is neem granules in the soil). Encouraging natural predators is helpful too. Slugs and snails love tomato plants - removing their habitats (hiding places) is a main weapon against them. Night-time slug/snail hunts are very helpful. I do occasionally resort to the use of a less-harmful (to pets) snail pellet such as Quash. And lastly, covering the crop with bird netting to keep the birds from eating all your hard-earned fruit is a must in my book!

10. Thou shalt encourage pollination. Good pollination means a nice full truss of tomatoes. Poor pollination means much fewer tomatoes. Tomatoes are self-fertile; they are able to pollinate themselves in the right conditions. The flowers face downwards, and pollination occurs when the pollen falls upon the stamen. Wind is what generally causes pollination in the open field, though bees are helpful. In fact, apparently the buzz of a passing bumblebee's wings is just the right frequency to cause pollen to drop and pollinate the flower. In a greenhouse situation, where there are no wind or bees, it is common practice to use an electric toothbrush to stimulate pollination. The toothbrush apparently vibrates at just the right frequency too - the vibrating shaft (brush head removed) touched to the stems of the plant on or near the flower sets does the job. I did this last year in my greenhouse, and saw an obvious increase in pollination. But in the outdoors, your main focus will be on ensuring good air flow and encouraging bees to buzz around - again, providing plenty of flowers will do the trick. If you are noticing poor pollination (eg only one or two tomatoes setting in a truss) it might be time to pull out an old electric toothbrush!

Picture
So, that's the theory. As with most food growing, time will tell! I'll keep you posted on my (hopefully) terrific tomatoes! Of course, no matter how diligent or expert one is as a gardener, some things are simply beyond our control. As any gardener knows, some years certain plants just don't do well. So in the end, all I can do is do my best, and leave the rest in the hands of God. God willing, I hope to grow terrific tomatoes this year!
4 Comments

The Purple Cauliflower Mystery

22/9/2013

0 Comments

 
Picture
This year, I've grown purple cauliflower for the first time. Purple coloured veges add some interest both to the garden and to the plate, and also veges with the redder hues to their leaves are reputed to be higher in nutrients in winter than green veges and so something we should all eat more of in the colder months (think red cabbage, purple lettuces etc).

But there is one thing I don't understand....

When I grow purple cauli, it's head is a beautiful purple colour. But when I cook it, it turns a pale green! And yet when the cooked, now pale green cauli is served on rice, it stains the rice purple!

It's a mystery to me! Any scientists out there who would care to explain?

Picture
Pictured here - a mixture of purple cauli and regular broccoli, cooked (the paler florets are the cauliflower).

0 Comments

Building a Greenhouse Over the Tomatoes - late one night!

1/5/2013

1 Comment

 
At the beginning of April, the temperatures suddenly started to get much lower at night. It seems the beginning of frosty weather was imminent. My tomatoes, which were planted very late, were growing so well - it seemed a shame to lose them! I mentioned to my husband that perhaps we should cover them with plastic or something, to see if we could keep them going a bit longer. He said something along the lines of "we need a greenhouse anyway" which got me thinking - the tomatoes were actually growing in a spot that would be pretty ideal for a small greenhouse......

On April 10th, we had a very, very light frost in the morning. THAT'S IT! I decided - off to the building supply store with a sketch and some measurements, and home with a load of supplies for a simple, quick to build greenhouse. My daughter and I began digging post holes about 5pm, shortly before my husband got home from work as it was becoming dark. "Family" said I, "We're building a greenhouse tonight, and no one is going to bed until it's done!"

So, by the light of a portable lamp, we did, indeed, build a greenhouse. The temperatures were dropping rapidly - we all had to rug up in jerseys and jackets, hats and gloves. We finished about 11pm, by which time WE were frozen. But the tomatoes were safely covered.

The funny thing is, a casual observer from a distance could have been forgiven for thinking we were working in our clandestine "weed" patch. LOL
Picture
First, a frame work of timber.

Picture
Then steel reinforcing mesh over sides and top.

Picture
Then plastic over the lot. A 4m wide roll of greenhouse plastic went up one side, over the roof, and down the other nicely. I used lighter plastic for the ends, as they're temporary - intended to be replaced with a door at the front etc later on. Meanwhile, the front is hung in two pieces which overlap when down. Simple, but it works. At 11pm my husband declared it was time for bed. Finishing touches to be added later.....

1 Comment

The Green Bean Experiment - Does Planting by the Moon Make a Difference? Is it OK for a Christian to use Moon Planting Guides?

6/4/2013

0 Comments

 
Picture
When I first began thinking about growing food this season, I was seeing quite a lot of mention of gardening by the moon in magazines and on the internet. Now, I'm not into astrology etc - in fact due to my Christian beliefs I avoid anything that leans in the direction of astrology or witchcraft, divination etc. Over the years I've tended to ignore "planting by the moon" ideas, subconsciously writing them off as at least "a bit weird."

But then I got to thinking...What IS planting by the moon really all about? Is it science or fantasy? Good or evil?Commonsense or nonsense?

Now, there are some folk who add the whole moon-planting idea to their own various beliefs and leanings and then talk about goddesses and so forth in the same breath. But just because some folk use a tool in a certain way does not mean that that is the only way it can be used.

So what is moon-planting? It is the idea that the cycles of the moon affect the sap and growth of plants in much the same way as it affects the tides of the sea, and that being aware of those cycles, one can recognise that there are certain times in the cycle which are best for planting different things, and other times when it's best not to plant at all.

Now, I doubt there is any educated person on earth who would dispute that the moon causes or affects the tides, right? Though no doubt at some point in history that idea was considered witchcraft.

Though it is an area of dispute still, it's widely believed that there is a correlation between lunar cycles and the behaviour or moods of humans and animals too. I know several people who work with mental health patients, and they attest that there is an obvious increase in restlessness and aggressiveness in their patients when the moon is full.

Now, if the moon can affect the water on the earth, and the behaviour of people, is it really such a stretch to think it could affect the growth of plants? If so, would this thinking be science, commonsense, or "weirdness"?

What does the Bible tell us about the moon?

Genesis 1:14 is part of a passage recording the creation of the sun and moon:

"And God said, Let there be lights in the firmament of the heaven to divide
the day from the night; and let them be for signs, and for seasons, and for
days, and years"

Psalm 104:19 "He made the moon to mark the seasons..."

Deut 33:13-14

"Blessed of the Lord be his land, for the precious
things of heaven, for the dew, and for the deep that coucheth beneath,
And for the precious fruits brought forth by the
sun, and for the precious things put forth by the moon" (Emphasis mine)

God created the moon to be seen at night, and the movements of the moon, along with that of the sun, show us the seasons, the days and the years. This is simple fact - time can be measured by the passage of both sun and moon. In Deuteronomy, the passage quoted above is part of Moses' blessing on Joseph and his descendants, that his land may be blessed with rain from heaven, water from below, precious fruit which the sun causes to grow, and precious things that are brought forth by the moon! Within this is a simple reflection of the fact that both the sun and moon affect the growth of vegetation and ultimately the crops they produce.

We all know our plants need sufficient sun to grow and produce crops. We know that different things grow  better at different times of year, due to the rotation of the earth in relation to the sun and so the differing lengths and strengths of daylight. Any reasonable gardener knows that to ignore the sun and seasons when planning and planting their garden is folly. Why, therefore, should we not accept that the moon also has a physical effect on the natural world, and use that knowledge to our advantage?

Now, before I really had worked my way through all of the above thinking, I decided to conduct an experiment to see if planting by the moon made any difference to the end results, or not. I devised and carried out "The Green Bean Experiment."

I took one of my raised garden beds, 2m x1m, and divided it down the length with a string. I planted one side (the left) with dwarf green bean seeds during the first week of December 2012, when the moon planting guide said I should NOT be planting anything. I sowed the other side from the same seed packet on Dec 17th, when it was supposed to be the right time to do so. Both sides sprouted, both sides grew. Was there any difference?

Well, it turned out there were a number of differences! The photo above was taken on Jan 16th. Before I go on, please note that I had later filled some gaps in the bed, especially near the front and to the left, with some yellow dwarf bean seedlings I was given by a friend. Those plants/beans aren't counted in these results. The differences between the two rows:
1) Germination - I planted the same number of seeds on each side. Row 1 had 9 plants grow, Row 2 had 14.
2) Size and strength - the plants in Row 2 appeared taller and more vigorous, but on closer examination I found this was mostly because the plants in the first row did not grow up straight, but were mostly leaning over, collapsed on the soil. The plants in the second row were stronger and straighter.
3) Production - I harvested and weighed the beans from each row separately. At the time of posting this, Row 1 has yielded 1.962 kgs of beans, and Row 2 has yielded 2.508 kgs of beans (though planted later so slightly behind in age/production time)

I concluded that planting according to the cycle of the moon DOES make a difference. Now, one of the reasons for not planting at the "wrong" time, is that plants put in then tend to bolt to seed. With things such as beans, where it's the seed pods you're harvesting, this hardly seems like much of a problem, but germination, size and vigour are all good reasons to use the guides as a helpful tool. I also started to take more note of the difference in my sweetcorn patches and when they were each planted in relation to the moon calendar - for info on that, see
HERE.

So, where does one find a good moon planting guide? There are several available, but my favourite is from New Zealand Gardener's website - you can download and print the guide; I keep it in the front of my garden diary. This one works as a wheel - each month you turn it so the symbol lines up with the date of the new moon, and it shows you what dates are best for planting root crops, above ground crops, or concentrating on non-planting chores. I find it's also helpful to have something that helps me plant my month like this, so I keep moving along with all the different types of garden chores, rather than focussing on one and neglecting the rest. You can download the chart
HERE.

Speaking of New Zealand Gardener magazine, if you're a Kiwi, you can subscribe to their magazine (and several other inspirational publications) by using Flybuys points - 320 pts gets you a year's worth of mags. They have a lot of useful ideas and tips.


0 Comments

Growing Sweetcorn

15/3/2013

0 Comments

 
I don't recall ever growing corn before, so this crop has been a learning curve for me.
Picture
In late December, my husband and I dug up 3 blocks of dirt in the front yard for corn. I had been given several packets of F1 Hybrid sweetcorn by a friend. We added sheep manure, woodash, and compost to the beds. The soil was very dry, hard, and looked very low in organic matter. It was a patch of the garden that used to flood every winter when we first moved here, before we improved the drainage. I doubt it had ever been given any soil improvement measures.

When I started doing this, I hadn't given any thought to planting by the
moon, so it wasn't until later that I realised how the planting of these beds
fell into that. The middle bed was sown first, on Dec 23rd, with 65 seeds.
Turned out this was a good time, according to the moon calendar. The far bed was
sown on Dec 29th with 65 seeds, a bad time according to the calendar. The
closest bed was sown on 8th Jan with our remaining 70 seeds, again a bad time.
 

Picture
The first bed planted germinated with an 89% success rate. All the plants grew strongly, and none succumbed to pests or otherwise died.

The second bed had a 100% germination rate, but I quickly lost a few plants to snails or similar. The results in the 3rd bed were much the same. The plants in these two beds simply weren't as strong as in the first bed, and much more inclined to fall over or die just because.

Picture
By 1st March, the differences were even more striking - the middle bed's corn are way over my head and in full flower. The others are still small, but starting to show signs of flowering. I've had to repeatedly prop up plants in the third bed that kept wanting to fall over.  

The proof will be in the harvest, details of which I will add to this page when they are available, sometime soon.

Now, for some interesting facts about growing corn:
  • Corn is mostly wind pollinated, which is the reason it should always be planted in blocks, so you get better pollination. The flowers are long thin stems at the top of the plant loaded with pollen. The pollen must drift down onto the tassels of the potential corn lower on the stems. Planting in blocks also gives these tall plants better stability so they are less likely to get blown over in the wind.
  • Each thread in a tassel  leads to what could become one kernel of corn. Each thread that is pollinated will cause a kernel to form. Each that is not, will leave an unformed kernel. When you peel open a cob of corn, and find the top part of the cob empty or unformed, this is because not all the threads were pollinated. Gentle shaking the plant, or picking a pollen stem and wiping it over the tassels can aid pollination.
  • Corn needs deep, well dug soil to enable it to put down strong roots to support the plant. Roots will show near the soil surface - drawing soil up over them can also help support the plant.
  • Beans or peas can be planted under the corn - this will add extra nitrogen which they need lots of. Another popular plant to grow under the corn is watermelon.
  • F1 hybrids will not produce true-to-type seeds, so are not worth saving for seeds. Next season I plan to buy heirloom non-hybrid seed.
  • All corn seed imported into NZ is required by law to be treated with fungicide - this is the pink coating you see on the seeds. This stuff is systemic - it is all through the plants and cobs. I didn't know much about this when I planted these, but now I do, I won't be planting such treated seeds in the future.
  • Corn is also one of the most commonly genetically modified crops. GMOs are super bad for us. For one of the best sources of info on this, watch Genetic Roulette.
Update: The difference in the harvest from the first bed as opposed to the other two is huge! Total harvest of cobs by weight:
Middle bed (planted at the right time in the moon calendar): 14.178 kg
Bed 2 (planted at the wrong time): 4.22 kg
Bed 3 (planted at the wrong time) 4.112 kg
So the middle bed yielded more than 3 times as much sweetcorn, even though the total number of plants was the same or less than the other beds!
I also noticed that the pollination was better in the middle bed - the other two beds had a lot more cobs with missing kernels or entire ends that were unpollinated (even though I helped all three beds along by shaking plants and/or wiping silks with strands of pollen).
0 Comments

    Author

    This page is my blog formerly known as Kiwi Urban Homestead.

    I'm a Kiwi homeschooling mother of 5 living in a small town. After growing 1000 kg of produce in my back yard in 2013, I'm now expanding my edible gardens even further.

    Archives

    February 2016
    December 2015
    October 2015
    September 2015
    June 2015
    May 2015
    April 2015
    March 2015
    February 2015
    January 2015
    December 2014
    November 2014
    October 2014
    September 2014
    August 2014
    April 2014
    February 2014
    December 2013
    November 2013
    October 2013
    September 2013
    August 2013
    July 2013
    June 2013
    May 2013
    April 2013
    March 2013
    February 2013
    January 2013
    December 2012

    Categories

    All
    Bees
    Butchering
    Chickens
    Compost
    Corn
    Diy Projects
    Events
    Everything Else
    Firewood
    Freebies
    Frugal Fortnight
    Garden Diary
    Gardener Of The Year
    Getting Started
    Greenhouse
    Harvest
    Harvest Totals
    Health
    Herbs
    Home Made Cleaners
    Homesteading Skills
    Jungle Taming
    Livestock
    Media
    Monthly Garden Pics
    Moon Planting
    Musings
    Pests And Diseases
    Planting
    Preserving The Harvest
    Recipes
    Salads
    Soil Improvement
    Specific Crops
    Tomatoes
    Weekly Round Up
    Worms
    Yates Vegie Challenge
    Zucchini

    RSS Feed

Powered by Create your own unique website with customizable templates.