There are many different ways to preserve the harvest, and home bottling (or "canning" in the U.S) is one of them. I especially like it because it doesn't need freezer space, and once preserved this way, the contents of the jars last a long time and can be stored pretty much anywhere.
But even bottling can involve different methods. There's water bath and pressure canning, and the overflow method, to name the three main ones. My personal favourite is Overflow Bottling - it's the quickest, the simplest and the best place to start when you're new to home preserving.
Note: Overflow bottling is only suitable for preserving things that are at least somewhat acidic. It's perfect for most fruit, anything containing tomatoes or vinegar and so forth. It's not suitable for non-acidic veges (unless done with vinegar, as a pickle) or meat.
There are a few simple steps to this method, and each is important:
1) Prepare your jars. Gather up the jars you are going to use, and wash them thoroughly, then rinse to remove any traces of soap. Drain, but don't dry them (to avoid lint from tea towels). Any jars at all can be used, so long as you have a metal lid or dome and ring that will fit them. I reuse jam, salad dressing, pasta sauce etc jars from the supermarket (with labels removed), as well as Agee preserving jars. Discard any jars that are cracked or chipped. Next, place the jars into a COLD oven, simply standing them on the oven racks right way up. If the jars are small and won't stand easily, place them on an oven tray first. Turn on the oven to 100C, and leave them until the oven has warmed up and the jars have been at temperature for at least half an hour. I do this, then just leave them there until I'm ready to bottle. IMPORTANT: jars must be HOT when you bottle, or adding the hot contents will cause them to crack or break.
2) Prepare your lids. Simply heat a pot full of water to boiling, and shortly before you need to use the lids or seals and rings, drop them in the pot of water and boil for 5 mins. Keep them hot until use too.
3) Prepare whatever you're going to put in the jar. With the overflow method, this usually means that you are bringing to boil in a large pot either a sugar solution (for doing fruit) or a pickle solution (vinegar and spices). You will have also separately prepared the fruit or veges that will be going into it.
4) Get everything ready to go - I place a large wooden board onto a handy surface and cover it thickly with newspaper. This is where you will place the filled and sealed jars and leave them to cool. The newspaper helps to prevent sudden changes in temperature cracking jars. I take another chopping board, and again cover it very thickly with newspaper. This is placed right next to my stove, and when I'm ready to go moved as close as possible to the pot. When it's time to begin bottling, I lift one jar out of the oven onto this board, fill it quickly from the pot, then wipe the rim, add the lid and seal, then move to the cooling board. The newspaper on the "action board" both helps to prevent cracking when you bring a hot jar from the oven, and also absorbs any liquid that overflows from the jars. Also get out the utensils you will need - a slotted spoon for filling jars, a ladle for adding liquid, a flat knife for releasing trapped bubbles, tongs for lifting lids out of boiling water, and tea towels to help you handle hot jars. Place utensils in pot of boiling water for a few moments to ensure sterility before use too.
5) Ready, set, bottle! Add a colander full at a time of produce to the pot of boiling solution (if you work in too great a quantities at a time, some of it will cook to long and be mushy before you get it bottled). Bring it back to the boil and hold it there for the prescribed time depending on what you're doing. Lift a jar from the oven and set on board by stove, ensuring you do NOT put it down in a wet patch from previous jars - this will crack it. Use your slotted spoon to lift produce from pot to jar until full, then ladle in liquid from the same pot until almost overflowing. Insert flat knife down sides of jar to release trapped air, then top up with more liquid until just overflowing. Quickly wipe jar rim to ensure full contact with seal, add lid or seals, and tighten as much as you possibly can. Most jar failures are because the lids wasn't tightened enough. Set aside to cool. Move around the paper or remove layers to ensure a dry spot for the next bottle out the oven next to the stove.
6) When the jars have cooled right down (l just leave them overnight), check all are sealed - the lid or dome should be depressed in the middle - you've probably heard them "plinking" as they sealed. Was down outside of jars in hot soapy water, and remove rings if using Agee domes and rings. Dry and store in cupboard. If any did not seal, either put it in the fridge and use soon, or tip into another container and freeze. If there are a number which didn't seal, it is an option to reheat the contents to boiling, and rebottle in fresh, hot jars.
Now, if you are bottling something thick, like applesauce or jam, you can do exactly as above, except that you do not overflow the jar - fill the jar with the finished hot product, leaving about 2 cm empty "headspace" at the top of the jar, and then seal and set aside. The cooling jar and product will still form a vacuum and seal the jar, and it will keep a long time until opened.
One more tip. If you're bottling fruit, and you want the liquid in the jars to look beautifully clear, then the way to achieve that is to heat two pots to boiling - one containing the syrup for bottling, and the other with simply water. The fruit is heated and cooked in the pot of water, then spooned into the jars, and the syrup is ladled into the jar from the other pot.
And lastly, in the photo at the top of this page, you can see two slightly different quart-size preserving jars. These are the most common sort you find at garage sales etc. The one of the left has a thick, pronounced ring of glass that sticks out just below the threaded part. These require gold rings. The one on the right does not, and needs green rings. Both take the same large dome seal. It's very important that when preparing to bottle you make sure you have the right size lids or rings for your jars before you start - otherwise you could be left with lots of cooked produce and no way of sealing the jars. The green and gold rings are just slightly different in size, and both should be available from your supermarket. Rings can be reused many, many times. Domes (seals) can also be reused so long as they are undamaged, particularly in the food-contact side surface. I check my domes for any sings of damage or corrosion, and discard those, then reuse the rest.
I've written out quite a bit to explain all this, but really, overflow bottling is super easy and fast to do. I use it for all my bottling. One day perhaps I'll be able to invest in an American pressure canner so I can do beans and meat, but until then I happily bottle all fruits using the steps described here. I also bottle pickles, tomatoes, applesauce, pasta sauces, relish, jams and jellies in the same way, except with those I leave a half inch of empty "head space" at the top of the jar. Happy preserving!
But even bottling can involve different methods. There's water bath and pressure canning, and the overflow method, to name the three main ones. My personal favourite is Overflow Bottling - it's the quickest, the simplest and the best place to start when you're new to home preserving.
Note: Overflow bottling is only suitable for preserving things that are at least somewhat acidic. It's perfect for most fruit, anything containing tomatoes or vinegar and so forth. It's not suitable for non-acidic veges (unless done with vinegar, as a pickle) or meat.
There are a few simple steps to this method, and each is important:
1) Prepare your jars. Gather up the jars you are going to use, and wash them thoroughly, then rinse to remove any traces of soap. Drain, but don't dry them (to avoid lint from tea towels). Any jars at all can be used, so long as you have a metal lid or dome and ring that will fit them. I reuse jam, salad dressing, pasta sauce etc jars from the supermarket (with labels removed), as well as Agee preserving jars. Discard any jars that are cracked or chipped. Next, place the jars into a COLD oven, simply standing them on the oven racks right way up. If the jars are small and won't stand easily, place them on an oven tray first. Turn on the oven to 100C, and leave them until the oven has warmed up and the jars have been at temperature for at least half an hour. I do this, then just leave them there until I'm ready to bottle. IMPORTANT: jars must be HOT when you bottle, or adding the hot contents will cause them to crack or break.
2) Prepare your lids. Simply heat a pot full of water to boiling, and shortly before you need to use the lids or seals and rings, drop them in the pot of water and boil for 5 mins. Keep them hot until use too.
3) Prepare whatever you're going to put in the jar. With the overflow method, this usually means that you are bringing to boil in a large pot either a sugar solution (for doing fruit) or a pickle solution (vinegar and spices). You will have also separately prepared the fruit or veges that will be going into it.
4) Get everything ready to go - I place a large wooden board onto a handy surface and cover it thickly with newspaper. This is where you will place the filled and sealed jars and leave them to cool. The newspaper helps to prevent sudden changes in temperature cracking jars. I take another chopping board, and again cover it very thickly with newspaper. This is placed right next to my stove, and when I'm ready to go moved as close as possible to the pot. When it's time to begin bottling, I lift one jar out of the oven onto this board, fill it quickly from the pot, then wipe the rim, add the lid and seal, then move to the cooling board. The newspaper on the "action board" both helps to prevent cracking when you bring a hot jar from the oven, and also absorbs any liquid that overflows from the jars. Also get out the utensils you will need - a slotted spoon for filling jars, a ladle for adding liquid, a flat knife for releasing trapped bubbles, tongs for lifting lids out of boiling water, and tea towels to help you handle hot jars. Place utensils in pot of boiling water for a few moments to ensure sterility before use too.
5) Ready, set, bottle! Add a colander full at a time of produce to the pot of boiling solution (if you work in too great a quantities at a time, some of it will cook to long and be mushy before you get it bottled). Bring it back to the boil and hold it there for the prescribed time depending on what you're doing. Lift a jar from the oven and set on board by stove, ensuring you do NOT put it down in a wet patch from previous jars - this will crack it. Use your slotted spoon to lift produce from pot to jar until full, then ladle in liquid from the same pot until almost overflowing. Insert flat knife down sides of jar to release trapped air, then top up with more liquid until just overflowing. Quickly wipe jar rim to ensure full contact with seal, add lid or seals, and tighten as much as you possibly can. Most jar failures are because the lids wasn't tightened enough. Set aside to cool. Move around the paper or remove layers to ensure a dry spot for the next bottle out the oven next to the stove.
6) When the jars have cooled right down (l just leave them overnight), check all are sealed - the lid or dome should be depressed in the middle - you've probably heard them "plinking" as they sealed. Was down outside of jars in hot soapy water, and remove rings if using Agee domes and rings. Dry and store in cupboard. If any did not seal, either put it in the fridge and use soon, or tip into another container and freeze. If there are a number which didn't seal, it is an option to reheat the contents to boiling, and rebottle in fresh, hot jars.
Now, if you are bottling something thick, like applesauce or jam, you can do exactly as above, except that you do not overflow the jar - fill the jar with the finished hot product, leaving about 2 cm empty "headspace" at the top of the jar, and then seal and set aside. The cooling jar and product will still form a vacuum and seal the jar, and it will keep a long time until opened.
One more tip. If you're bottling fruit, and you want the liquid in the jars to look beautifully clear, then the way to achieve that is to heat two pots to boiling - one containing the syrup for bottling, and the other with simply water. The fruit is heated and cooked in the pot of water, then spooned into the jars, and the syrup is ladled into the jar from the other pot.
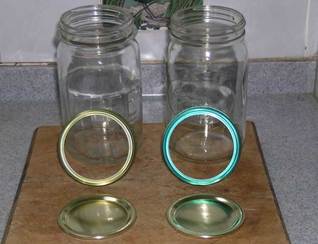
And lastly, in the photo at the top of this page, you can see two slightly different quart-size preserving jars. These are the most common sort you find at garage sales etc. The one of the left has a thick, pronounced ring of glass that sticks out just below the threaded part. These require gold rings. The one on the right does not, and needs green rings. Both take the same large dome seal. It's very important that when preparing to bottle you make sure you have the right size lids or rings for your jars before you start - otherwise you could be left with lots of cooked produce and no way of sealing the jars. The green and gold rings are just slightly different in size, and both should be available from your supermarket. Rings can be reused many, many times. Domes (seals) can also be reused so long as they are undamaged, particularly in the food-contact side surface. I check my domes for any sings of damage or corrosion, and discard those, then reuse the rest.
I've written out quite a bit to explain all this, but really, overflow bottling is super easy and fast to do. I use it for all my bottling. One day perhaps I'll be able to invest in an American pressure canner so I can do beans and meat, but until then I happily bottle all fruits using the steps described here. I also bottle pickles, tomatoes, applesauce, pasta sauces, relish, jams and jellies in the same way, except with those I leave a half inch of empty "head space" at the top of the jar. Happy preserving!
 RSS Feed
